
Attackers, defenders, batteries and safe squares
By GM Ulvi Bajarani
Knowing how the pieces move tells you which captures may be possible. Evaluating a capture tells you whether you should make it.
A piece may look undefended but be protected by a tactical idea. Another may have several defenders, yet none can recapture legally. Even when both sides can exchange pieces, the player who makes the last capture does not necessarily come out ahead.
The practical method is to identify the captures, check which pieces can legally participate, and calculate the resulting position. Counting attackers and defenders helps you begin that calculation. It does not replace it.
Start with your opponent's last move
Before looking for something to capture, ask what changed.
Did your opponent attack one of your pieces? Did a defender move away? Did a file or diagonal open? Did the last move create a threat against your king?
A threat can change your priorities. If your king is in check, your next move must resolve the check. A capture elsewhere on the board is not an option unless it also makes your king safe.
Also examine the square your opponent has just occupied. A piece that moved into an attacked square is not automatically a mistake. It may be defended, protected by a tactic, or part of a deliberate sacrifice.
Look for captures for both sides
Ask two separate questions:
- What can I capture?
- What can my opponent capture?
Do not examine only your own opportunities. A tempting pawn capture may leave your queen exposed, remove an important defender, or give your opponent a stronger capture elsewhere.
Begin with legal captures available in the current position. Then, for each candidate move you consider, examine your opponent's captures in the position that would result.
Include captures that come with check, captures of undefended pieces, and captures that remove a defender. A checking capture may force a response before you can carry out your intended recapture.
Your opponent is not obliged to recapture immediately. Sometimes the strongest answer is a check, a threat, or a capture on another square.
Check the destination square
Whether you intend to capture or simply move a piece, examine its destination.
- Which enemy pieces attack that square?
- Which of your pieces would defend your piece there?
- Would moving your piece open a new line of attack?
- Would the move leave something important behind undefended?
Ask these questions about your opponent's possible moves as well. This helps you see which threats are real and which moves would allow you to win material.
There are two different meanings of “safe” to keep separate.
For a king, the destination must not be attacked. Moving into an attacked square is illegal.
For another piece, moving to an attacked square may be legal and even good. You must determine what happens if the opponent captures it. A defended queen can still be lost for a pawn; a properly calculated sacrifice can be worthwhile.
Evaluate the board after the proposed move, not only the board before it. The piece's departure and arrival can change which squares are attacked.
Count attackers and defenders
Choose a target square and list the pieces that can take part in an exchange there.
For clarity, call the side considering the first capture the attacking side. Call the other side the defending side. The piece already on the target square is the initial target, not an extra defender of itself.
For a simple exchange, counting provides a useful first impression:
- More attackers than defenders may allow the attacking side to make the last capture.
- Equal numbers, or more defenders, may allow the defending side to make the last capture instead.
This description assumes that the counted pieces can all participate legally, the exchange continues on that square, and neither side changes the situation with another move. Those assumptions often fail in real positions.
Some pieces are pinned. Others are blocked behind a friendly piece. A king may be unable to recapture. A defender may have to protect something more important elsewhere. The order of captures may open or close lines.
Therefore, record the count, but then test it by making the moves in your calculation. Do not decide “safe” or “unsafe” from the numbers alone.
Follow the exchange and compare what was lost
Start with a candidate capture. Find your opponent's best reply. Continue until the immediate tactical situation is clear, including any useful checks or captures away from the original square.
Then compare what each side lost.
As a starting guide, a pawn is worth about 1 point, a knight or bishop about 3, a rook about 5, and a queen about 9. These are practical estimates, not fixed laws. King safety, checkmate, promotion and the resulting position can matter more than the material total.
The diagrams below are simplified teaching positions. Some diagrams omit one or both kings for clarity. Assume that the omitted king is safe and that no unshown piece changes the illustrated captures or attacks. These examples teach particular ideas, rather than showing complete game positions.
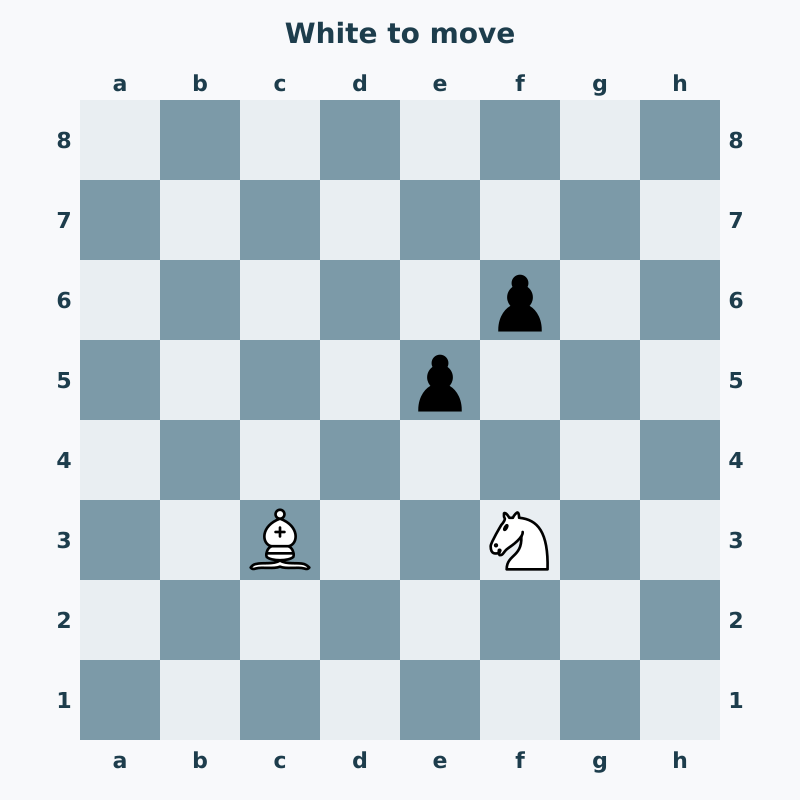
White: bishop c3, knight f3. Black: pawns e5 and f6.
Illustrated line: 1.Nxe5 fxe5 2.Bxe5.
White have two attackers on e5, the knight on f3 and the bishop on c3, against one defender, the pawn on f6. After 1.Nxe5 fxe5 2.Bxe5, White make the last capture but lose a knight worth about 3 points for two pawns worth about 2. Making the last capture did not make the exchange profitable.
Pattern B: A bishop captures a rook, and a pawn recaptures the bishop.
The defending side makes the last capture, but loses a rook worth about 5 points in return for a bishop worth about 3. The attacking side has won the exchange.
It is often sensible to examine captures with a lower-value piece first. However, do not turn that into an automatic rule. A different capture may be stronger because it gives check, opens a line or avoids a tactic.
At every stage, ask whether either player should stop exchanging. A player does not have to continue an unfavorable sequence just because more captures are possible.
Look behind the front piece for batteries
A battery usually describes cooperating line-moving pieces arranged along the same file, rank or diagonal. Common examples include two rooks on a file, a queen and rook, or a queen and bishop on a diagonal.
The order matters. A queen behind a bishop and a bishop behind a queen can produce very different exchanges because the value of the front piece and its available moves differ.
Three heavy pieces can also cooperate on one line: queen–rook–rook, rook–queen–rook, or rook–rook–queen. They do not all attack through one another simultaneously. The rear pieces become relevant as the line clears.
How should you count them?
Separate direct attackers from pieces that may join later.
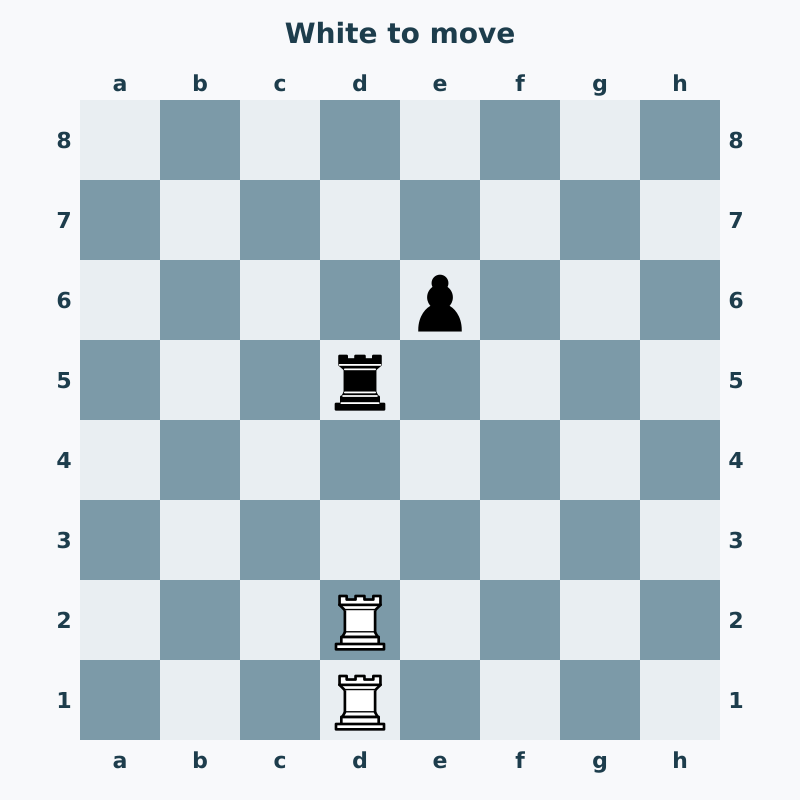
White: rooks d1 and d2. Black: rook d5, pawn e6.
Illustrated line: 1.Rxd5 exd5 2.Rxd5.
The rook on d2 directly attacks the Black rook on d5. The rook on d1 is blocked by its own rook. The pawn on e6 defends d5.
After 1.Rxd5 exd5, the rear rook can join along the cleared file with 2.Rxd5. In this illustrated sequence, White lose one rook and capture a rook plus a pawn, gaining one pawn. This conclusion assumes the stated captures are legal and no other tactical factors intervene. The diagram does not mean Black must choose to recapture.
Do not count the rear rook as a second direct attack in the starting position. Mark it as a potential participant, then check that it actually becomes available in your calculated sequence.
What about a bishop or queen behind a pawn?
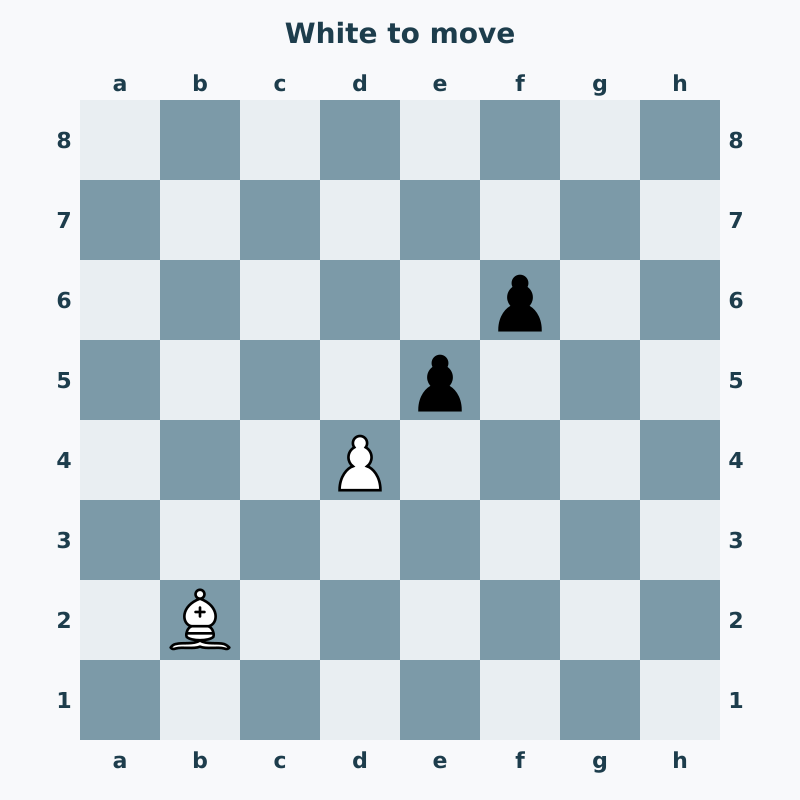
White: bishop b2, pawn d4. Black: pawns e5 and f6.
Illustrated line: 1.dxe5 fxe5 2.Bxe5.
A pawn can also mask a diagonal line. Here the White pawn on d4 blocks the bishop on b2 from reaching e5. After 1.dxe5 fxe5, the bishop can capture on e5. In this illustrated sequence, White lose one pawn and capture two pawns. Count the bishop as a potential participant, not as a direct attacker on e5 in the starting position.
For beginners, “a pawn masking a bishop or queen” is a clearer description than treating every such arrangement as a standard battery. A pawn does not move like a bishop: it captures one square diagonally, and its ordinary move is forward.
A king or knight may support an exchange too, but it does not create the same sliding line of attack. Count its actual contribution separately.
The essential habit is the same in every case: after each capture, look again at the newly opened lines.
Check absolute pins
A piece is absolutely pinned when moving it off the pinning line would expose its own king to attack.
Such a piece may appear to defend a target but be unable to recapture legally. If your count includes that recapture, your calculation is wrong.
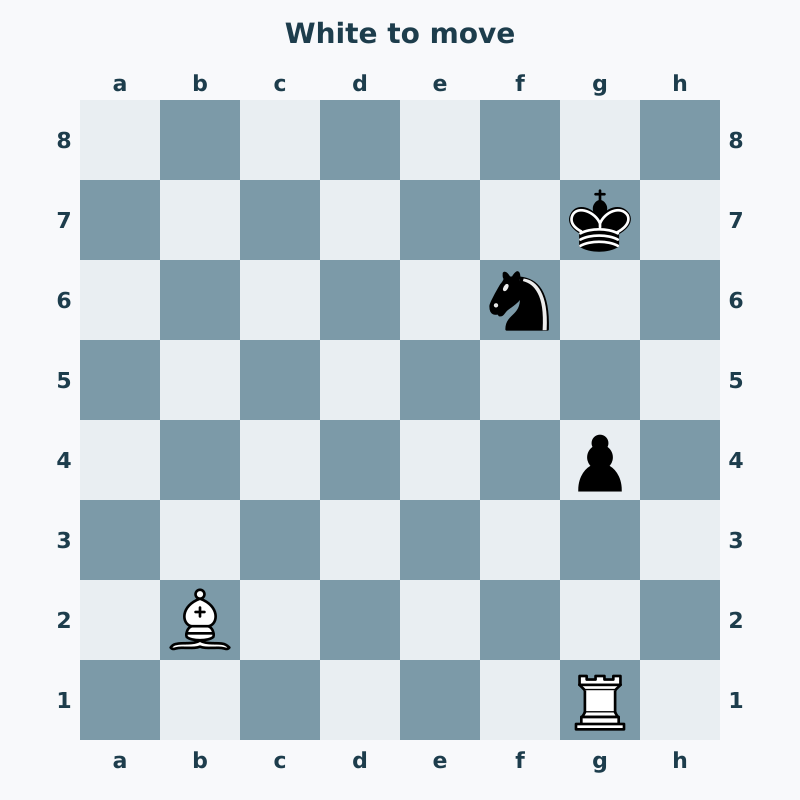
White: bishop b2, rook g1. Black: king g7, knight f6, pawn g4.
Illustrated move: 1.Rxg4+. The reply 1…Nxg4 is illegal.
The bishop on b2 pins the knight on f6 to the king on g7. White can play 1.Rxg4+, giving check along the g-file. Although 1…Nxg4 would remove the checking rook, it would open the bishop's diagonal to the Black king. Black therefore cannot make that recapture and must answer the check another way.
However, “pinned” does not always mean “unable to move at all.” A pinned rook, bishop or queen may sometimes move along the pinning line, including capturing the pinning piece, if the king remains safe. Test the specific move rather than simply removing every pinned piece from your count.
A pin to a queen or rook is different. Moving the pinned piece may lose valuable material, but it is not automatically illegal. Check whether another tactical benefit justifies the move.
There is one especially important distinction: a piece absolutely pinned to its king still attacks squares for the purpose of deciding where the opposing king may move. Do not allow a king to capture onto such an attacked square merely because the attacking piece is pinned.
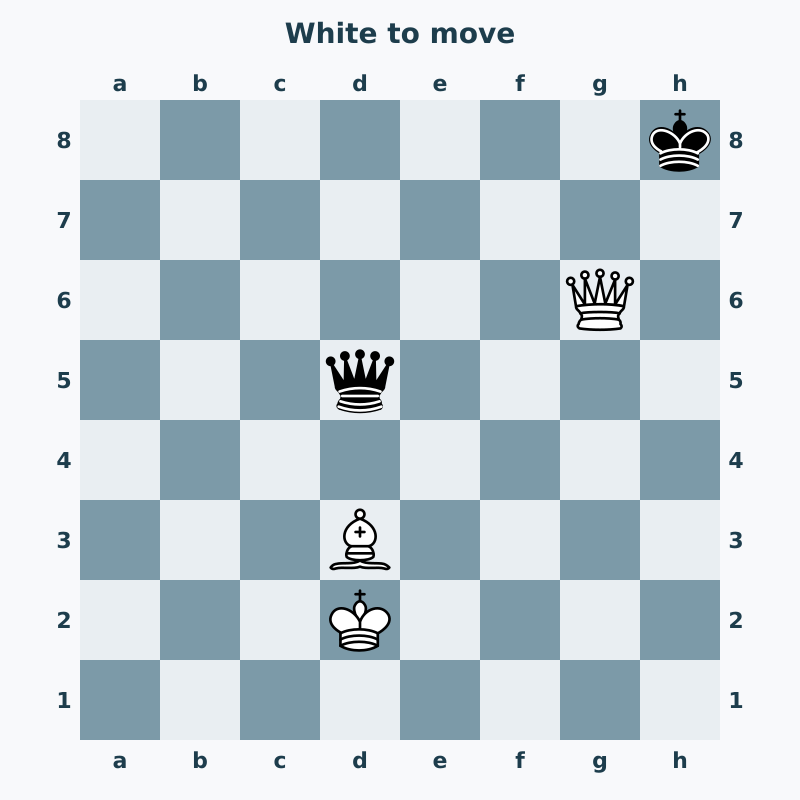
White: king d2, queen g6, bishop d3. Black: king h8, queen d5.
Illustrated move: 1.Qh7#. The reply 1…Kxh7 is illegal.
The Black queen on d5 pins the bishop on d3 to White's king on d2. Moving the bishop off the d-file would expose White's king to attack. Nevertheless, after 1.Qh7#, the bishop still attacks h7 along d3-e4-f5-g6-h7. Black cannot capture the queen with the king on h7: an absolutely pinned piece still attacks squares for the purpose of king safety. In this complete position, 1.Qh7# is checkmate.
Take special care when the king is a defender
A king is not an ordinary defender. It can recapture only if the destination is not attacked in the resulting position.
An attacking majority may leave the destination covered, preventing the king from making the final recapture. But a majority is not the legal test. One remaining enemy attacker is enough to make the king's capture illegal.
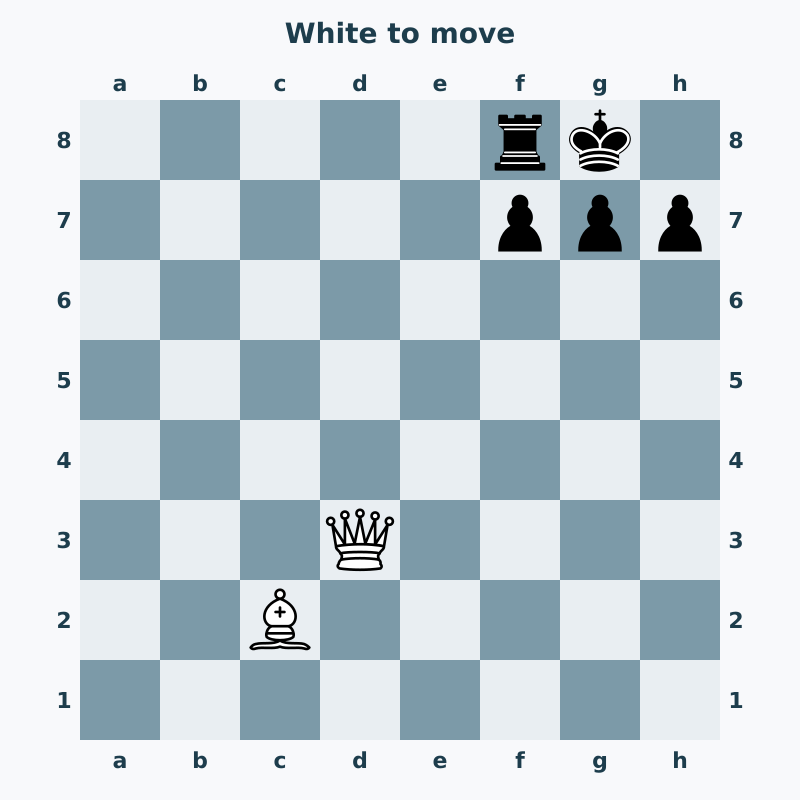
White: queen d3, bishop c2. Black: king g8, rook f8, pawns f7, g7 and h7.
Illustrated move: 1.Qxh7#. The reply 1…Kxh7 is illegal.
After 1.Qxh7#, the queen is protected by the bishop on c2 along c2-d3-e4-f5-g6-h7. Black cannot capture the queen with the king because h7 is attacked by that bishop. In the displayed position this is checkmate: the king's own rook and pawns block its other nearby squares, while the queen also controls h8. No Black piece can capture the queen or block her adjacent check.
Conversely, if a piece has no remaining protection after a king captures it, that particular obstacle disappears. You must still examine every enemy attack, including lines opened by the capture and attacks by the opposing king.
Always check the position after the king's proposed capture. Never treat “the king defends it” as proof that a recapture is available.
Use a short checklist before moving
- What changed after my opponent's last move? Am I in check?
- What captures do I have, and what captures does my opponent have?
- Is my intended move legal? What attacks its destination afterward?
- Which attackers and defenders can actually participate on the target square?
- Are any pieces pinned, blocked, or needed for another defensive job?
- Will a battery or another hidden line become active after a capture?
- If a king recaptures, is its destination unattacked?
- What is the best capture sequence, and can either side improve by checking, capturing elsewhere or stopping?
- What is the final material balance, and is the resulting position safe?
With practice, simple cases become quick to assess. Complicated exchanges deserve more calculation, not more confidence in the original count.
Practice calculating before moving the pieces
Choose a position with a possible capture and write down your intended sequence before moving anything on the board.
List the direct attackers and defenders, then note any rear pieces that might become active. Calculate a line, record what each side loses, and check the final position.
Afterward, replay the moves. If your answer was wrong, identify the reason: a missed defender, an illegal recapture, an opened line, a mistaken material count or a stronger move elsewhere.
When reviewing your own games, return to positions where you lost material. Ask which step of the checklist would have helped you notice the problem. This turns a mistake into a specific training task.
The goal is not simply to count more accurately. It is to understand which captures are possible, which are worthwhile, and why.
Want help applying this to your games?
Private coaching can focus on your own positions, recurring tactical mistakes and calculation habits. Explore Azeri Chess Academy's private online chess lessons, or ask about private chess coaching in Houston.
Rules reference
FIDE Laws of Chess, Articles 3.1.3 and 3.9.2, explain attacked squares and the prohibition on exposing or leaving one's king in check. The material values, checklist and teaching sequence above are instructional guidance, not FIDE rules.