
By GM Ulvi Bajarani, Founder and Head Coach of Azeri Chess Academy
How to checkmate with two rooks, a king and queen, and a king and rook
Winning a queen or a rook is valuable only if you can finish the game. These basic checkmates teach a skill that is useful far beyond simple endings: controlling the opposing king’s escape squares.
The goal is not to give as many checks as possible. First, restrict the king. Then improve the position of your pieces and build a mating net. A quiet move that removes an escape route can be more useful than a check that lets the king return to the center.
Checkmate and stalemate
Checkmate means that the king is in check and there is no legal way to escape. Stalemate means that the player to move has no legal move, but their king is not in check. Stalemate is a draw, even when the other side has a queen or several rooks.
King and bishop against a lone king, and king and knight against a lone king, are draws because of insufficient mating material. Neither single minor piece can deliver checkmate with only its own king’s help. A queen or rook, by contrast, provides enough material to win with correct play.
In all the positions below, only kings and the named mating pieces remain. White have the extra material. The same methods work with Black, and the board can be turned to use a different edge.
Checkmate with two rooks
With two rooks, the simplest method is the ladder mate. One rook restricts the king, and the second pushes it back with a check on the next rank. The king must retreat. The rooks then switch roles and repeat the process until the king reaches the edge.
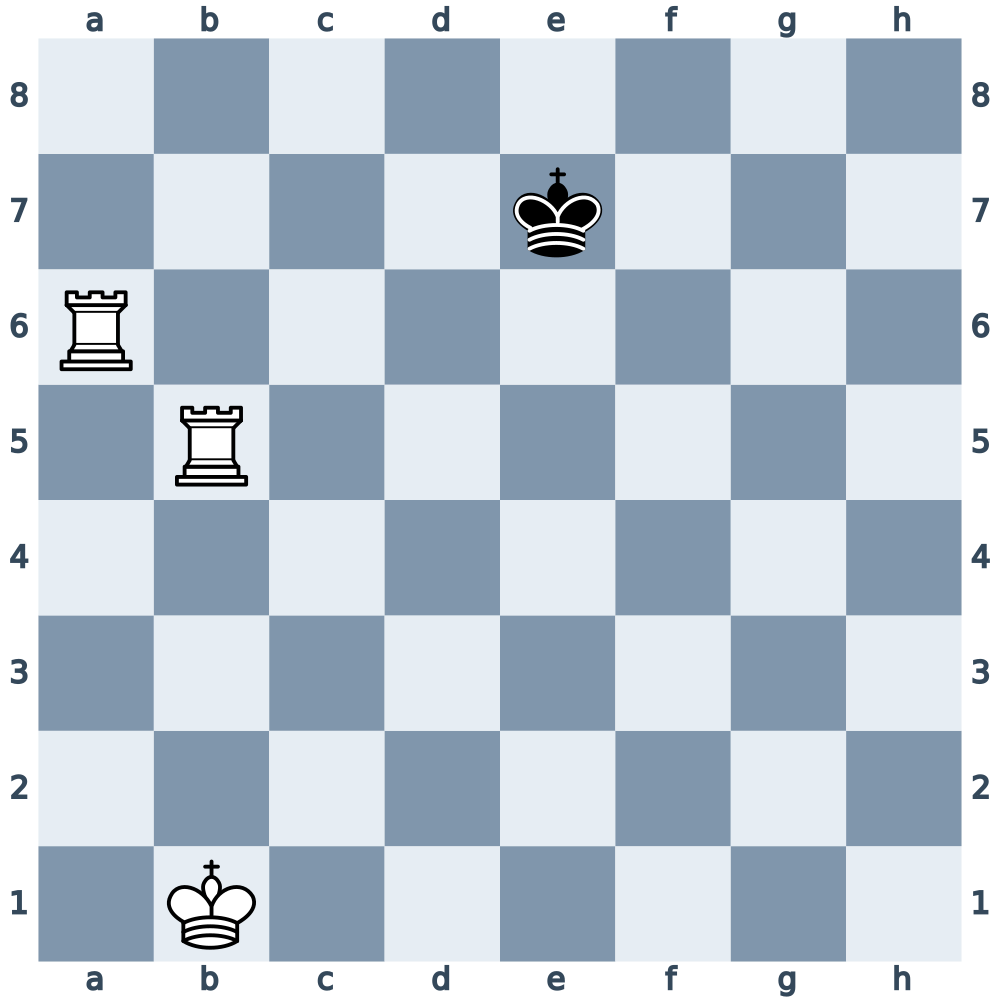
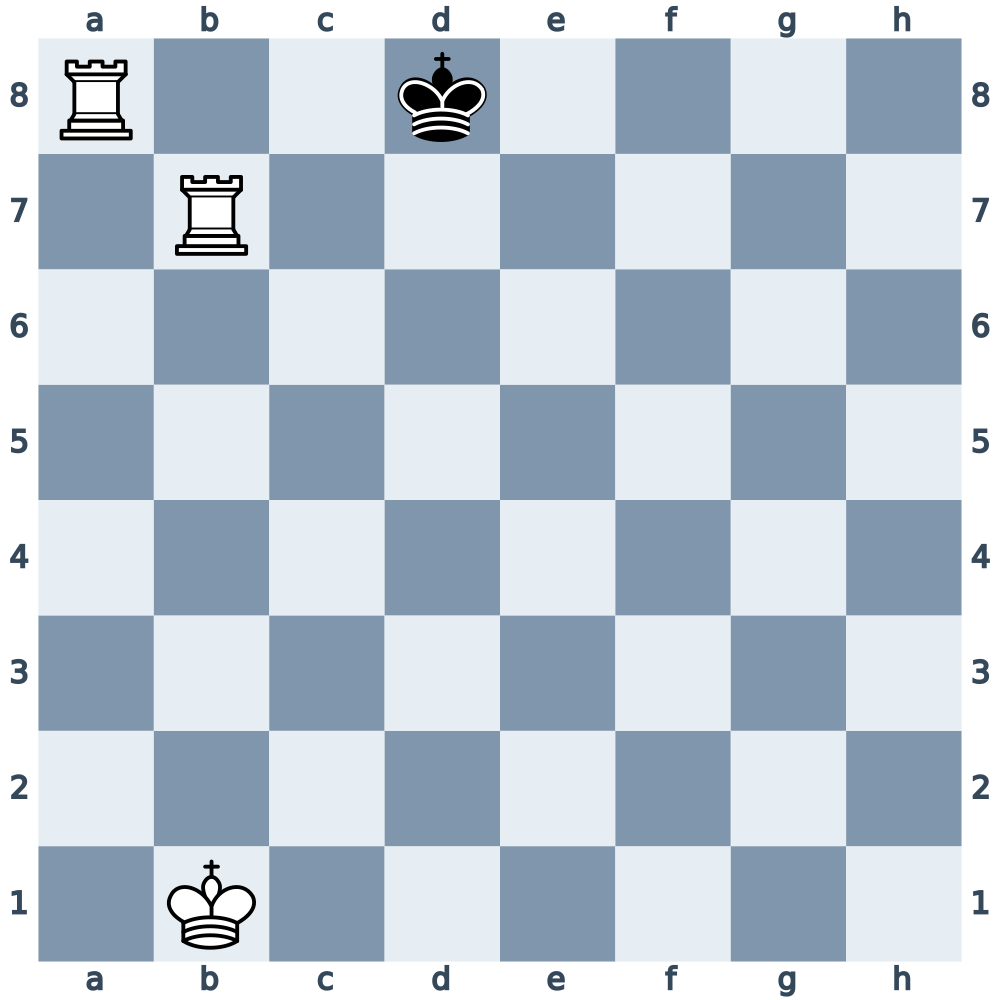
In Diagram 1, the rook on a6 cuts off the sixth rank. White play 1.Rb7+, attacking the king along the seventh rank. Black cannot come forward across the sixth rank, so they must retreat to the eighth. After 1…Kd8, White finish with 2.Ra8#. The rook on b7 covers the seventh rank, and the rook on a8 checks along the eighth.
Black could choose 1…Ke8 or 1…Kf8 instead. The result is the same: 2.Ra8#. White’s king on b1 does not need to join this particular mating net because the two rooks cover the necessary lines themselves.
The important safety rule is to watch the king’s distance from an unprotected rook. If the king approaches closely enough to capture a rook, do not continue the ladder automatically. Move the endangered rook farther away, often to the other side of the board, while preserving the barrier.
A rook controls a whole open rank or file from a distance. It does not need to stand beside the opposing king to be effective. Keeping both rooks safely away makes the method easier to execute.
The same ladder idea also works with queen and rook against a lone king, or with two queens against a lone king. One piece restricts while the other pushes, then their roles change. Queens also control diagonals, so check carefully for stalemate rather than treating them exactly like rooks.
Practice the ladder toward the eighth rank first. Then repeat it toward the first rank, the a-file and the h-file. The pattern stays the same; only its direction changes.
King and queen against a lone king
A queen can restrict the opposing king by herself. Other lone pieces and ordinary minor-piece mating combinations need help from their king to restrict effectively. The heavy-piece pairs just described are exceptions: two rooks, queen and rook, or two queens can build their own ladder without bringing the king into that mating net.
For this method, use the queen to restrict the opposing king first, and bring your own king closer after the confinement is secure. Before moving, choose two adjacent borders toward which you will guide the king, such as the eighth rank and the h-file.
These borders give the plan a direction. If you want the king to finish near the top-right corner, your queen should prevent escape toward the lower ranks and the a-file side. Do not chase the king randomly around the board.
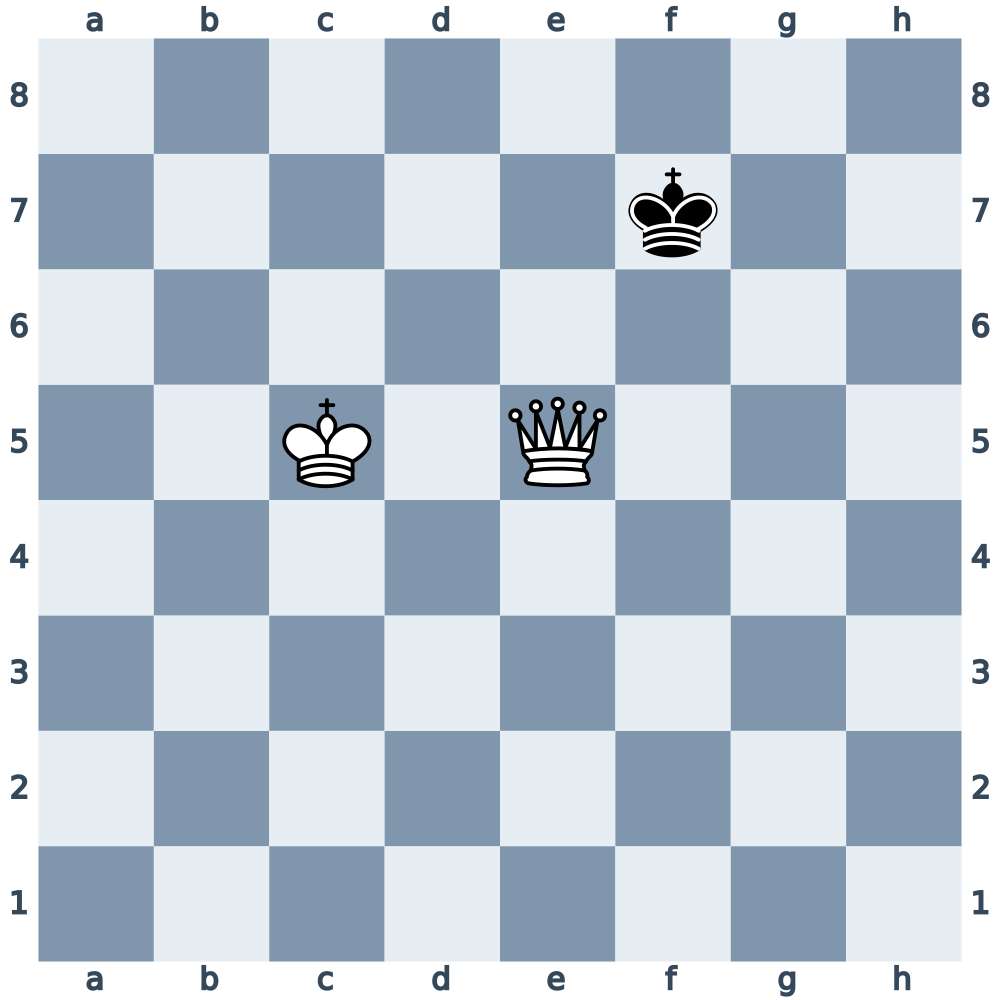
A useful starting relationship is to keep the queen a knight’s move away from the opposing king: two squares in one direction and one in the other. In Diagram 3, the queen on e5 and king on f7 have this relationship. The queen is outside the king’s reach, and its rank and file help limit the king’s space.
As the king moves, reposition the queen to keep useful barriers and reduce the available area. Knight-distance is a guide to positioning, not an order to copy every king move. Check the actual controlled squares, the queen’s safety and the opponent’s legal moves each time.
For example, play could continue 1…Kg8 2.Qf6 Kh7 3.Qg5 Kh8. The queen was a knight’s move from the king after 2.Qf6 and again after 3.Qg5. Now the king is confined to h7 and h8. The first move, 1…Kg8, is an illustrative choice rather than a forced reply; other king moves require you to adjust the plan.
The restriction phase ends when the opposing king has reached a border and is confined there. You do not have to reduce its space to exactly two squares: a larger area along the edge is also enough. Stop tightening the queen’s net and bring your king. The two-square shuttle in the example is one convenient arrangement, not a required final shape.
Bring your king and avoid stalemate
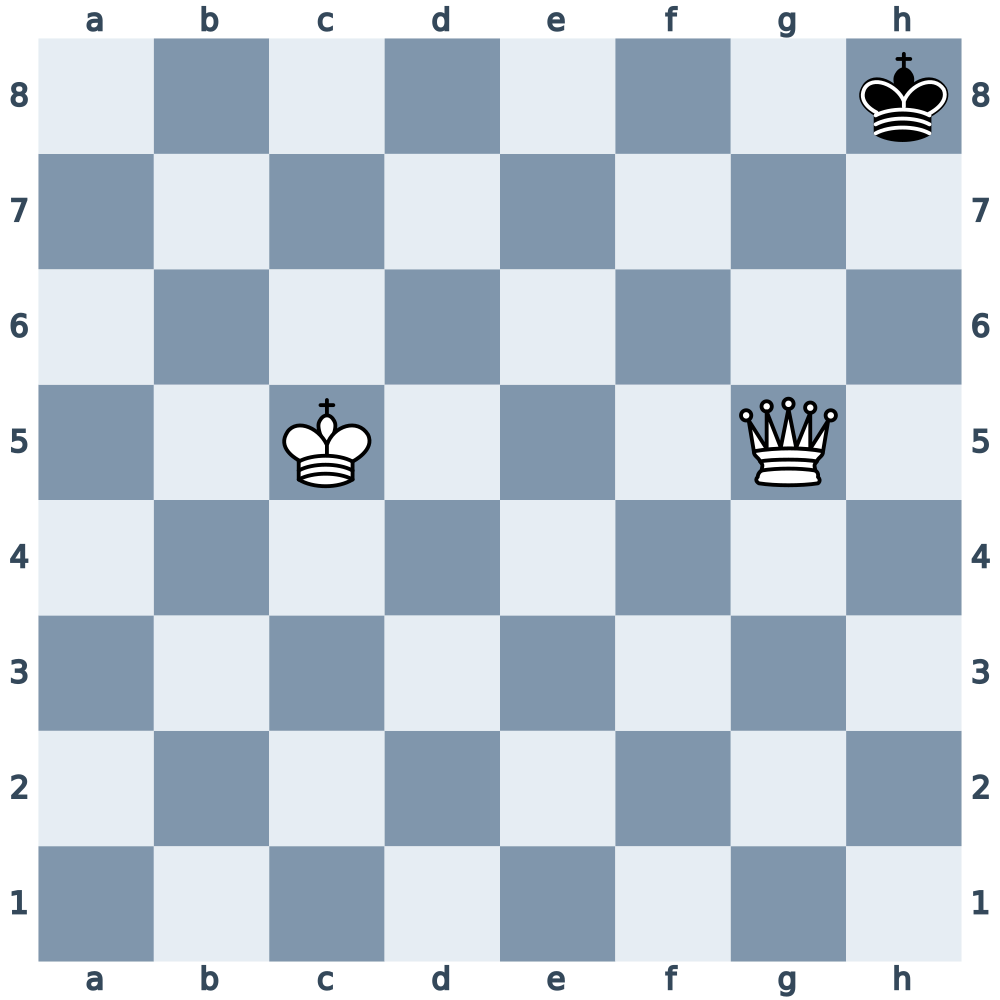
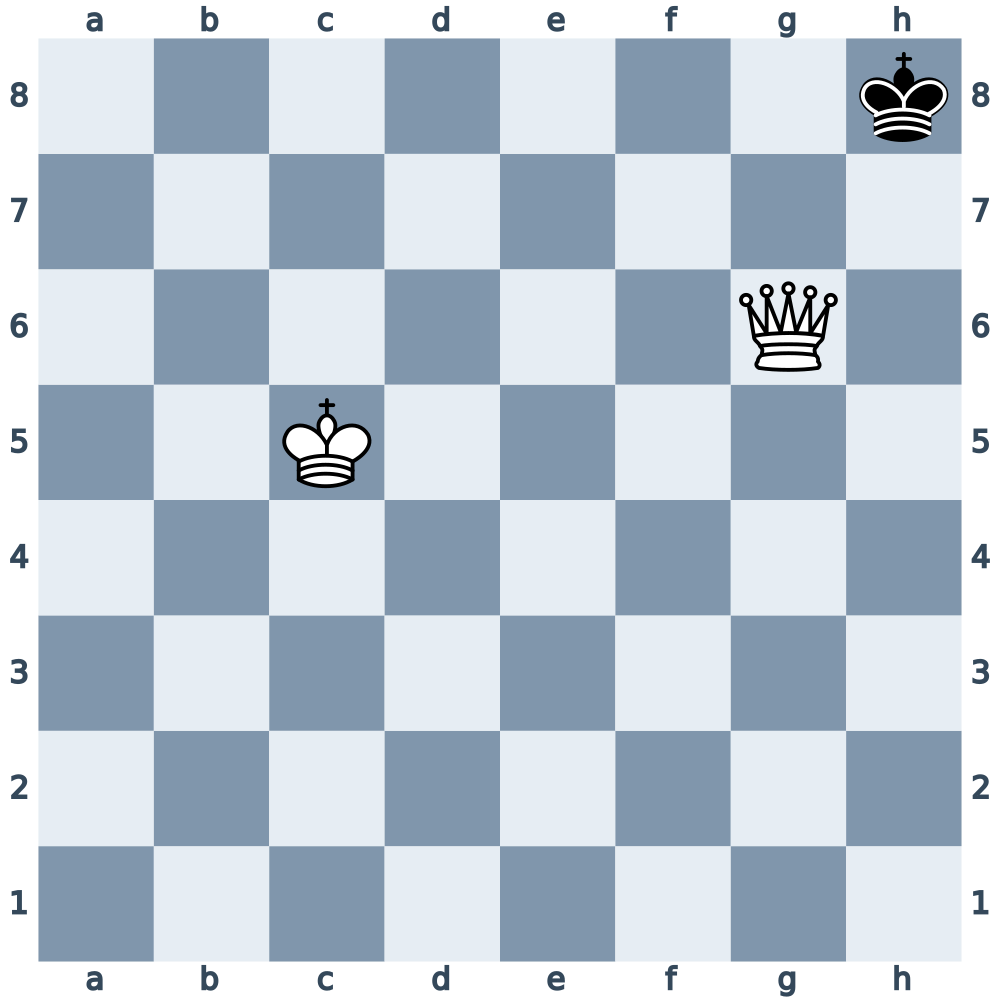
In Diagram 4, the queen on g5 blocks the g-file and controls h6. The opposing king can move between h8 and h7, but cannot escape toward the center. Leave the queen where it is and bring your king closer.
As a practical safeguard, leave the restricted king at least two squares to shuttle between: the square it occupies and an alternative square it can legally reach. This does not mean it must have two legal moves on every turn. The essential check is that, before the final mate, the defender has at least one legal move whenever it is their turn and they are not in check. You can leave more than two squares.
One complete continuation is 4.Kd5 Kh7 5.Ke6 Kh8 6.Kf7 Kh7 7.Qg7#. The queen finally gives check from g7, protected by the king on f7. Black cannot capture the queen or move to an unattacked square.
This illustrates why the king is needed. The queen can restrict the lone king by herself, but your king supplies the support needed for the final mating net. Your king does not give check directly: kings may never stand next to each other. It controls escape squares and protects the queen.
Do not tighten the queen’s net one move too far. In Diagram 4, 4.Qg6?? produces Diagram 5. Black’s king on h8 is not in check, but g8, g7 and h7 are all attacked. There is no legal move, so the game is immediately drawn by stalemate.
Before every quiet queen move near a corner, ask: “If this is not check, where can the king move?” If the answer is nowhere, do not play it. Stop the queen chase while a safe shuffling route remains, and use your own king instead.
Choosing the eighth rank and h-file is only an example. You can use any pair of adjacent borders. What matters is that the queen closes the escape directions away from those borders without removing every legal move too early.
King and rook against a lone king
A rook has fewer ways to control squares than a queen, so king and rook must cooperate throughout the process. Think of their jobs separately: your king creates a local barrier by controlling nearby squares; your rook restricts along a rank or file and pushes the opposing king back with well-timed checks.
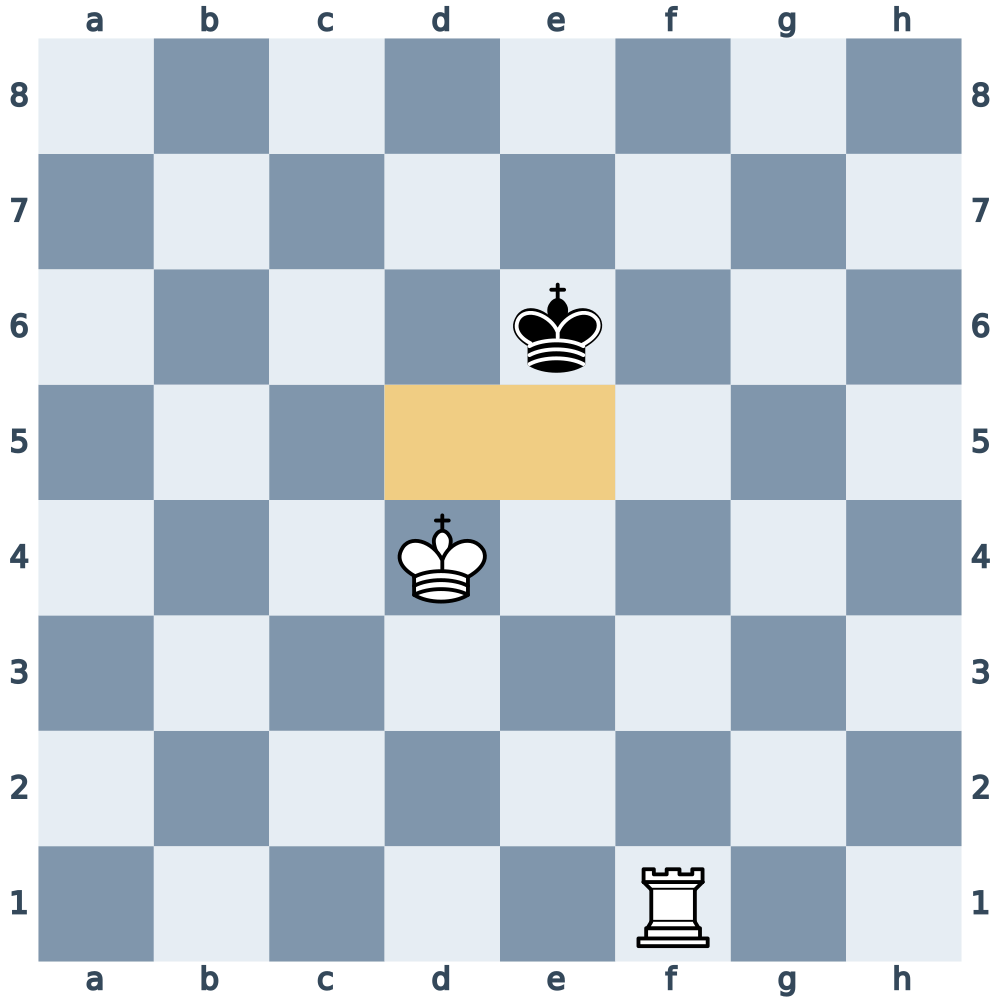
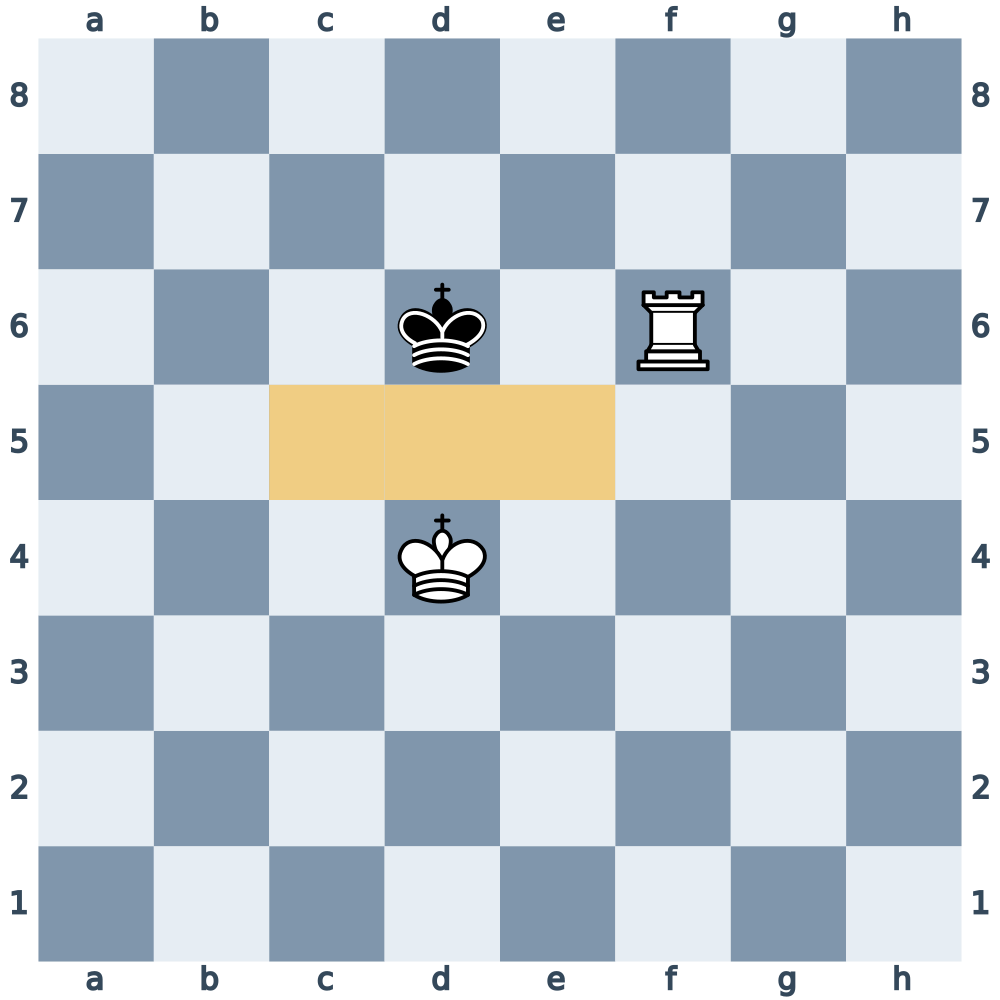
Diagram 6 reproduces the first barrier position. White’s king on d4 controls d5 and e5, so Black’s king on e6 cannot enter either square. The rook on f1 also cuts off the f-file. These are restrictions on the king’s movement, not suggested king moves.
The goal in Diagram 6 is zugzwang, not creating a new barrier. Play 1.Rf2, a safe waiting move that preserves the f-file restriction and leaves Black obliged to change the king’s position. Black have exactly three legal replies: 1…Kd6, 1…Kd7 and 1…Ke7. None can capture the rook.
After 1…Kd6, play 2.Rf6+, reaching Diagram 7. White’s king controls c5, d5 and e5, preventing a forward escape from the rook’s check. Black must retreat with 2…Kc7, 2…Kd7 or 2…Ke7. The existing king barrier makes this check effective.
After 1…Kd7 or 1…Ke7, Black have already retreated to the seventh rank. White can bring the king forward with 2.Ke5, keeping the rook safe. Thus 1…Kd6 is not forced: the waiting move gives Black a choice between retreating and allowing a check that pushes them back.
These barriers can be mirrored or rotated. A file can play the role of a rank, and the king can block escape on the opposite side. Learn which squares the pieces control rather than memorizing one picture. Also keep checking that the rook cannot be captured as the opposing king approaches.
Waiting moves and zugzwang
Sometimes the barrier is ready, but an immediate check would let the king escape in the wrong direction. A waiting move can keep the useful restrictions while making the opponent move first.
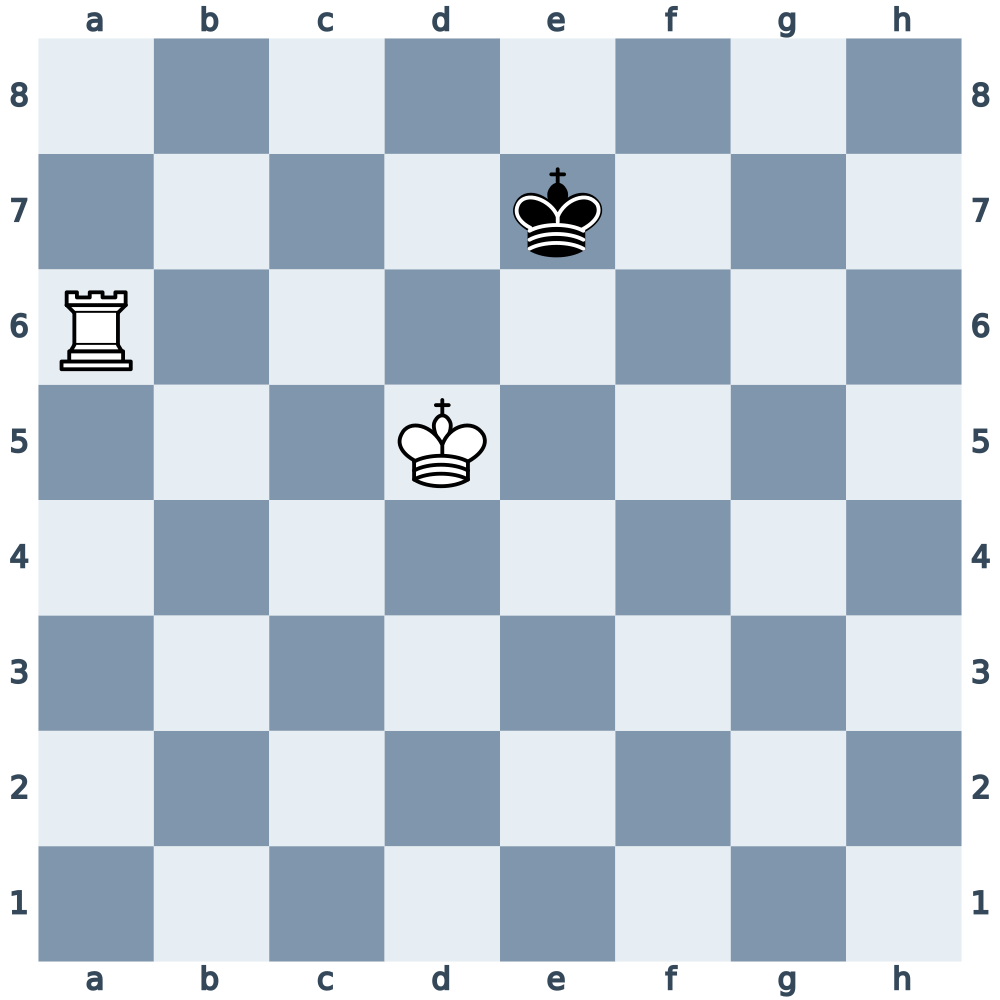
In Diagram 8, White’s king is on d5 and the rook is on a6. Black’s king is on e7. White can play 1.Rb6, keeping the sixth rank closed without checking.
If Black reply 1…Kd7, the kings face one another with one square between them. White’s king covers c6, d6 and e6. Now 2.Rb7+ forces Black’s king onto the eighth rank. The waiting move allowed the king barrier and rook check to work together.
Black are not obliged to play 1…Kd7. They can move toward the eighth rank, or play 1…Kf7 and stay on the seventh rank. That sideways move does not immediately give White the same checking push. Do not memorize the example as a forced sequence. If the king retreats, you have gained space; if it moves sideways, reposition your king as needed while preserving a safe rook barrier.
Zugzwang means that the obligation to move is a disadvantage: a player would prefer to keep the position unchanged, but must give something up by moving. Diagram 6 shows this idea: after 1.Rf2, Black cannot keep the king on e6. They must retreat or step onto d6 and allow the effective checking push. Diagram 8 gives another waiting-move pattern with several replies. Not every quiet rook move creates zugzwang; inspect all the king’s legal responses and check the rook’s safety.
Once the king reaches the edge, arrange the final king barrier before checking along that edge. For example, with White’s king on d6, a rook on b7 and Black’s king on d8, White have 1.Rb8#. The white king covers c7, d7 and e7, and the rook checks along the eighth rank.
Practice and a final checklist
Reading the method is only the beginning. Set up each ending on a board and play it against someone who tries to escape. Change the starting squares and the target edge so that you learn the restrictions rather than a single move sequence.
Exercise 1. In Diagram 1, find the check that forces the king onto the eighth rank. Can the same final move work against all three legal replies?
Exercise 2. In Diagram 4, should White move the queen or bring the king? Explain why Qg6 would spoil the win.
Exercise 3. In Diagram 7, list every legal square for Black’s king. Which white piece prevents a retreat toward the fifth rank?
Exercise 4. In Diagram 8, consider 1.Rb6 Kd7. Why is 2.Rb7+ useful now? Would every check have the same effect?
Answers. 1: Rb7+ forces Kd8, Ke8 or Kf8, and Ra8# follows against each. 2: Bring the king; Qg6 is stalemate because Black are not in check and have no move. 3: c7, d7 and e7; White’s king covers c5, d5 and e5. 4: The king barrier closes the forward escape squares, so the check forces a retreat to the eighth rank.
Before each move, check these points:
- Which edge or pair of adjacent borders am I using?
- Which escape squares do my pieces control?
- Can the opposing king capture my queen or rook?
- Does this check make progress, or am I checking without a plan?
- If my move is not check, does the opponent still have a legal move?
Two rooks teach the ladder. A queen teaches confinement and the danger of stalemate. A rook teaches cooperation, king barriers and the value of waiting. In all three endings, the essential habit is the same: control the king’s space before trying to deliver the final check.