
Chess visualization is the ability to keep track of a position while considering moves without playing them on the board. If you imagine a capture but leave the captured piece in your calculation, every decision that follows may rest on the wrong position.
You do not need to play a whole game blindfold to practice this skill. Begin with a short sequence, account for every change, and check the resulting position. This guide explains that process and gives six exercises for players who know how the pieces move. The first two are simple geometry drills; the others use legal chess positions.
What chess visualization involves
It helps to separate three tasks. Board vision concerns what the pieces are doing now. Visualization keeps track of the position as imagined moves change it. Calculation uses possible sequences to test whether an idea works. These practical distinctions follow Dan Heisman’s definitions. Remembering a move list is useful, but it does not prove that you have correctly updated every piece and square.
For these exercises, judge the accuracy of the position, not the vividness of a mental picture. Can you name the occupied squares and explain which pieces attack each other? Chabris and Hearst’s discussion of expert chess thinking describes representations involving piece functions and relationships rather than a detailed photograph. That does not mean every player thinks in the same way.
An important error is keeping a piece on a square it has already left. Campitelli and Gobet recorded this kind of outdated-square error in blindfold memory tasks. Their small studies involved skilled players; they did not test the beginner program below. The exercises below are practical training suggestions, not a promise of a particular rating gain.
Keep the position accurate one move at a time
Start with the board visible. Know whose turn it is, identify the pieces, and use square names rather than vague directions such as “over there.” If coordinates are unfamiliar, work on those first. The Steps Method trainer’s manual emphasizes board overview, precise move descriptions, and basic skills before harder thinking-ahead tasks. There is no need to remove all visual support immediately.
- Establish the starting position. Check the kings and the pieces involved in the line, but also notice stationary defenders and blockers. A piece that never moves can still decide whether a continuation works.
- Complete each update. Identify the moving piece’s starting square and destination. The starting square becomes empty. On an ordinary capture, remove the opponent’s piece from the destination before placing the capturing piece there. Then switch the side to move. Avoid holding both the old and new versions of the position at once.
- Check the changed relationships. Has an empty square opened a rook’s file or a bishop’s diagonal? Has a defender moved away? Has the arriving piece blocked a line? The moving piece is only part of the change. Kuljasevic’s visualization work explicitly considers changes in piece locations, exchanges, attacks, and protection.
- Stop at the endpoint and reconstruct it. Name the important occupied and empty squares, account for captures, and say whose turn it is. Only then decide whether the position supports your idea.
- Verify after answering. Replay the line on a board and find the first point where your imagined position differs. Correct that update before adding more moves. Ramesh’s calculation guidance uses this kind of feedback to identify where analysis first went wrong.
The relevant coaching references are Kuljasevic’s visualization workbook and Ramesh’s calculation book. The simple exercises here were prepared for this guide rather than copied from either book.
Special moves need additional bookkeeping. Castling moves both king and rook; en passant removes a pawn from a square other than the capturing pawn’s destination; promotion replaces the pawn with a chosen queen, rook, bishop, or knight. Leave those extra demands for later if ordinary moves and captures are not yet reliable.
Six exercises from square names to branching lines
Use a board or the diagrams below. Keep the starting position visible if needed, but do not move the pieces until you have answered. For a harder version, study the diagram and then cover it. Write your answers before looking at the separate answer section.
All diagrams have White’s side at the bottom. Exercises 1 and 2 are geometry drills, not legal game positions. In Exercises 3–6, both sides alternate normally; White are to move in every starting position. Follow the supplied moves rather than searching for a better move. They are tracking prompts, not claims about best play.
In the move notation, K means king, B bishop, N knight, and x a capture. Pawn moves have no piece letter. A half-move is one player’s move: 1. e4 e5 contains two half-moves. For Exercises 3–6, also state whose turn it is at the end of each line.
Exercise 1 Find the square
Warm up with coordinates
Orient yourself on the empty grid. Cover it if you can; otherwise use it to check the relationship between files and ranks.
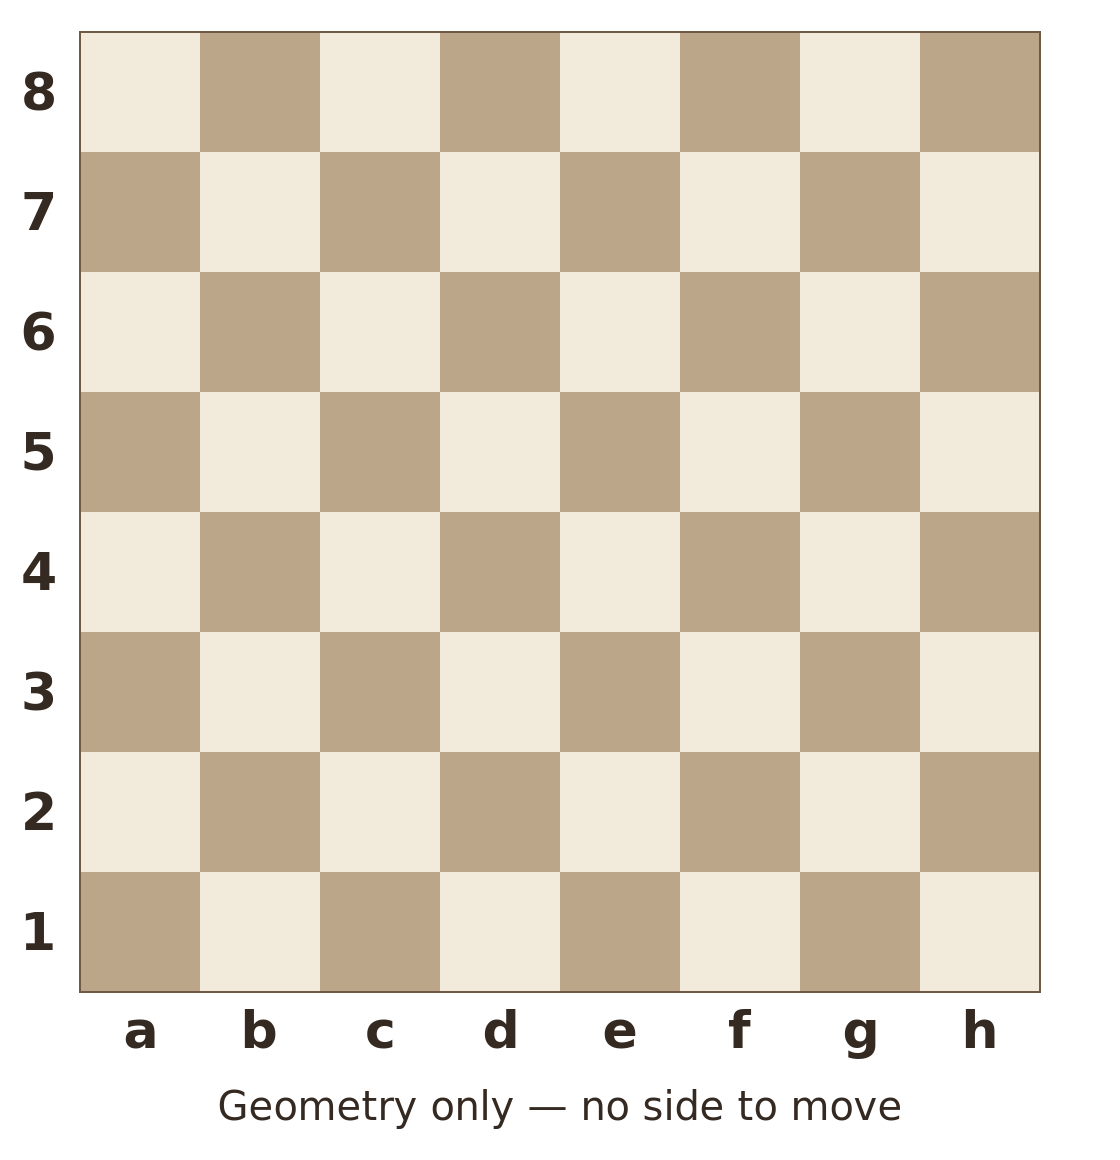
- Are a1, h1, e4, and f6 light or dark squares?
- From d4, go two ranks up and one file to the right, viewed from White’s side. Which square do you reach?
Alexandra Kosteniuk describes a card-and-clock game devised by her father in How I Became Grandmaster at Age 14. He wrote all 64 square names on separate cards and showed them one at a time. She had to name the square’s color, point to it on the board, and then press the clock. She had to complete all 64 correctly within one minute of her own clock time; a wrong answer or running out of time meant losing.
Our optional beginner adaptation is to name the color and point to the square without a clock first. Add timing only after both are reliable; the one-minute challenge is not a universal requirement.
Exercise 2 Follow one knight
One piece and three jumps
Follow the knight from c3 along this route. Each arrow is one knight jump. There is no opponent and no alternating turn in this geometry drill.
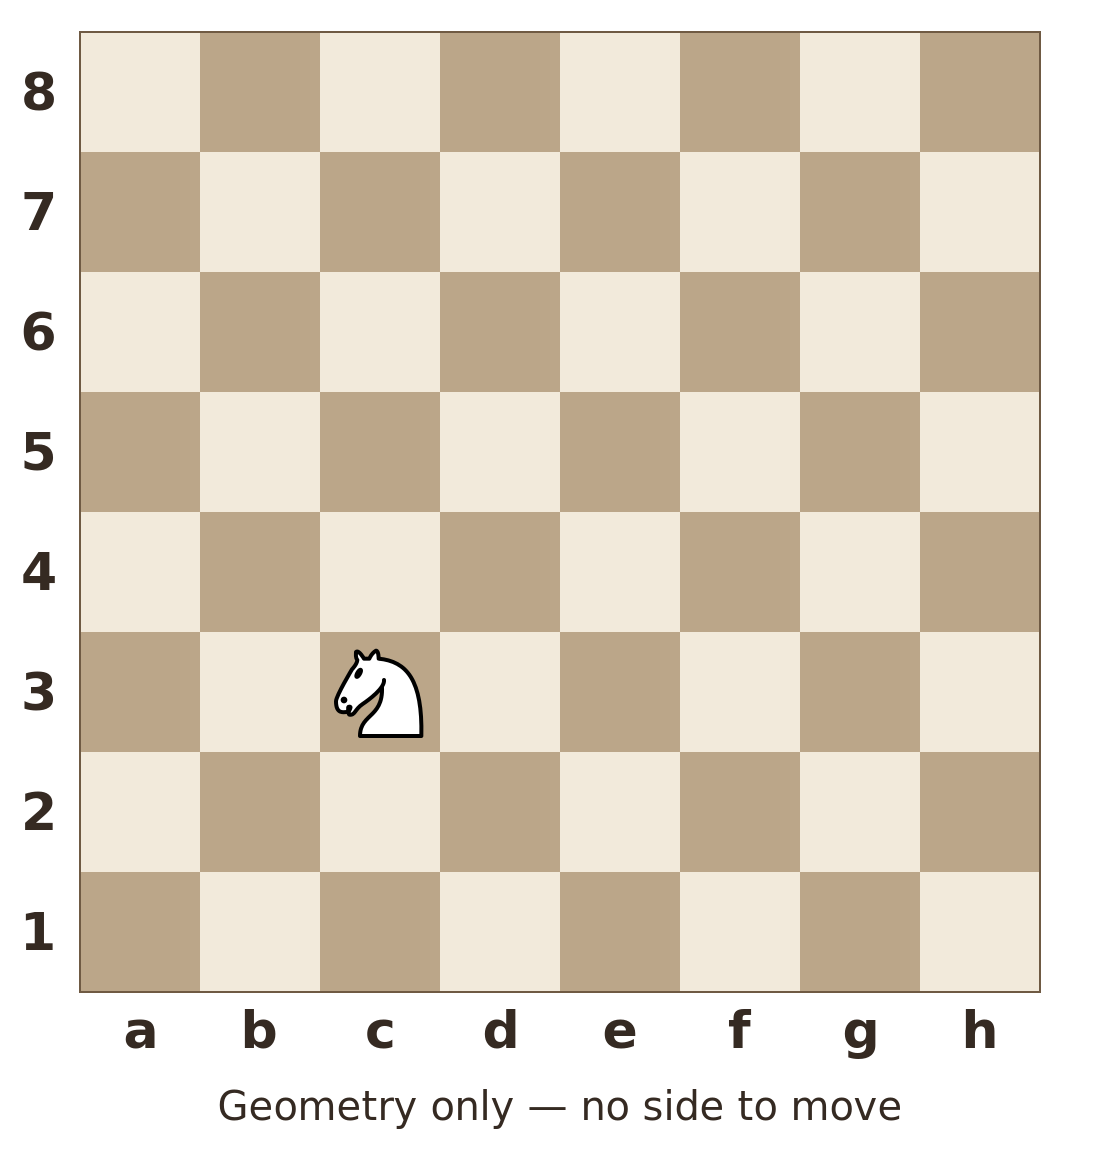
c3 → d5 → f4 → e2
- Where does the knight finish, and what color is that square?
- Which of c3, d5, and f4 still contains a piece?
- From the final square, can the knight jump to g3?
Exercise 3 Track a capture
Two half moves
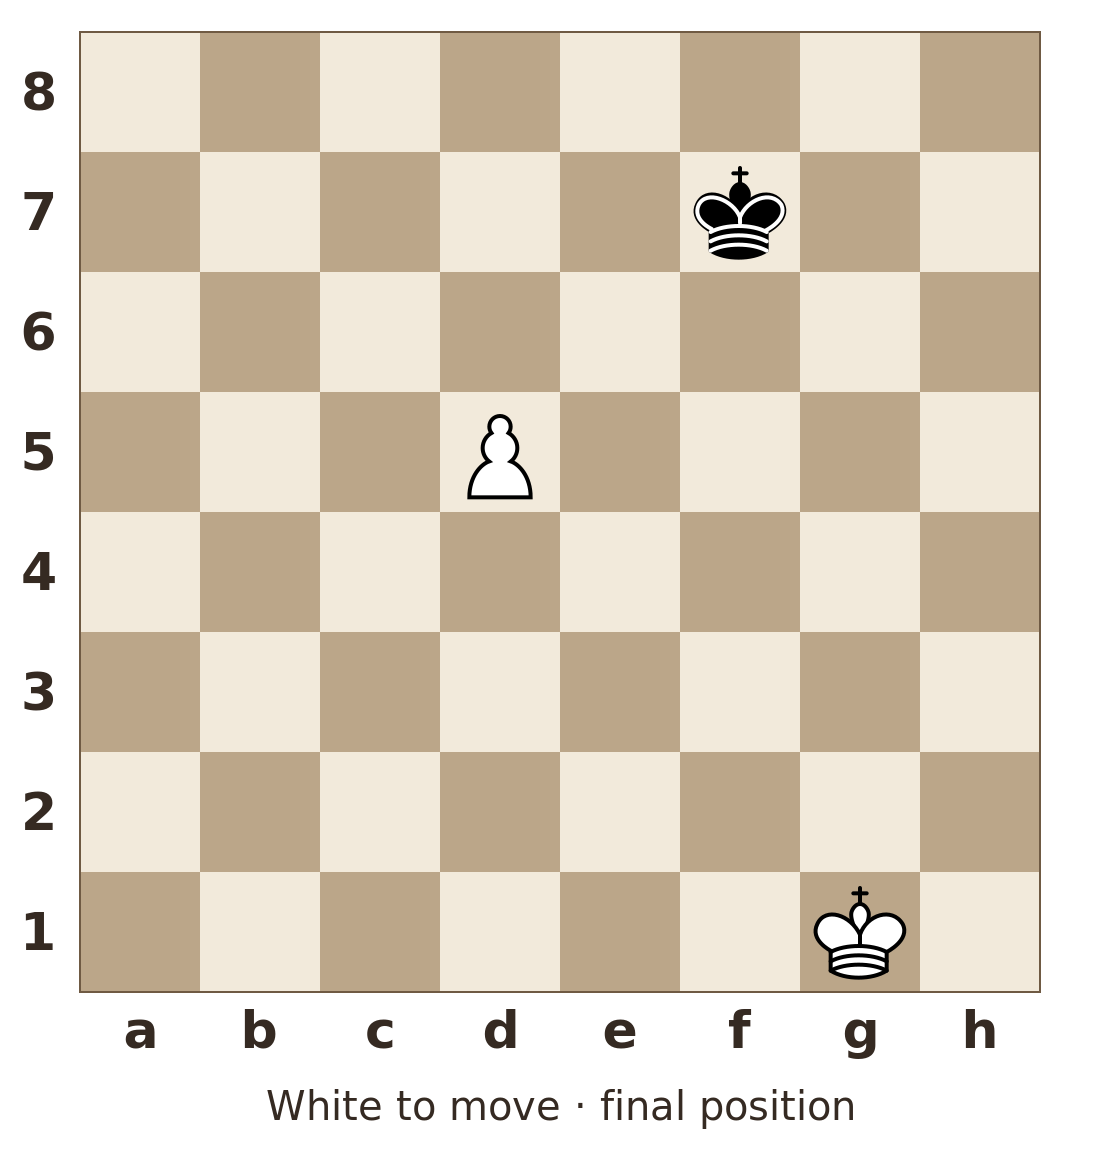
Keep track of the captured pawn as well as the two pieces that move.
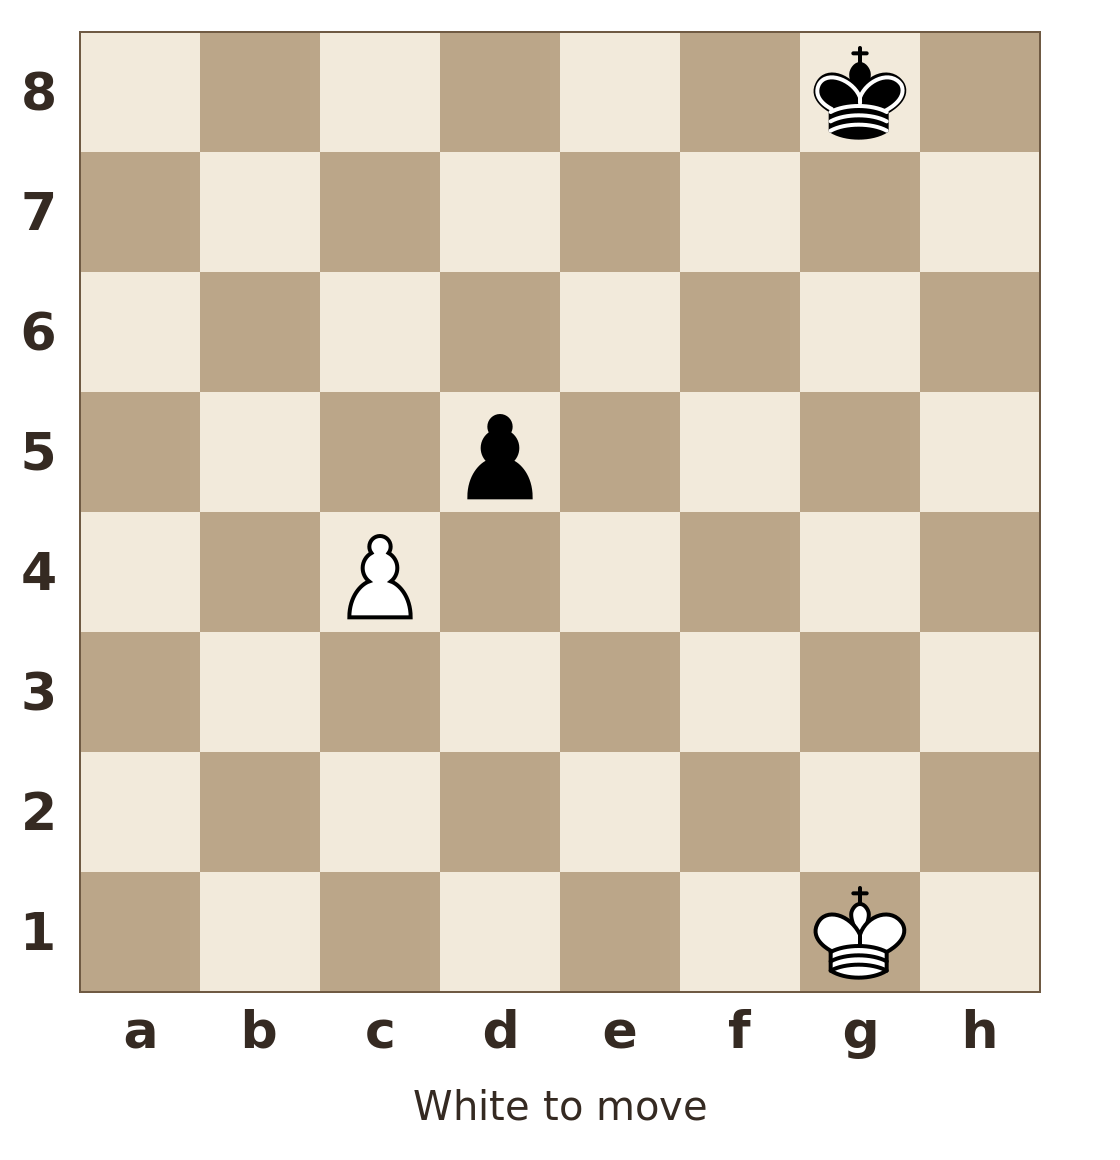
1. cxd5 Kf7
- Where is White’s pawn, and what is on c4? Which piece disappeared?
- Where is Black’s king?
- Which two squares does White’s pawn attack now?
Exercise 4 Watch a stationary bishop
Four half moves
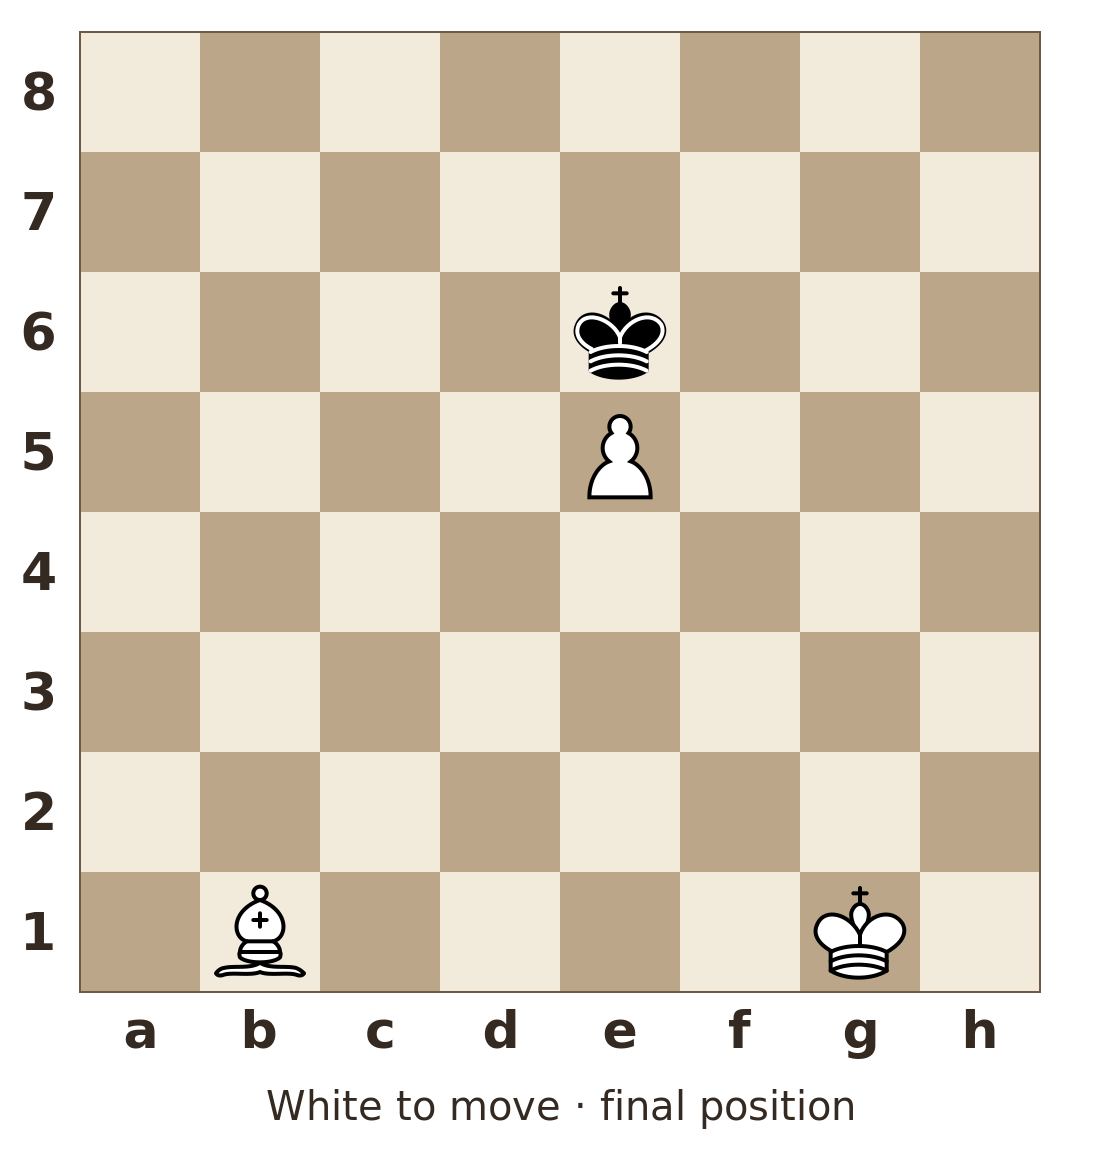
The bishop remains on b1. Pause after 1. e4, then continue to the end.
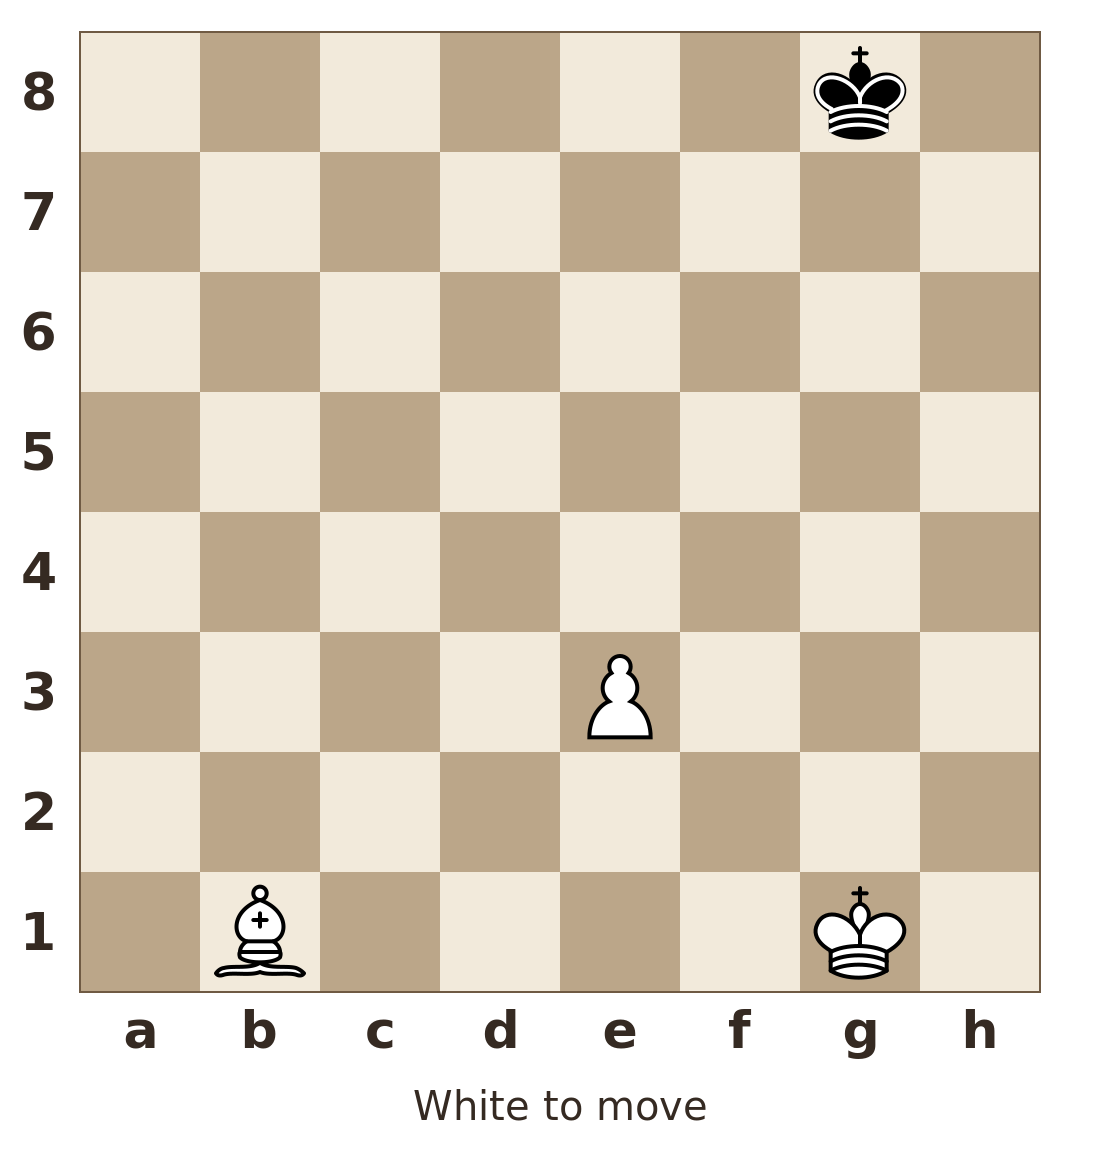
1. e4 Kf7 2. e5 Ke6
- Where do White’s pawn and Black’s king finish?
- Does the b1-bishop attack h7 initially, just after 1. e4, and at the end?
- Are e3 and e4 empty in the final position?
Exercise 5 Keep the opening in view
Six half moves
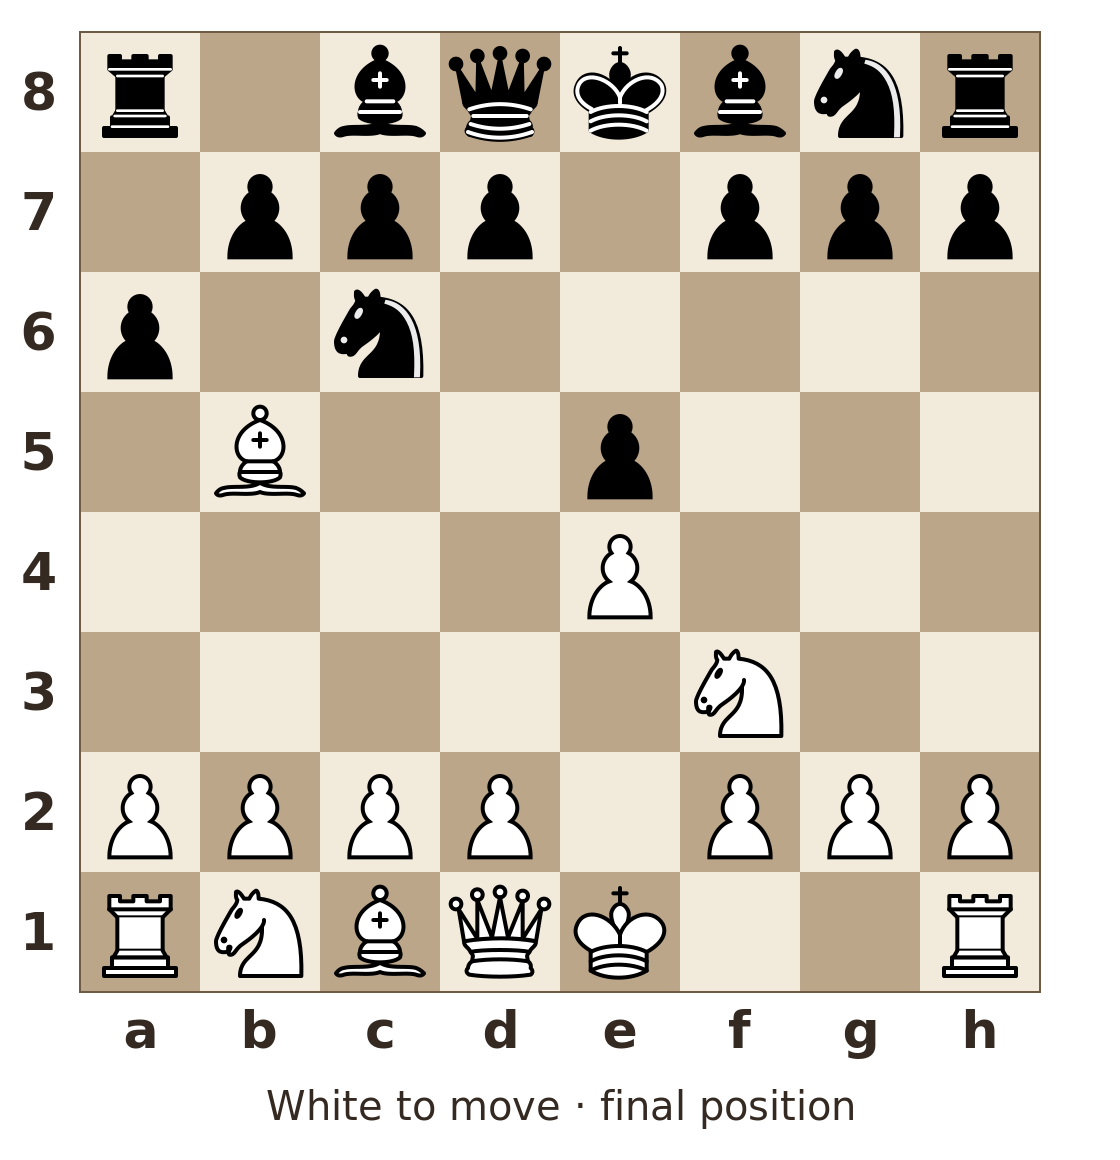
Begin from the normal initial position. If necessary, check after 2…Nc6 before continuing. This is a tracking exercise, not a test of opening theory.
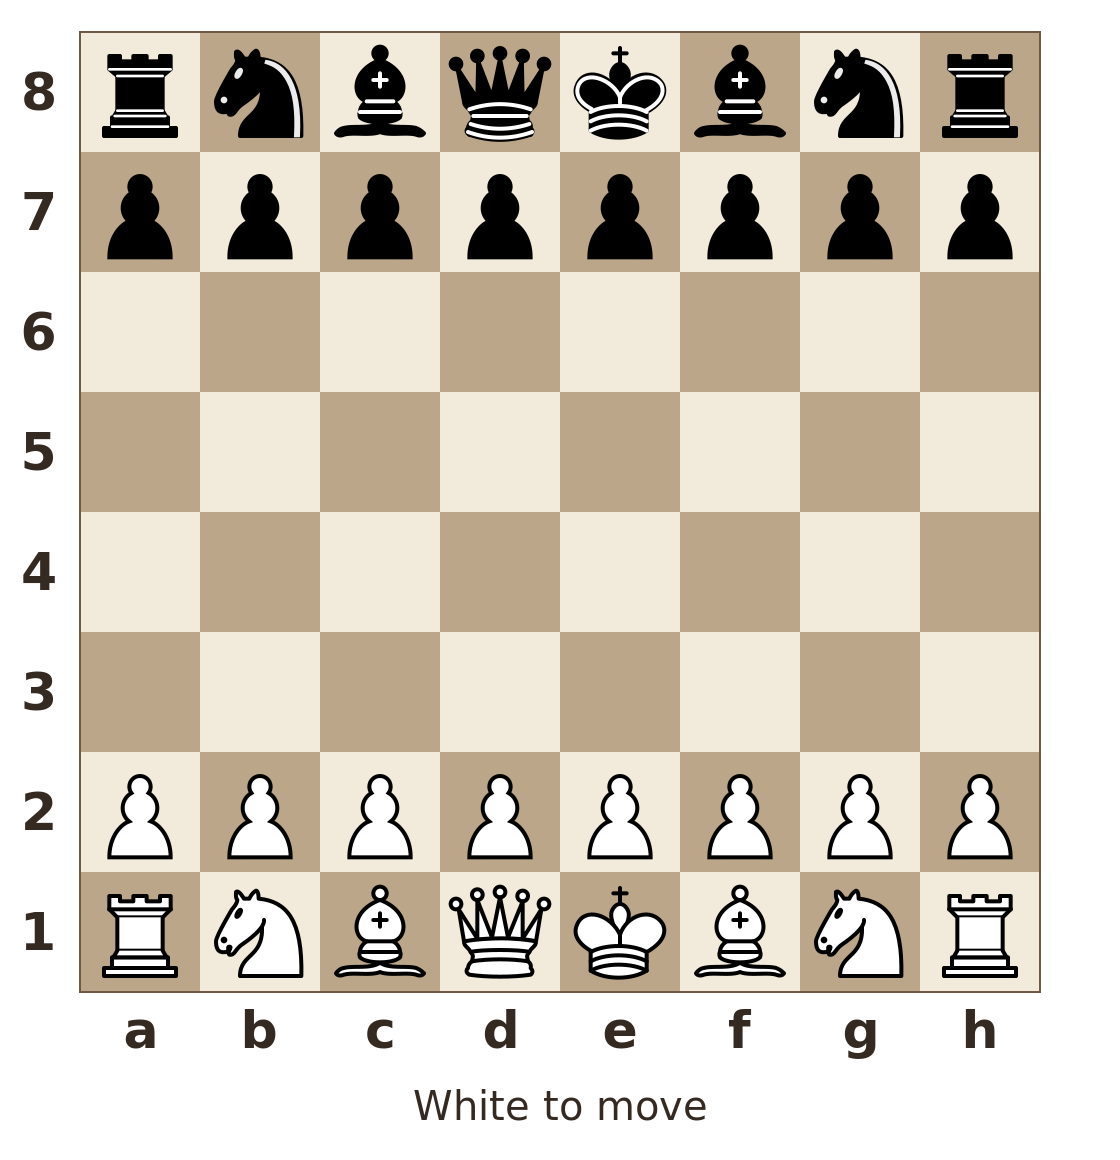
1. e4 e5 2. Nf3 Nc6 3. Bb5 a6
- Where are the two knights that moved?
- Where is White’s light-squared bishop, and is f1 empty?
- Where are the e-pawns, and is e2 empty?
- Which black pawn now attacks White’s bishop on b5?
Exercise 6 Reset before the next line
Optional challenge with two branches
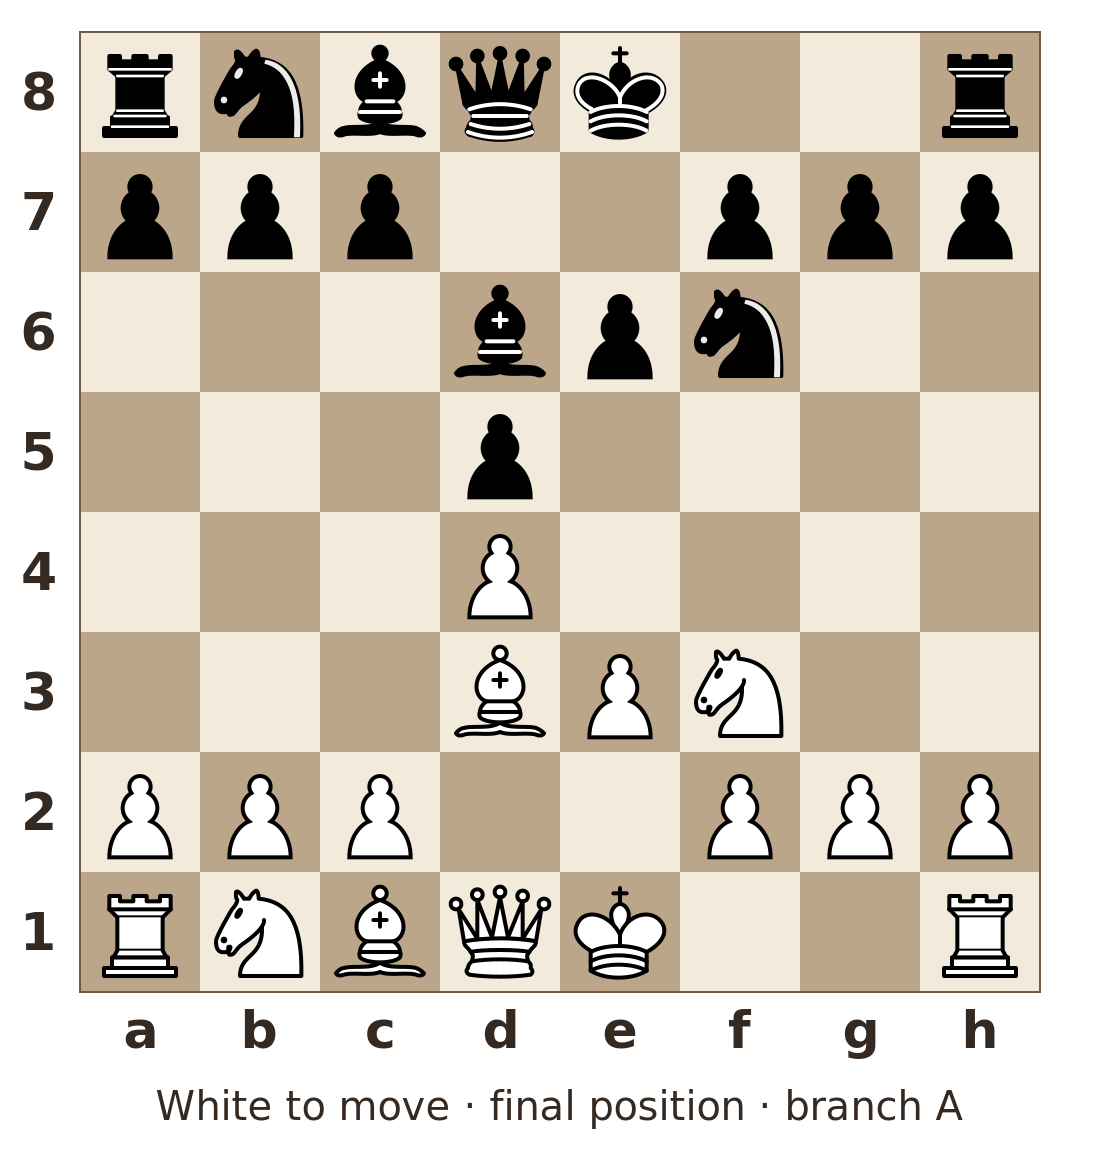
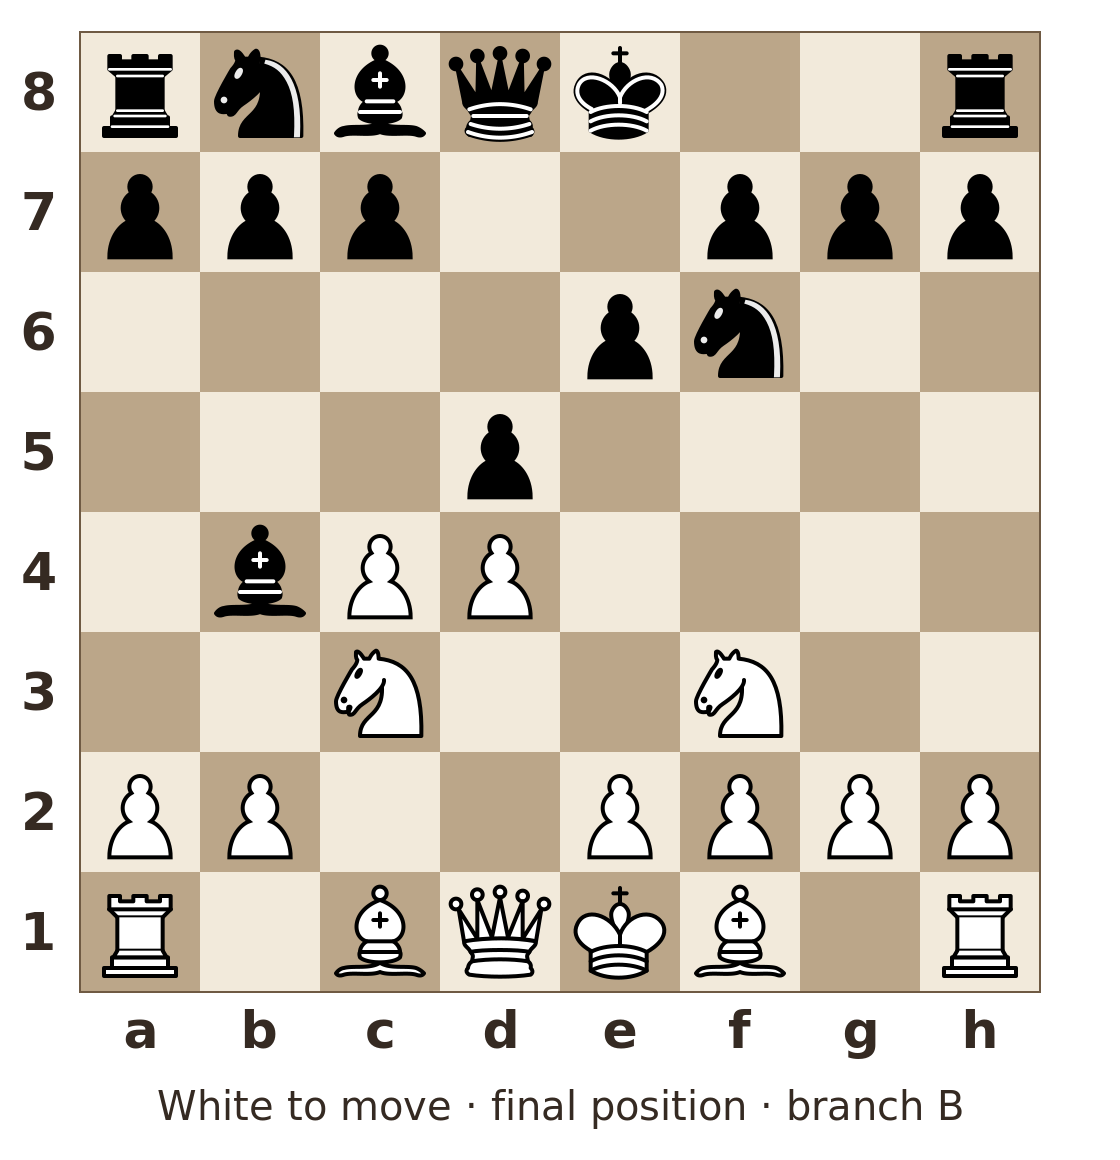
The diagram follows 1. d4 d5 2. Nf3 Nf6. Follow branch A and answer its question. Then restore the original diagram before starting branch B. Do not continue from the end of branch A.
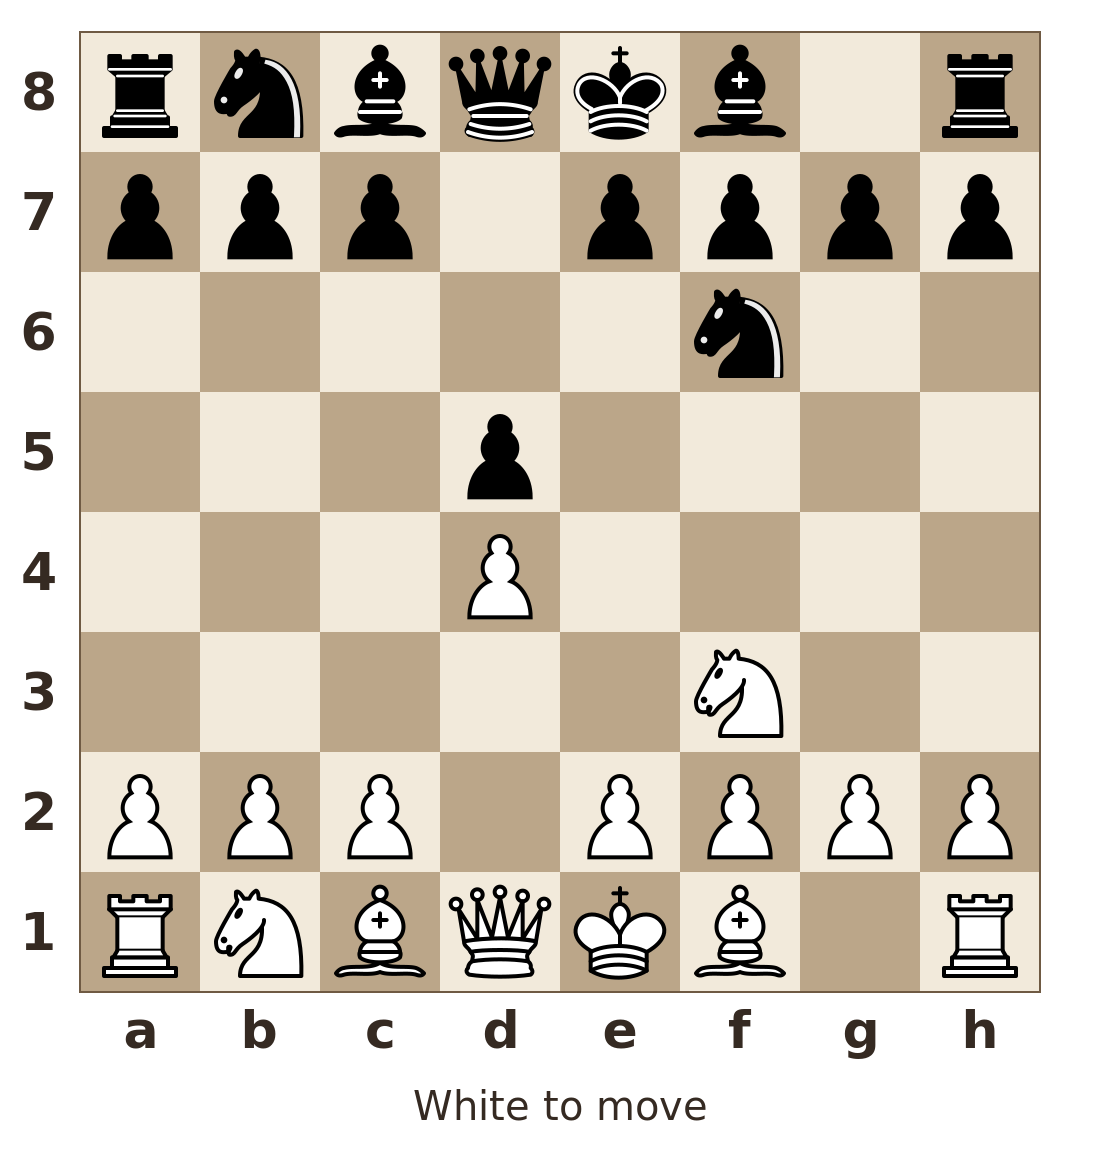
Branch A 3. e3 e6 4. Bd3 Bd6
Branch B 3. c4 e6 4. Nc3 Bb4
- After A, where are the bishops that moved, and what is on e3?
- After the reset and B, where is White’s f1-bishop? Is there a white pawn on e3?
- After B, where are White’s queen’s knight and Black’s moved bishop?
- Which white piece remains on f3 at the end of both branches?
Answers and explanations
Check the position as well as the answer. In Exercises 3–6, White are to move after every complete supplied line, including both branches of Exercise 6.
Exercise 1
a1 is dark; h1 is light; e4 is light; f6 is dark. Moving two ranks up and one file right from d4 reaches e6. Square colors alternate along each file and rank, so a known corner can help you check an uncertain square.
Exercise 2
The knight finishes on e2, a light square. c3, d5, and f4 are all empty. From e2, the knight can jump to g3. Each jump changes the knight’s location; it does not leave another knight behind on the route.
Exercise 3
White’s pawn is on d5, c4 is empty, and the black pawn originally on d5 has been captured. Black’s king is on f7. The white pawn now attacks c6 and e6. Remember that its attacks come from d5, not from the c4 square it left.
Exercise 4
White’s pawn finishes on e5 and Black’s king on e6. The bishop attacks h7 initially. After 1. e4, the white pawn blocks the b1–h7 diagonal on e4. After 2. e5, that diagonal is clear again, so the bishop attacks h7 once more. Both e3 and e4 are empty at the end. The bishop never moved, but its reach changed twice.
Exercise 5
The knights that moved stand on f3 and c6. White’s light-squared bishop is on b5, leaving f1 empty. The e-pawns stand on e4 and e5, and e2 is empty. Black’s pawn on a6 attacks the bishop on b5. All 32 pieces remain on the board: there were no captures.
Exercise 6
After branch A, White’s bishop is on d3, Black’s bishop on d6, and White’s e-pawn on e3. After resetting and following branch B, White’s bishop is still on f1 and the e-pawn is still on e2; e3 is empty. White’s queen’s knight is on c3, and Black’s moved bishop is on b4. The white knight on f3 remains there in both lines. A bishop on d3 or a pawn on e3 in your branch-B position is a sign that you carried information over from branch A.
Use the same skill in your own games
When an answer is wrong, name the error before choosing another exercise. Did you misread a square, leave a captured piece on the board, forget a stationary defender, or mix two branches? Repeat the part that failed. If the position becomes uncertain after two half-moves, return to two rather than pushing through six by guesswork.
Increase one demand at a time: a longer sequence, more pieces, a capture, or less visual support. Accurate reconstruction is the reason to advance. A timer or a fixed daily quota is not necessary for this guide. You can also make a familiar exercise fresh by asking about a different unchanged piece or an empty square.
Another option is to start with positions containing only a few pieces and gradually increase the piece count. Carefully chosen mate-in-two problems can train visualization and calculation together; move on to suitable mates in three or four as your accuracy improves. Fewer pieces do not necessarily mean easier tactics, so increase piece count and line length separately. Solve without moving the pieces, accounting for every legal defense rather than just one cooperative sequence. Then verify your solution on a board.
Next, take a manageable position from one of your completed games. Our guide to reviewing a game before using an engine can help you choose a useful moment. Choose a candidate move and a serious reply for your opponent. Follow a short line, reconstruct the endpoint, and evaluate it: is either king unsafe, are any pieces hanging, and which threats need answering? Correct visualization supports this decision; it does not choose good candidate moves or evaluate the position for you.
Before trying an alternative, return to the exact position where the lines diverge. Put back any pieces captured only in the abandoned line. The useful habit is to reach a position you can account for, then make the chess judgment from that position.
Sources and further reading
Dan Heisman. Definitions. Practical distinctions between board vision, visualization, and calculation.
Davorin Kuljasevic. The How to Study Chess on Your Own Workbook Volume 2. Publisher sample, pp. 12–13 and 40–43.
Rob Brunia and Cor van Wijgerden. Learning Chess Step 2 Manual for Chess Trainers. Official sample, thinking-ahead prerequisites, pp. 221–222.
R.B. Ramesh. Improve Your Chess Calculation. Publisher sample, feedback and progression, pp. 18–19.
Guillermo Campitelli and Fernand Gobet. The mind’s eye in blindfold chess. European Journal of Cognitive Psychology, 2005.
Christopher F. Chabris and Eliot S. Hearst. Visualization, pattern recognition, and forward search: Effects of playing speed and sight of the position on grandmaster chess errors. Cognitive Science, 2003.
Alexandra Kosteniuk. How I Became Grandmaster at Age 14. The square-identification card game devised by her father.
Chess-piece artwork: Colin M. L. Burnett (BSD licence); diagrams rendered with python-chess.
Artwork license
Copyright (c) Colin M. L. Burnett. All rights reserved.

Redistribution and use in source and binary forms, with or without modification,
are permitted provided that the following conditions are met:

1. Redistributions of source code must retain the above copyright notice, this
   list of conditions and the following disclaimer.
2. Redistributions in binary form must reproduce the above copyright notice,
   this list of conditions and the following disclaimer in the documentation
   and/or other materials provided with the distribution.
3. Neither the name of the copyright holder nor the names of its contributors
   may be used to endorse or promote products derived from this software without
   specific prior written permission.

THIS SOFTWARE IS PROVIDED BY THE COPYRIGHT HOLDERS AND CONTRIBUTORS "AS IS"
AND ANY EXPRESS OR IMPLIED WARRANTIES, INCLUDING, BUT NOT LIMITED TO, THE
IMPLIED WARRANTIES OF MERCHANTABILITY AND FITNESS FOR A PARTICULAR PURPOSE
ARE DISCLAIMED. IN NO EVENT SHALL THE COPYRIGHT HOLDER OR CONTRIBUTORS BE
LIABLE FOR ANY DIRECT, INDIRECT, INCIDENTAL, SPECIAL, EXEMPLARY, OR CONSEQUENTIAL
DAMAGES (INCLUDING, BUT NOT LIMITED TO, PROCUREMENT OF SUBSTITUTE GOODS OR
SERVICES; LOSS OF USE, DATA, OR PROFITS; OR BUSINESS INTERRUPTION) HOWEVER CAUSED
AND ON ANY THEORY OF LIABILITY, WHETHER IN CONTRACT, STRICT LIABILITY, OR TORT
(INCLUDING NEGLIGENCE OR OTHERWISE) ARISING IN ANY WAY OUT OF THE USE OF THIS
SOFTWARE, EVEN IF ADVISED OF THE POSSIBILITY OF SUCH DAMAGE.