
By GM Ulvi Bajarani, Founder and Head Coach of Azeri Chess Academy
The rules and practical ways to save a difficult position
A material advantage does not always mean a win. A player with an extra queen can stalemate the opponent, while a player who appears lost may find a sacrifice that saves half a point. Learning to recognize these possibilities improves both defense and the conversion of winning positions.
This guide separates two questions: when do the rules end the game as a draw, and how can you reach a position that is drawable with correct play? Those questions are related, but they are not interchangeable. A fortress, for example, can give you a defensive plan without immediately ending the game.
The rules below use the FIDE over-the-board framework. US Chess events and online platforms may use different procedures or adjudication rules. Check the rules of your event rather than assuming that an online result or claim button applies everywhere.
Stalemate and dead positions
Stalemate occurs when the player to move has no legal move and their king is not in check. Check every piece, not only the king. A legal pawn move is enough to rule out stalemate.
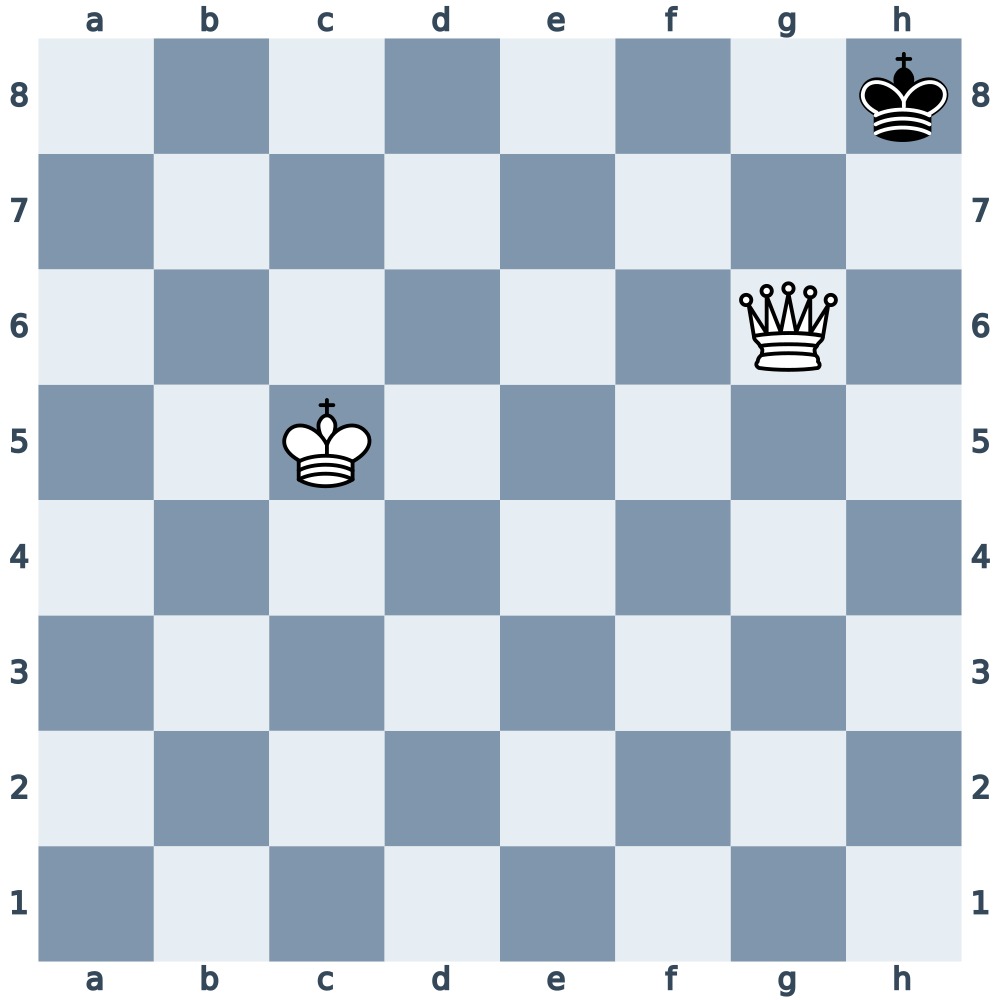
In Diagram 1, the queen on g6 controls g8, g7 and h7. These are all the squares adjacent to the black king on h8. The queen does not attack h8 itself, so the position is stalemate, not checkmate. White’s extra queen cannot change the result: the game has already ended.
A dead position is different. Neither side can possibly deliver checkmate through any sequence of legal moves. King against king, king and bishop against a lone king, and king and knight against a lone king are familiar examples. The game ends immediately.
Do not replace “mate is impossible” with “mate cannot be forced against good defense.” Those are different tests. For example, two knights against a lone king generally cannot force mate, but mating positions are possible. Counting the pieces alone is not enough to decide every case.
For the winning side, the practical lesson is to check the opponent’s legal moves before making a quiet move or capturing their last mobile piece. For the defending side, it is to notice when the lack of moves can become a resource. The next examples show how to create that resource deliberately.
Repetition and move counts
Some draws require a claim; others occur automatically. Under FIDE rules, the following distinction matters:
- Three occurrences of the same position: the player to move can claim a draw correctly. They need not be consecutive.
- Five occurrences of the same position: the game is drawn without a claim.
- Fifty moves by each player without any pawn move or capture: a correct claim is available.
- Seventy-five moves by each player without any pawn move or capture: the draw is automatic, except that checkmate on the final move takes priority.
A capture or a pawn move restarts the move count. Fifty moves means fifty by White and fifty by Black, not fifty individual turns altogether.
For repetition, the pieces must occupy the same squares, the same side must be to move, and the legal possibilities must match. Castling rights and a legal en passant capture can distinguish positions that otherwise look identical. Repeating checks is not required; repeating the position is what matters.
Claim before making the intended move
If your intended move will produce the third occurrence or complete the fifty-move count, record that move without playing it and declare your intention to the arbiter. If the qualifying position already exists, you can claim when you have the move. Pause the clock for the claim. Touching a piece with the intention of moving it can cost you the right to claim on that turn. Learn the procedure before tournament play.
Agreement and the clock
Players may also agree to a draw once both have made a move, subject to the event’s restrictions. A tournament can restrict or prohibit draw agreements. When an offer is permitted, make your move, offer the draw, then press the clock. An offer is not an instruction that the opponent must accept.
Running out of time is normally a loss, but FIDE has an important exception: it is a draw if the opponent cannot possibly checkmate through any legal sequence. Again, this is about the possibility of mate, not whether mate could be forced against correct defense. Ask the arbiter to decide a disputed result.
Create your own stalemate
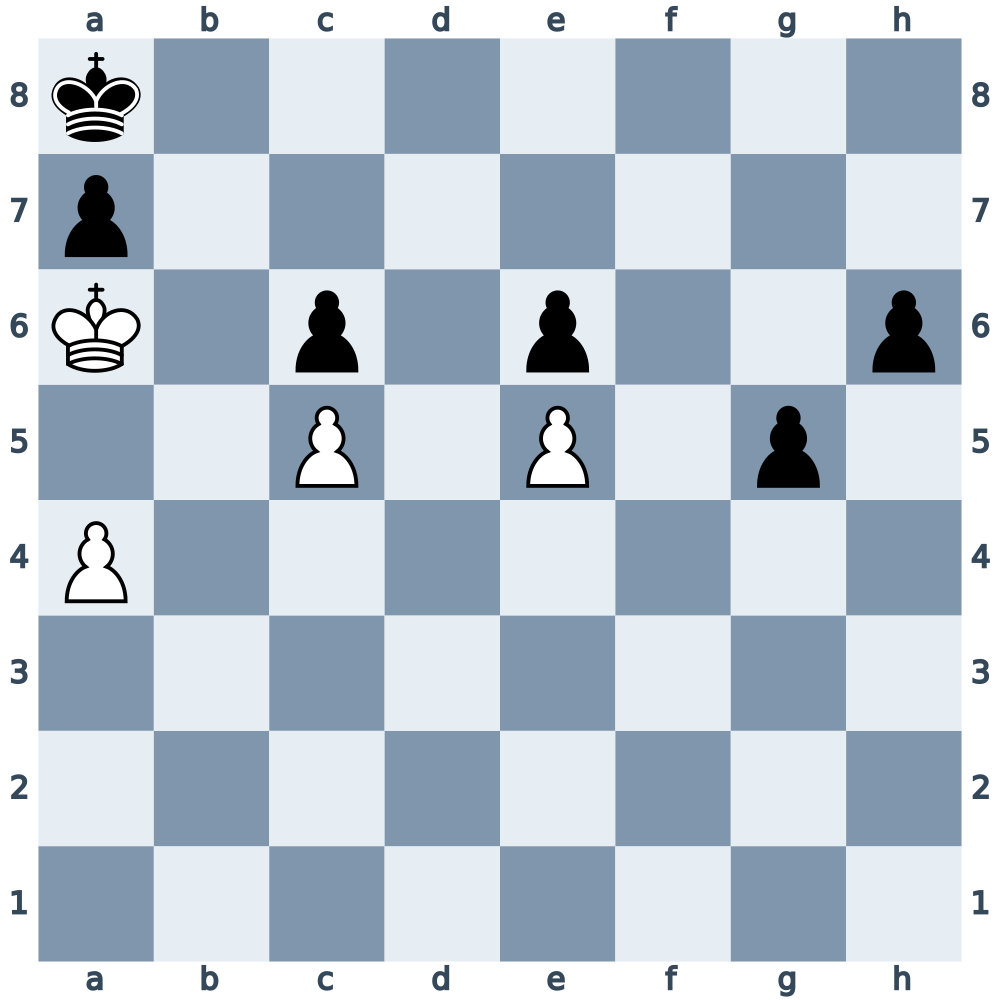
Black have two extra pawns, but White can save the game with 1.a5! The move blocks White’s last pawn that could advance. The c5-pawn is blocked by c6, and the e5-pawn is blocked by e6.
White’s king on a6 also has no move. The a5-square is occupied by White’s pawn, a7 by a protected black pawn, b5 is attacked by the pawn on c6, b6 by the pawn on a7, and b7 by Black’s king. The king is not in check.
There is one detail to remember: immediately after 1.a5 it is Black’s turn, so White are not yet stalemated. Black must move first. Their only legal choices are 1…Kb8, 1…h5 and 1…g4. Every choice leaves White with no legal move and no check. The game is then drawn by stalemate.
This is a useful defensive question: can I remove my own remaining moves without exposing my king to check? Usually we want active pieces and mobile pawns. Here, moving the last mobile pawn into a blockade is exactly what saves the game.
Do not apply the idea mechanically. If an opponent can give check, open a square for your king, or unblock one of your pieces, the stalemate may disappear. In this position the conclusion is reliable because every legal reply has been considered, not because the board merely looks closed.
Sacrifice the piece that can move
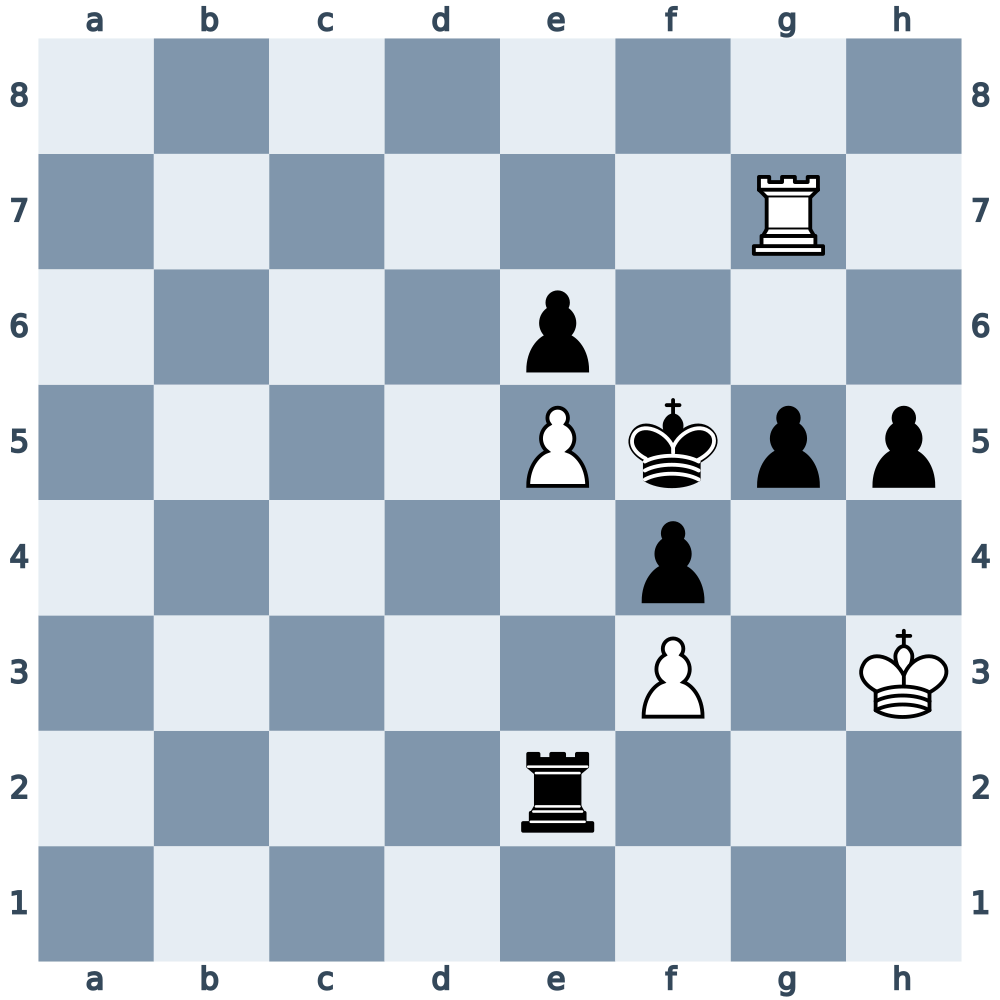
White play 1.Rxg5+! Black have only one legal reply: 1…Kxg5. The resulting position is stalemate.
Why must Black take the rook? The rook checks the king along the fifth rank. The e5-square is controlled by White’s pawn on f3, while e6, f4 and h5 are occupied by Black’s own pawns. The rook controls f5. White’s pawn on e5 controls f6, and the checking rook controls g6. No black piece can block this adjacent check or capture the rook instead.
After 1…Kxg5, White’s king on h3 is not in check. The rook on e2 controls g2 and h2; the black pawn on h5 controls g4; and the pawn on g5 is gone, but Black’s king on g5 controls h4 and g4. The pawn on f4 controls g3. White’s pawns are blocked: e5 by e6 and f3 by f4. White have no legal move.
The sacrifice works because it removes White’s last mobile piece while preserving the restrictions around the king. Before resigning a difficult position, look for forcing sacrifices of this kind. A sacrifice with check is particularly useful because it can limit the opponent’s replies.
The same pattern also warns the stronger side against automatic captures. Before accepting a sacrifice, check the resulting legal moves. In this example Black cannot decline successfully because the check forces the capture; in other positions, declining the material may preserve the win.
Simplify into a drawn ending
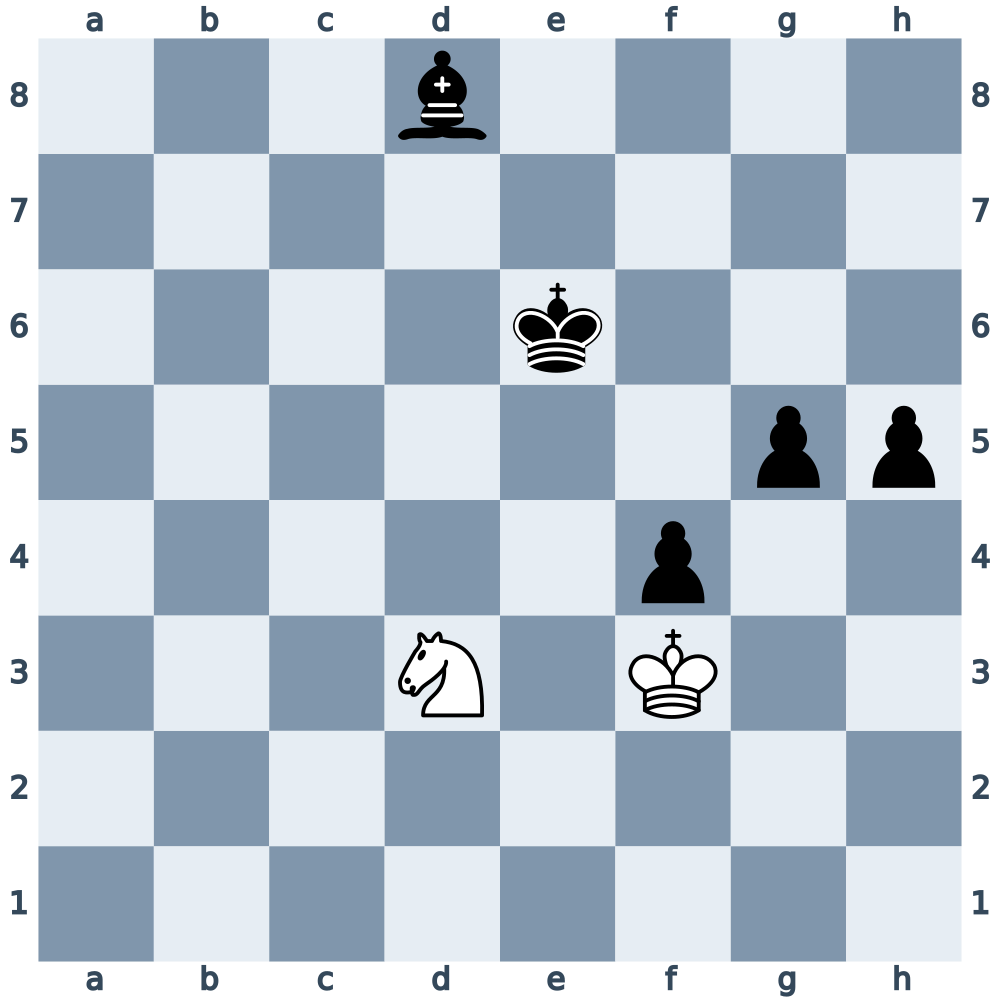
White should not try to stop every pawn with passive king moves. The saving move is 1.Nxf4+!, removing the f-pawn and offering an exchange that leaves Black with the wrong bishop for the remaining rook pawn. In this exact position, it is the only move that holds a draw with correct play.
After 1…gxf4 2.Kxf4, Black have a dark-squared bishop and an h-pawn. The pawn promotes on h1, a light square, so the bishop cannot control its promotion square. White’s king must head toward that corner and avoid being cut off. With the defending king able to reach the corner, the extra bishop and rook pawn do not win.
Black can decline the knight by moving the king out of check. White then have the resource Nxh5, removing the rook pawn instead. All Black’s legal replies to 1.Nxf4+ retain a drawn position with correct play; that does not mean every subsequent White move draws.
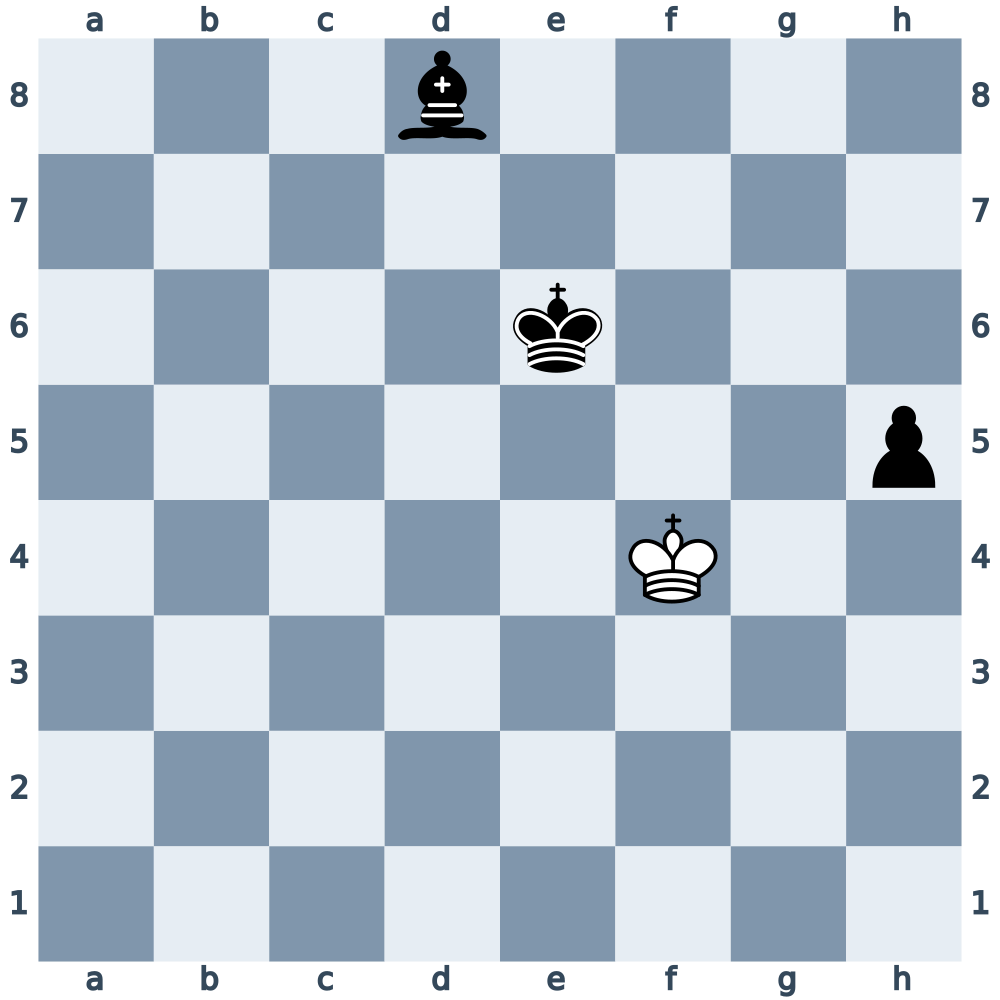
This is a theoretical draw, not a dead position. Black could still win if White later cooperated or defended badly. The draw therefore is not declared simply because this material appears. The defensive knowledge tells you how to hold the position; the game still needs to end under a draw rule or by agreement.
Perpetual check and fortresses
Perpetual check is a way to force a draw by continuing to check without allowing the opposing king to escape. It is not a separate automatic draw rule. In practice, the checks often lead to a repetition that can be claimed, or the players agree to a draw.
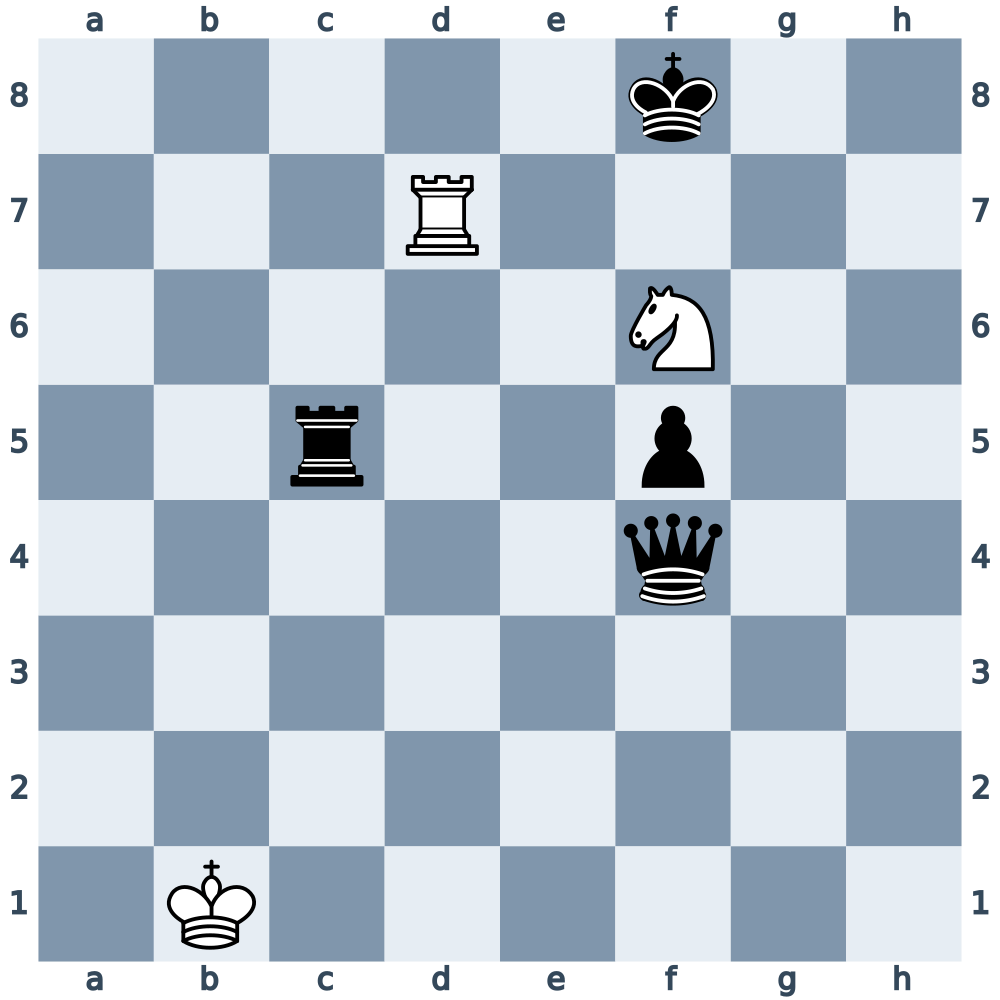
White play 1.Nh7+! A knight’s check cannot be blocked, and no black piece can capture the knight on h7. Black have exactly two legal moves: 1…Ke8 and 1…Kg8.
After 1…Ke8, White play 2.Nf6+. The rook on d7 controls the seventh rank and d8, while the knight checks the king on e8. Black’s only legal reply is 2…Kf8. The starting position has returned, with White to move again.
One complete repetition line is 1.Nh7+ Ke8 2.Nf6+ Kf8 3.Nh7+ Ke8 4.Nf6+ Kf8. The diagram position has now appeared three times: at the start, after 2…Kf8, and after 4…Kf8. White have the move and can correctly claim a draw under the threefold-repetition rule.
What if Black choose the other direction? After 1.Nh7+ Kg8 2.Nf6+, their only legal moves are 2…Kf8 and 2…Kh8. Returning to f8 restores the same checking cycle. Trying 2…Kh8? allows 3.Rh7#: the rook checks along the h-file, the knight protects h7 and controls g8, and the rook covers g7. The king has no escape.
Thus Black cannot escape the repetition without allowing checkmate. White do not need to guess which way the king will go: Nh7+ is answered by a king move to e8 or g8, and Nf6+ either brings the king back to f8 or produces the mating opportunity. In neither checking position can Black capture the knight or interpose another piece.
The checks are the defensive mechanism; they do not themselves announce an automatic draw. Claim correctly when the third occurrence qualifies. If play continues until the same position has occurred five times, the FIDE automatic-repetition rule applies. A draw agreement may also end the game sooner.
Recognize a fortress
A fortress is a defensive arrangement that the stronger side cannot break with correct play. The wrong-bishop rook-pawn ending illustrates how a secure promotion corner can neutralize extra material. In more complicated positions, the defender may need accurate waiting moves and careful protection of entry squares.
A fortress does not automatically stop the game either. Continue defending and observe the draw rules. Do not assume that a large material advantage defeats a fortress, or that a quiet position is a fortress merely because you cannot immediately see a breakthrough.
Practice and a defensive checklist
Return to the diagrams before reading the answers below. In Diagram 2, name every legal Black reply after 1.a5. In Diagram 3, identify what prevents each White king move after the sacrifice. In Diagram 5, which square must White’s king aim to protect, and why can the bishop not control it?
Answers: Diagram 2 permits Kb8, h5 and g4, all followed by stalemate. In Diagram 3, g2 and h2 are covered by the rook, g3 by the f4-pawn, and g4 and h4 by the king; both White pawns remain blocked. In Diagram 5, the target is h1, whose light color does not match the dark-squared bishop.
- Before resigning, check for stalemate sacrifices, repeated checks and exchanges into known drawn endings.
- Before accepting extra material, examine the opponent’s legal moves in the resulting position.
- Separate a position that is drawable with good defense from one in which the rules have already ended the game.
Related lesson: Basic Checkmates for Beginners
For more practice recognizing stalemate opportunities, explore Stalemate! by GM Ulvi Bajarani.
Sources and further reading
FIDE Laws of Chess — Articles 5.2, 6.9 and 9.1 to 9.6
Teaching positions: Azeri Chess Academy lesson “Intermediate move, Underpromotion and Guide to draws,” pages 9–10. The original example numbering is 5, 6, 7 and 8. Diagram 1 is a simple teaching illustration.
Lichess tablebase — explore the seven-piece simplification position
The simplification position and every immediate reply to 1.Nxf4+ were checked with the Lichess endgame tablebase. The stalemate examples and all defensive replies in the perpetual-check example were checked by enumerating legal moves; the escape to h8 was verified to allow checkmate.