You have developed your pieces, castled, and reached a middlegame without an obvious combination. What should you do next? A useful starting point is to find the piece that contributes least to your position and give it a better job.
Piece activity means more than the number of squares a piece attacks. An active piece influences important squares, creates threats, supports other pieces, or restricts the opponent. A rook on an open file with no entry square may achieve less than a knight that stops a dangerous pawn.
The examples below come from my own games. They show how a rook lift, a bishop move, a knight maneuver, and queen centralization can improve coordination. The aim is to understand the purpose of each move, not to assume that the most active-looking move is always best.
How to find your worst placed piece
Before making a positional improvement, check the immediate situation. Are you in check? Is a piece under attack? Does your opponent threaten a fork, a mating attack, or a pawn breakthrough? A useful maneuver can wait if a concrete threat requires an answer.
Then compare your pieces by what they are doing now. Ask what each piece attacks, defends, and prevents. Look for a rook trapped behind its own pieces, a bishop limited by pawns, or a knight far from the important action. Include your queen, but remember that bringing it forward may give your opponent a target.
Do not automatically choose the piece with the fewest legal moves. A quiet bishop may be the only defender of your king. A knight may have few squares because it is performing a valuable blockade. The worst-placed piece is the one whose contribution is least useful relative to the needs of the position.
Once you identify a candidate, name a better job and a realistic destination. For example: “My rook needs access to the c-file,” or “My bishop should control the diagonal leading toward the king.” Then look for a route and check what your opponent can do while you carry it out. You do not need to prove which piece is uniquely worst placed before finding a useful improvement.
Rook activity on useful files and ranks
Ulvi Bajarani–Zaur Mammadov, Azerbaijan Team Championship, 18 December 2008
Rooks need working lines. An open file has no pawns of either color; a semi-open file has no pawn of your own. Both can be useful, but ask where the rook can enter and what it can attack. Sometimes the route to activity runs across a rank rather than straight up a file.
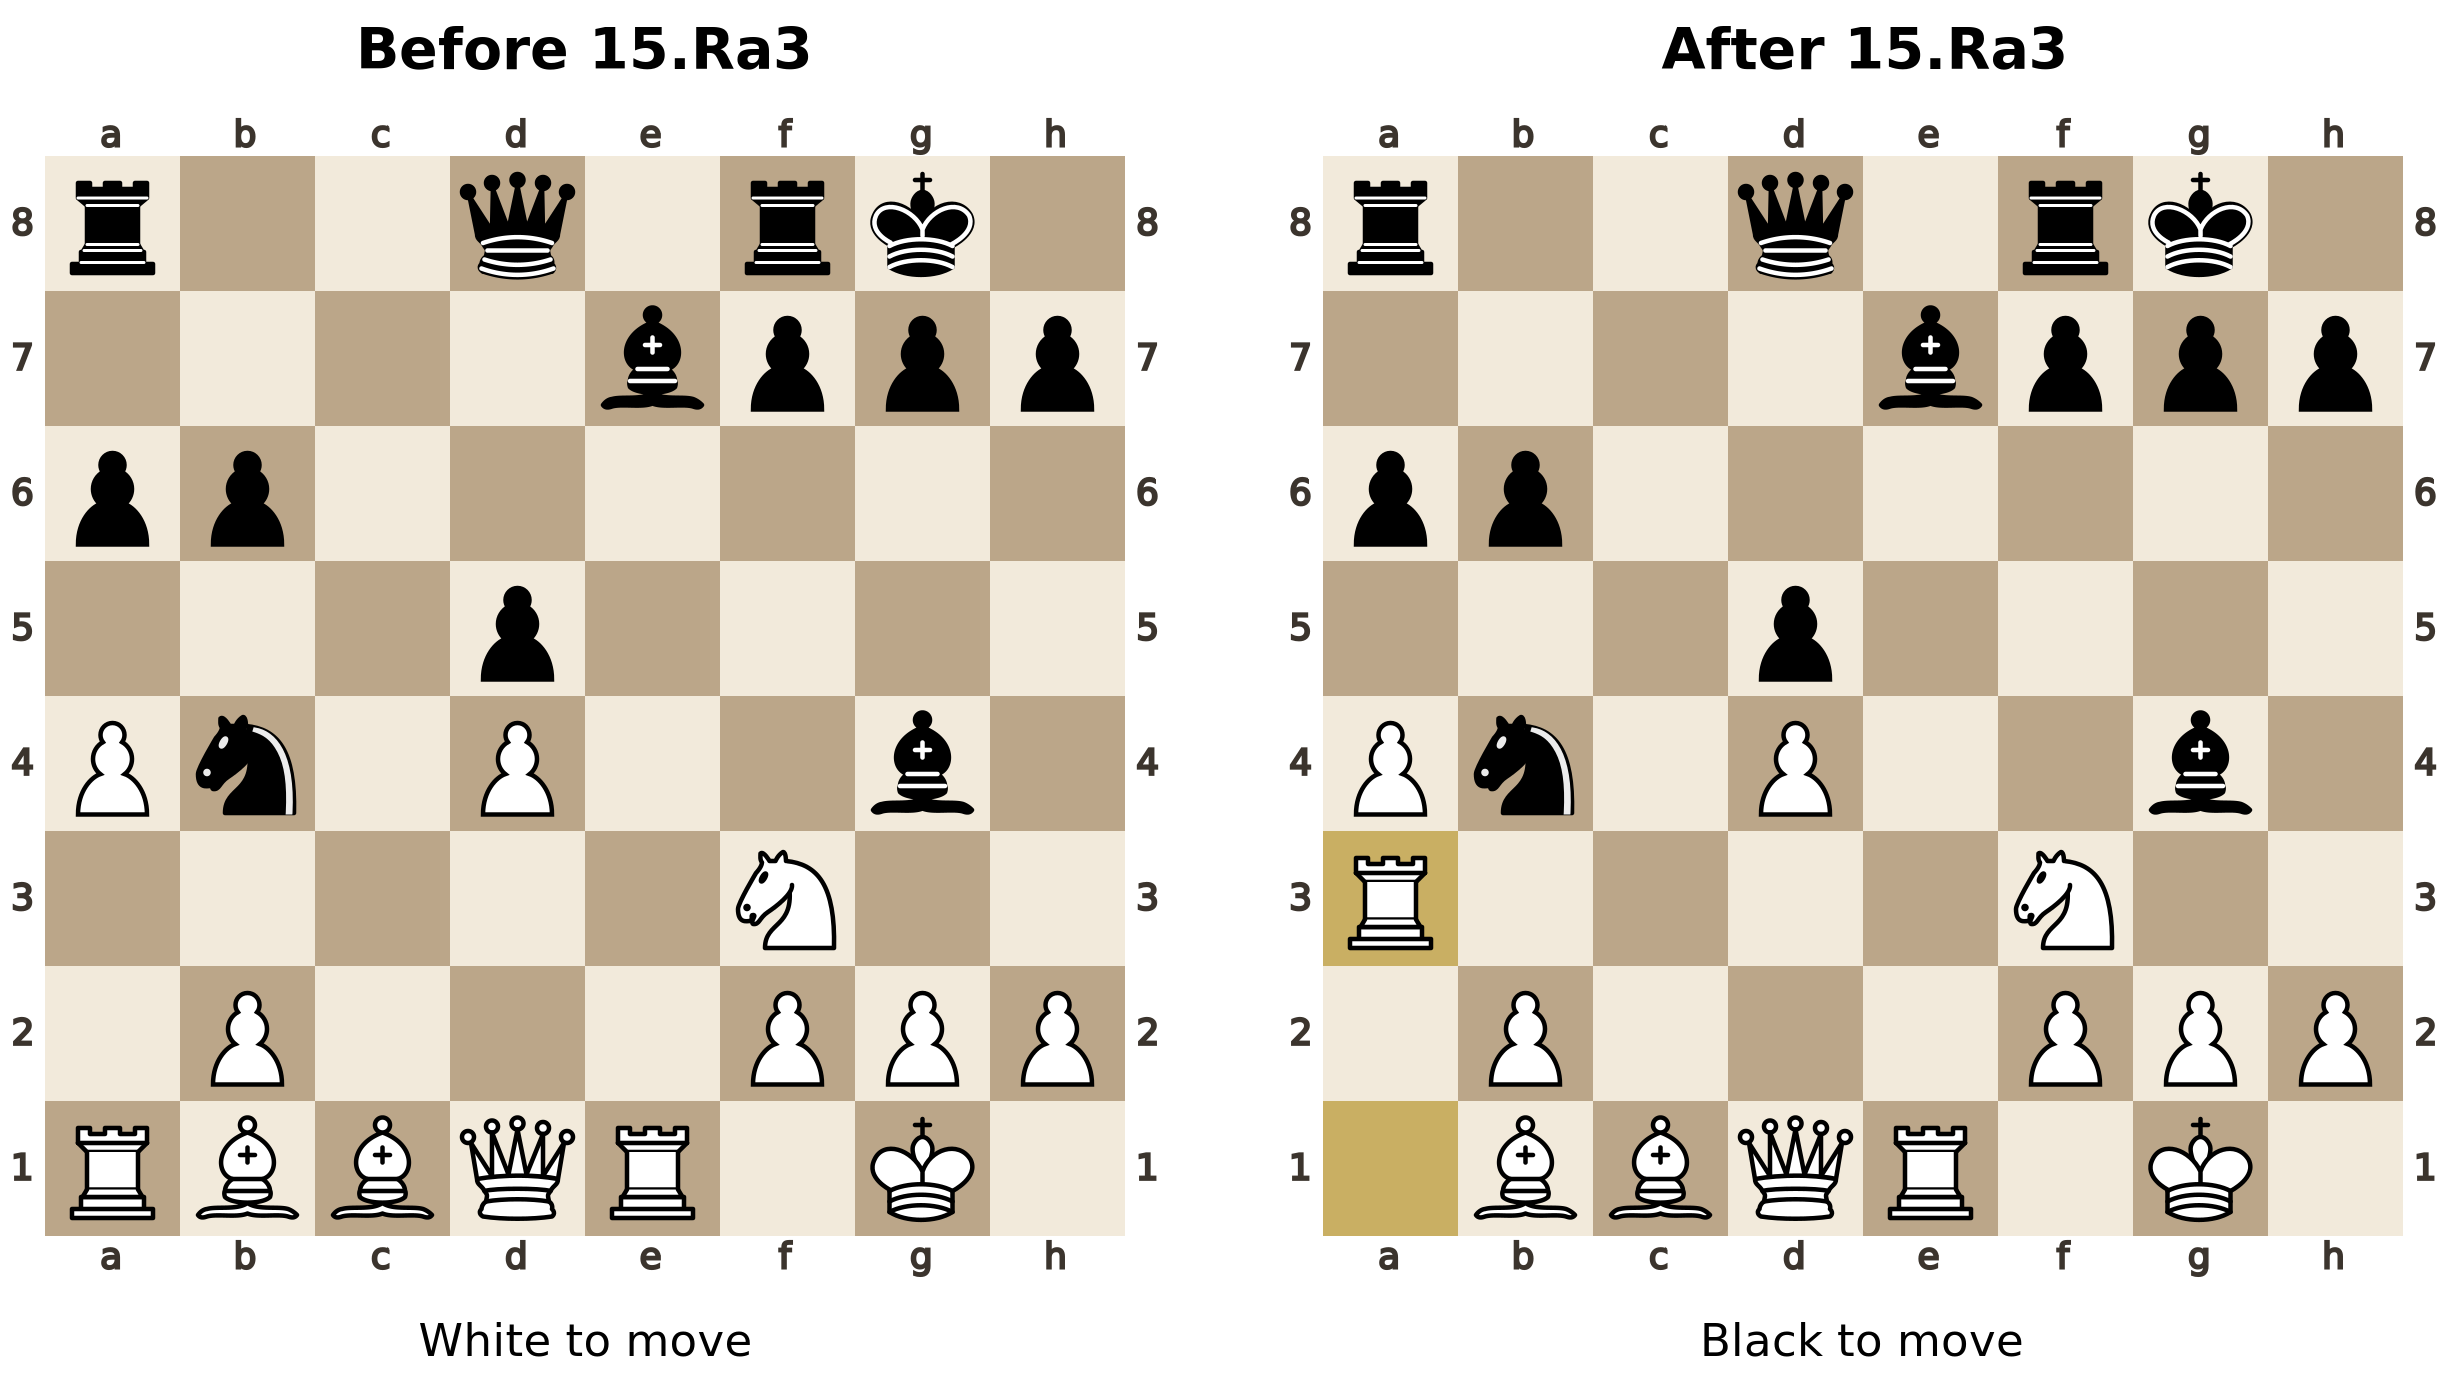
Here the a1-rook has difficulty joining the game along the first rank. White's bishops on b1 and c1 obstruct that route. The a-pawn has already advanced to a4, however, leaving a2 and a3 clear. White use this space with 15.Ra3, a rook lift.
15.Ra3 Rc8 16.Rc3
The rook first reaches the third rank and then moves across to c3. After Black bring their rook to c8, White contest the c-file, place a rook between the c8-rook and the c1-bishop, and create the option of exchanging rooks on c8. The lift gives the a1-rook a concrete role without waiting for the crowded first rank to clear.
The familiar advice to place rooks on the seventh rank for White, or the second rank for Black, has the same underlying purpose: reach vulnerable pawns or restrict the king. No rook has reached those ranks in this example. Here the useful achievement is access to the third rank and then the c-file.
Practical lesson: When a rook cannot use its usual route, look for a safe lift or lateral transfer. Choose the line for its targets and entry squares, not merely because it is open.
Bishop activity on useful diagonals
Mehrdad Sedaghati–Ulvi Bajarani, 10th Avicenna International Open, 29 July 2011
Bishops thrive on open diagonals, especially when those diagonals lead to something important. Count useful influence rather than empty squares. A bishop may improve by moving to another diagonal, or by a carefully prepared pawn move that opens its current line.
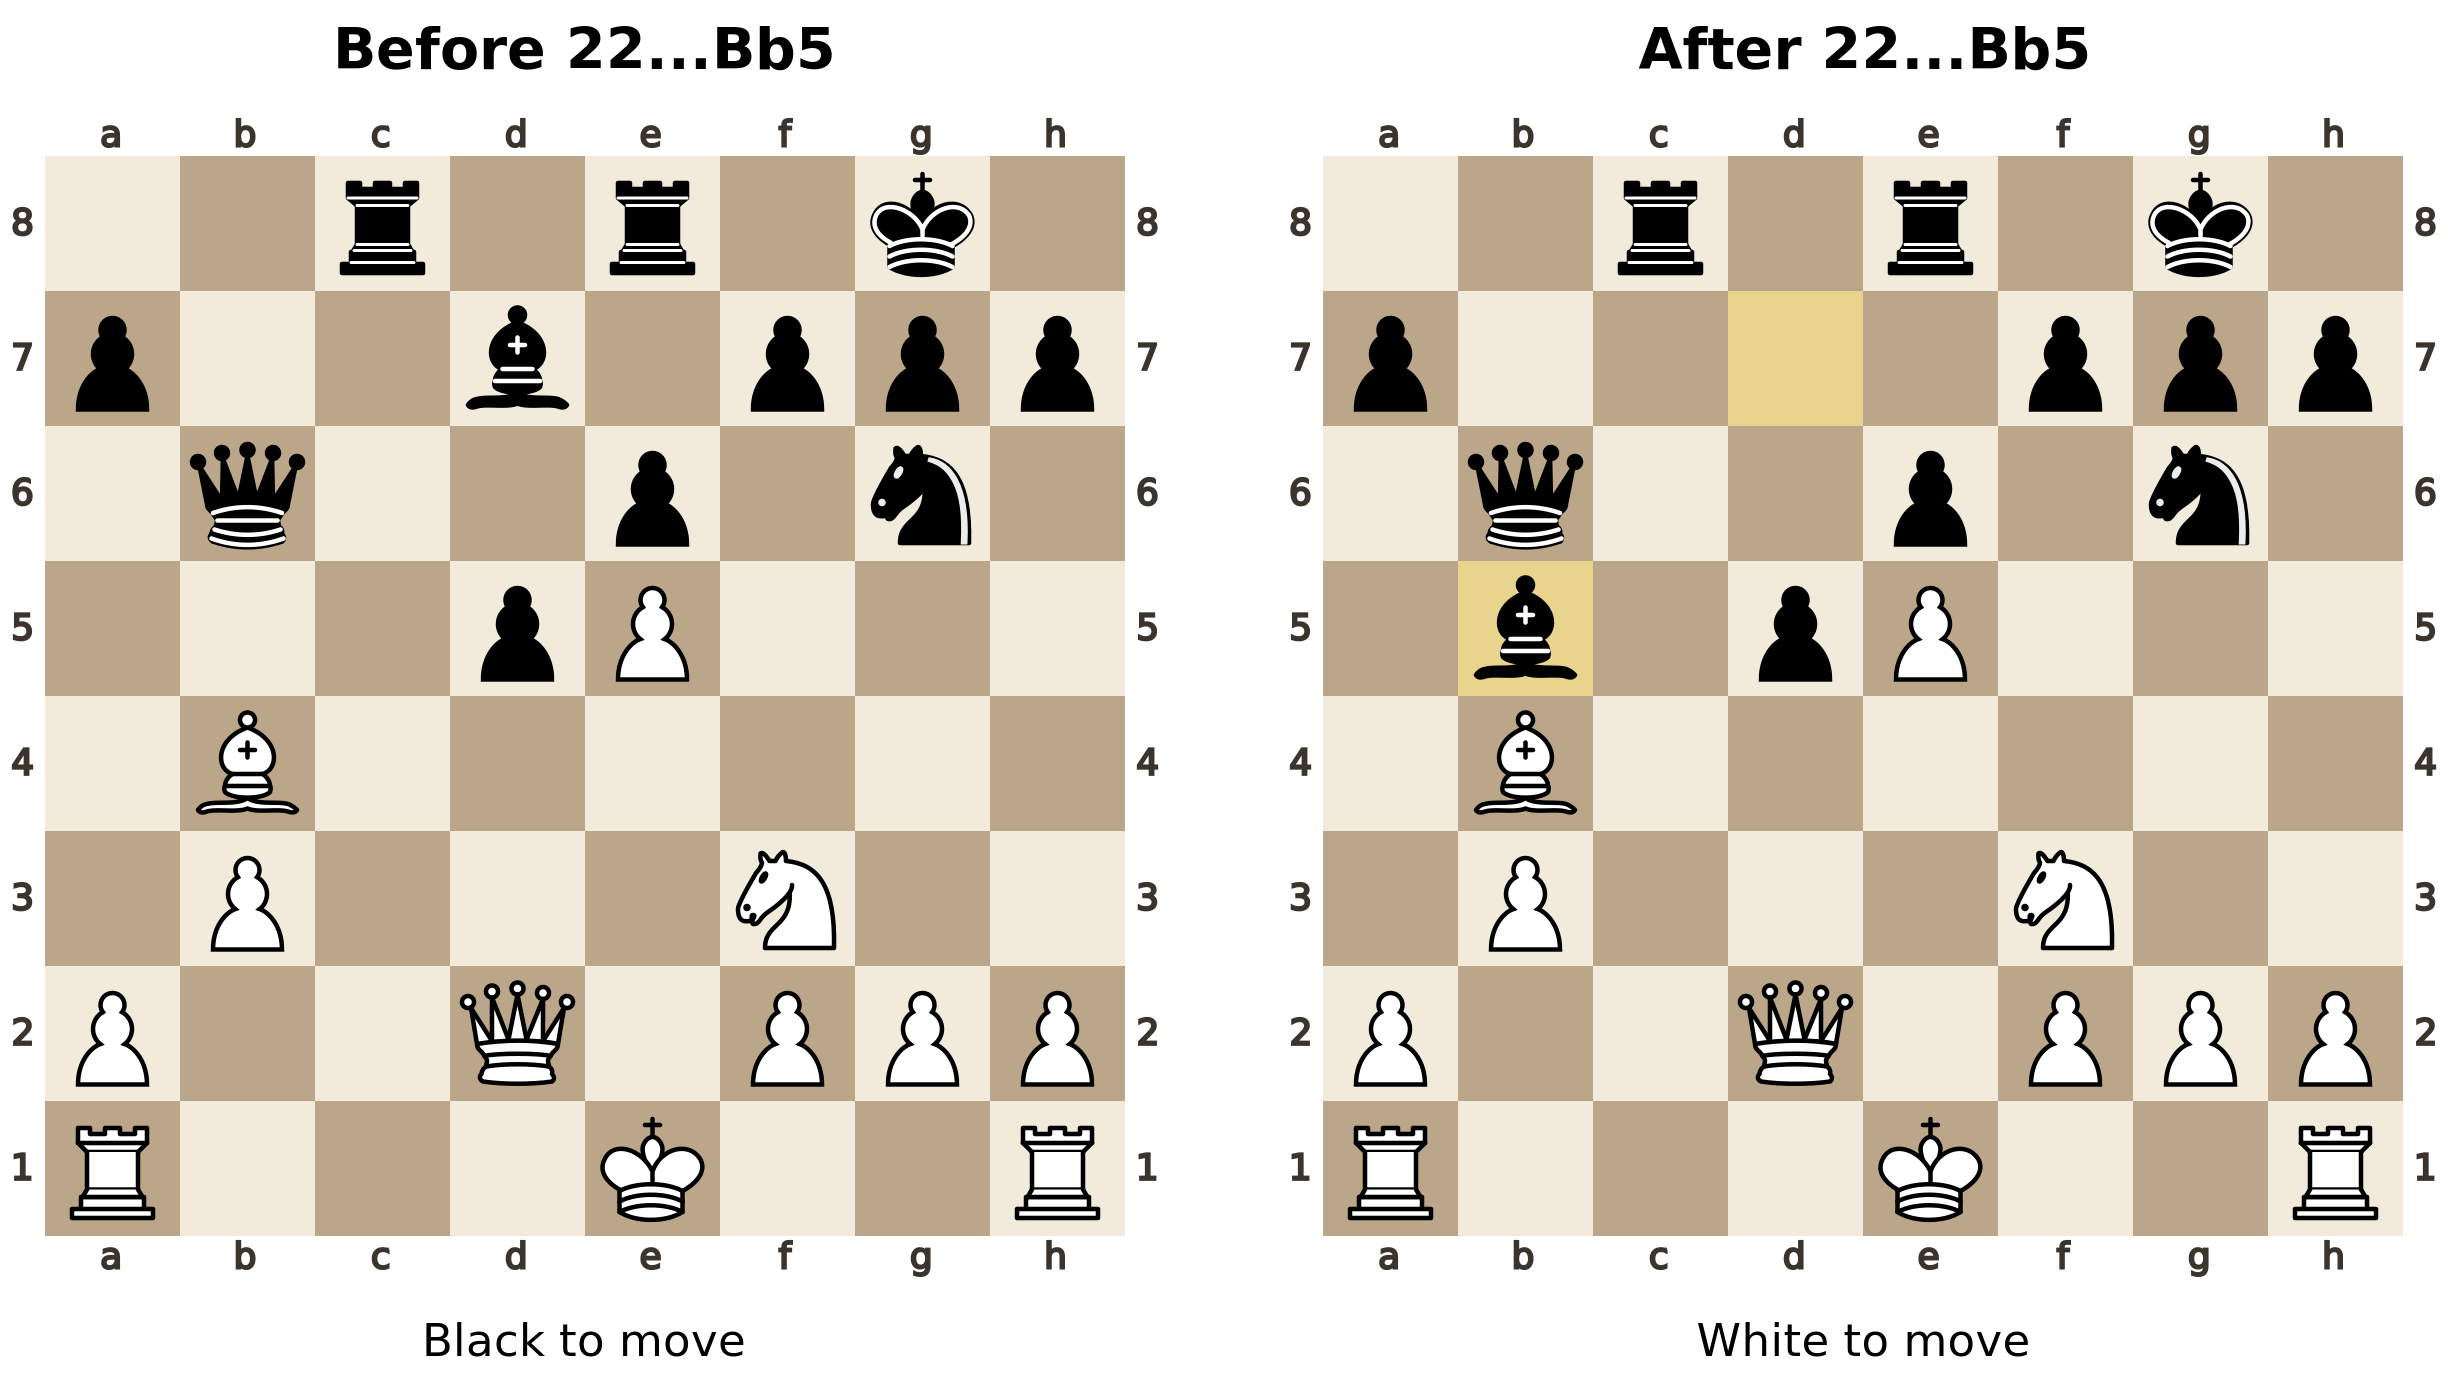
Before 22…Bb5, Black's bishop is on d7. Its own rook on c8 and pawn on e6 limit two of its directions. Moving to b5 opens the clear diagonal through c4, d3, and e2 to f1.
The important square is f1. White's king is still on e1, and the bishop now attacks a square the king would have to cross when castling kingside. White therefore cannot castle kingside in the resulting position. The bishop's activity has a practical effect even though the move does not capture anything.
This is a useful way to evaluate a bishop move: what does the new diagonal prevent or make possible? Pressure against a king, control of an entry square, and support for a pawn advance can matter more than an immediate attack on material.
Be careful when opening a diagonal by moving a pawn. The same pawn may be sheltering your king or controlling a square your opponent needs. Compare what both sides gain before you release it.
Practical lesson: Find a useful diagonal, then decide whether to move the bishop or change the pawn structure. An open line is valuable because of what lies along it.
Knight activity and purposeful routes
Farid Namazov–Ulvi Bajarani, 2nd Maccabi Cup, Baku, 20 April 2007
Knights often need several moves to reach useful squares. Central squares usually offer more options, but the destination must fit the position. A knight may need to blockade a pawn, attack a weakness, or support another piece. Check whether an enemy pawn can drive it away and whether the route costs too much time.
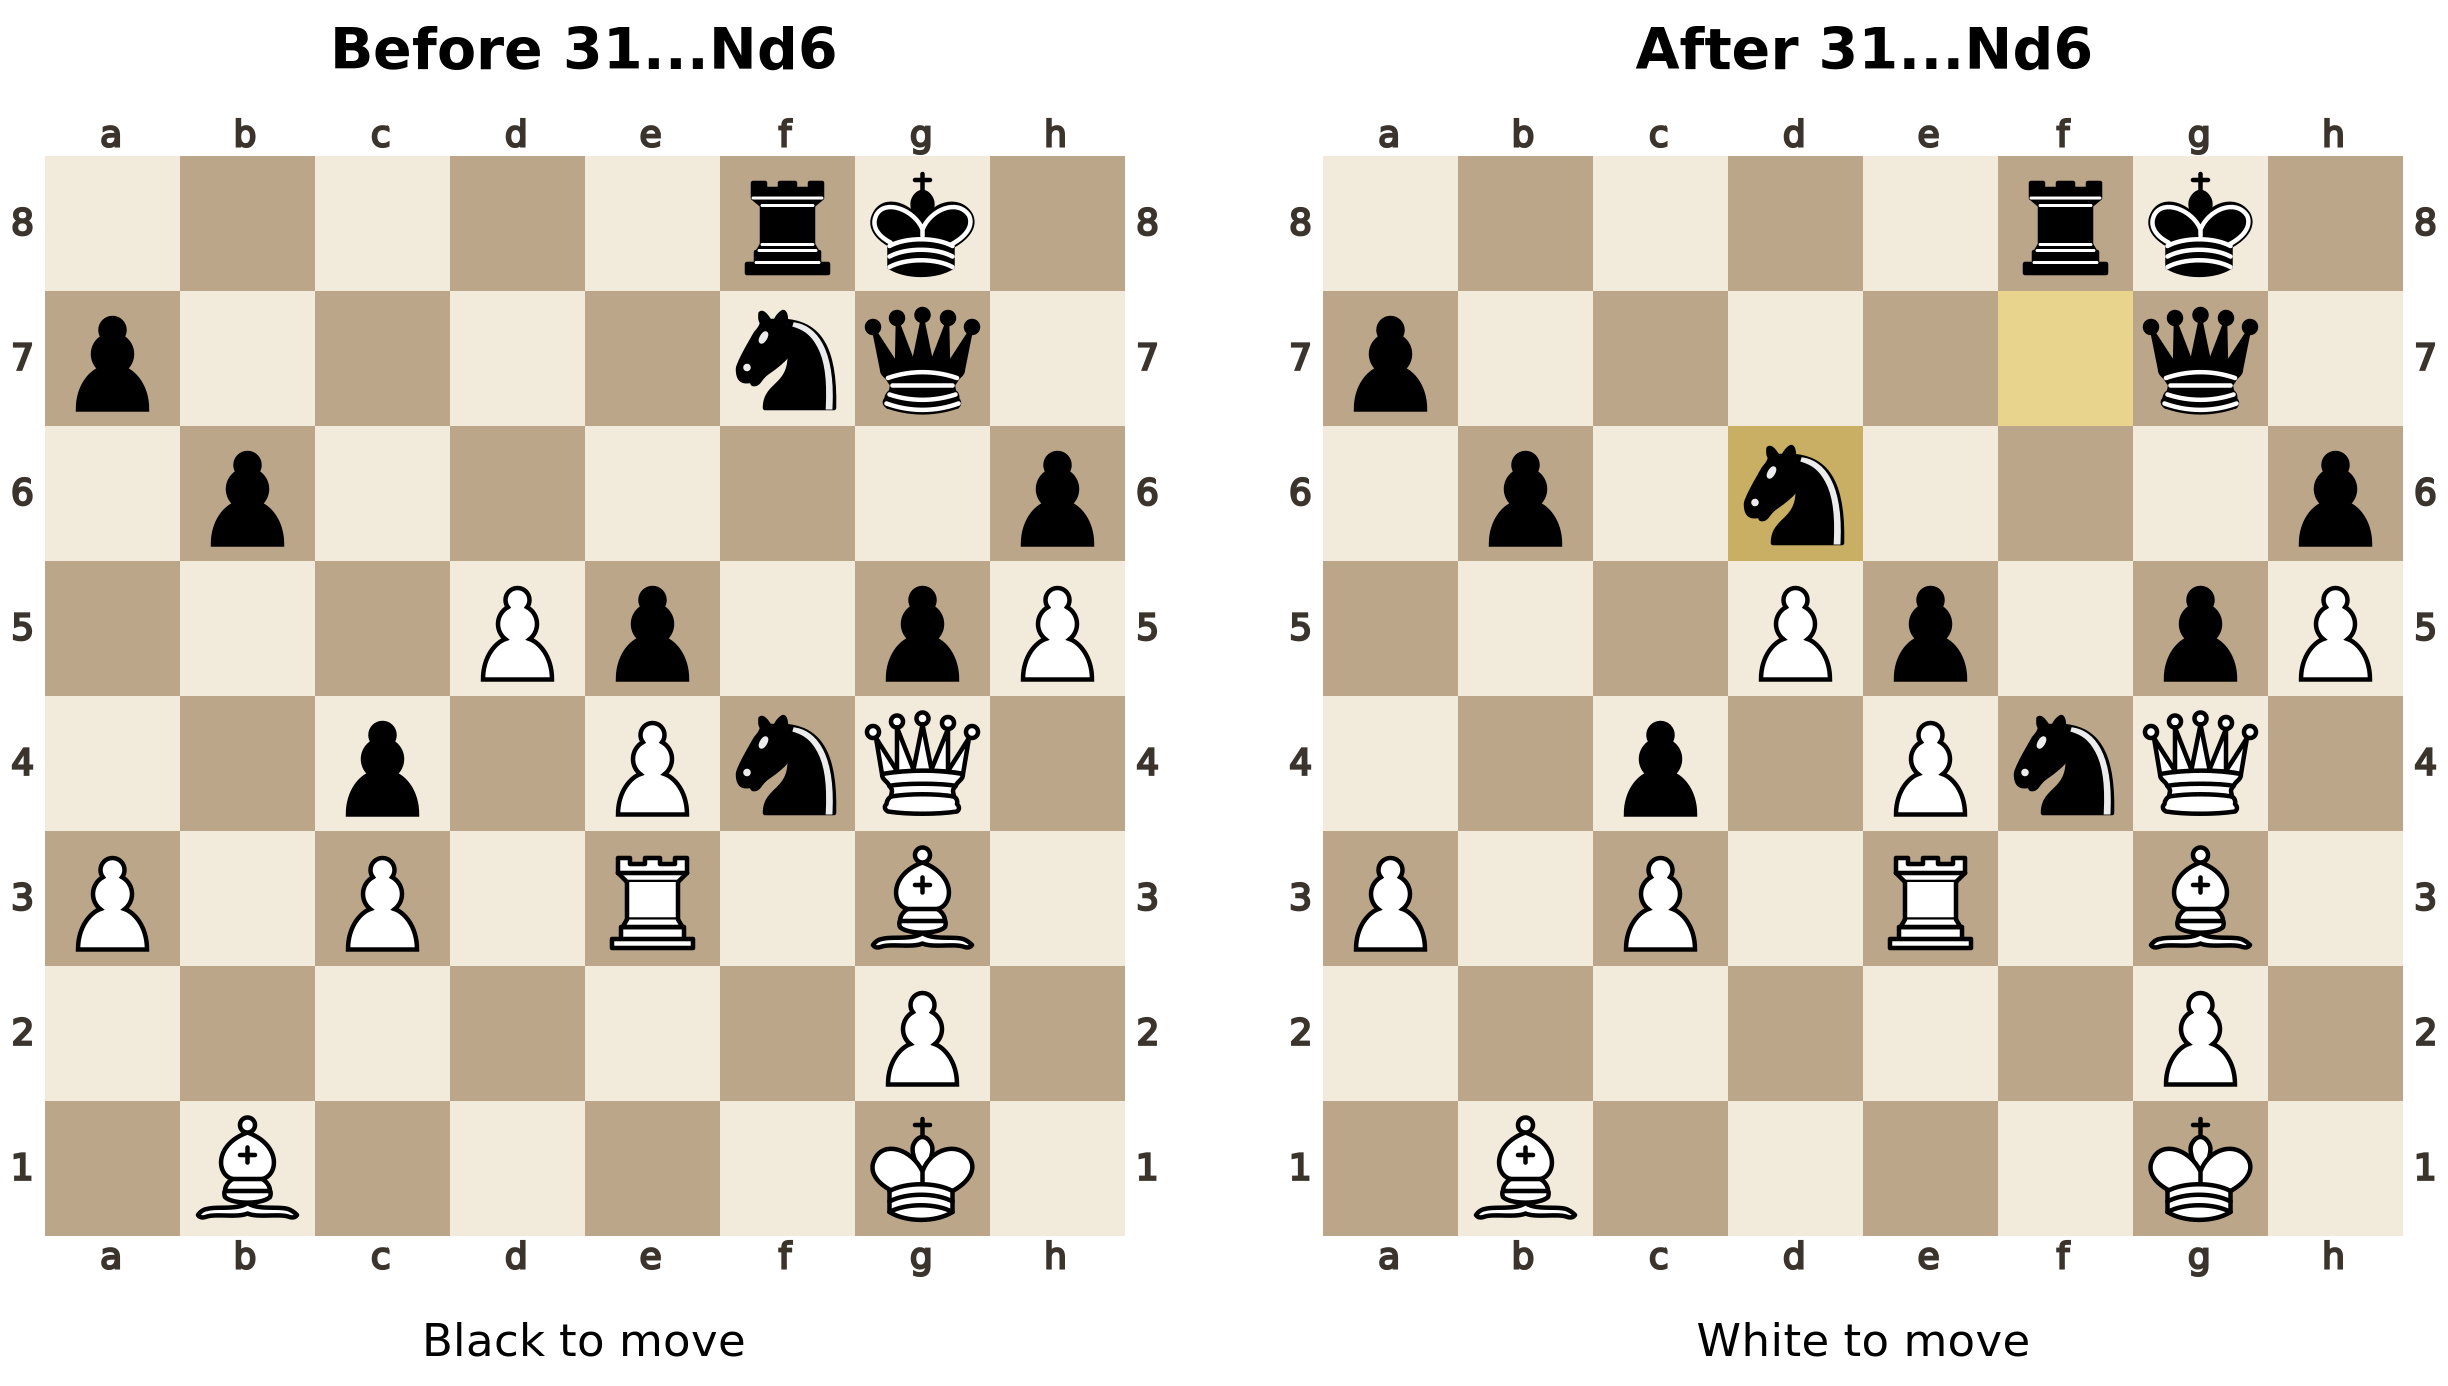
In the left-hand diagram, after 31.h5, Black's knights are on f7 and f4. With 31…Nd6, the f7-knight moves to d6. It stands directly in front of White's d5-pawn and prevents that pawn from advancing. The f4-knight stays where it is. The right-hand diagram therefore has black knights on d6 and f4.
Practical lesson: Choose a useful and sufficiently secure destination before calculating the route. Recheck the plan after each reply; a maneuver is not a sequence your opponent must allow.
Safe queen centralization
Ulvi Bajarani–Jan Musialkiewicz, European Under 14 Championship, Herceg Novi, 18 September 2008
A queen can influence both sides of the board from the center and can be dangerous near the opposing king. However, it is also a valuable target. Before centralizing it, check attacks by pawns and minor pieces, possible discoveries, and whether another piece is being left undefended.
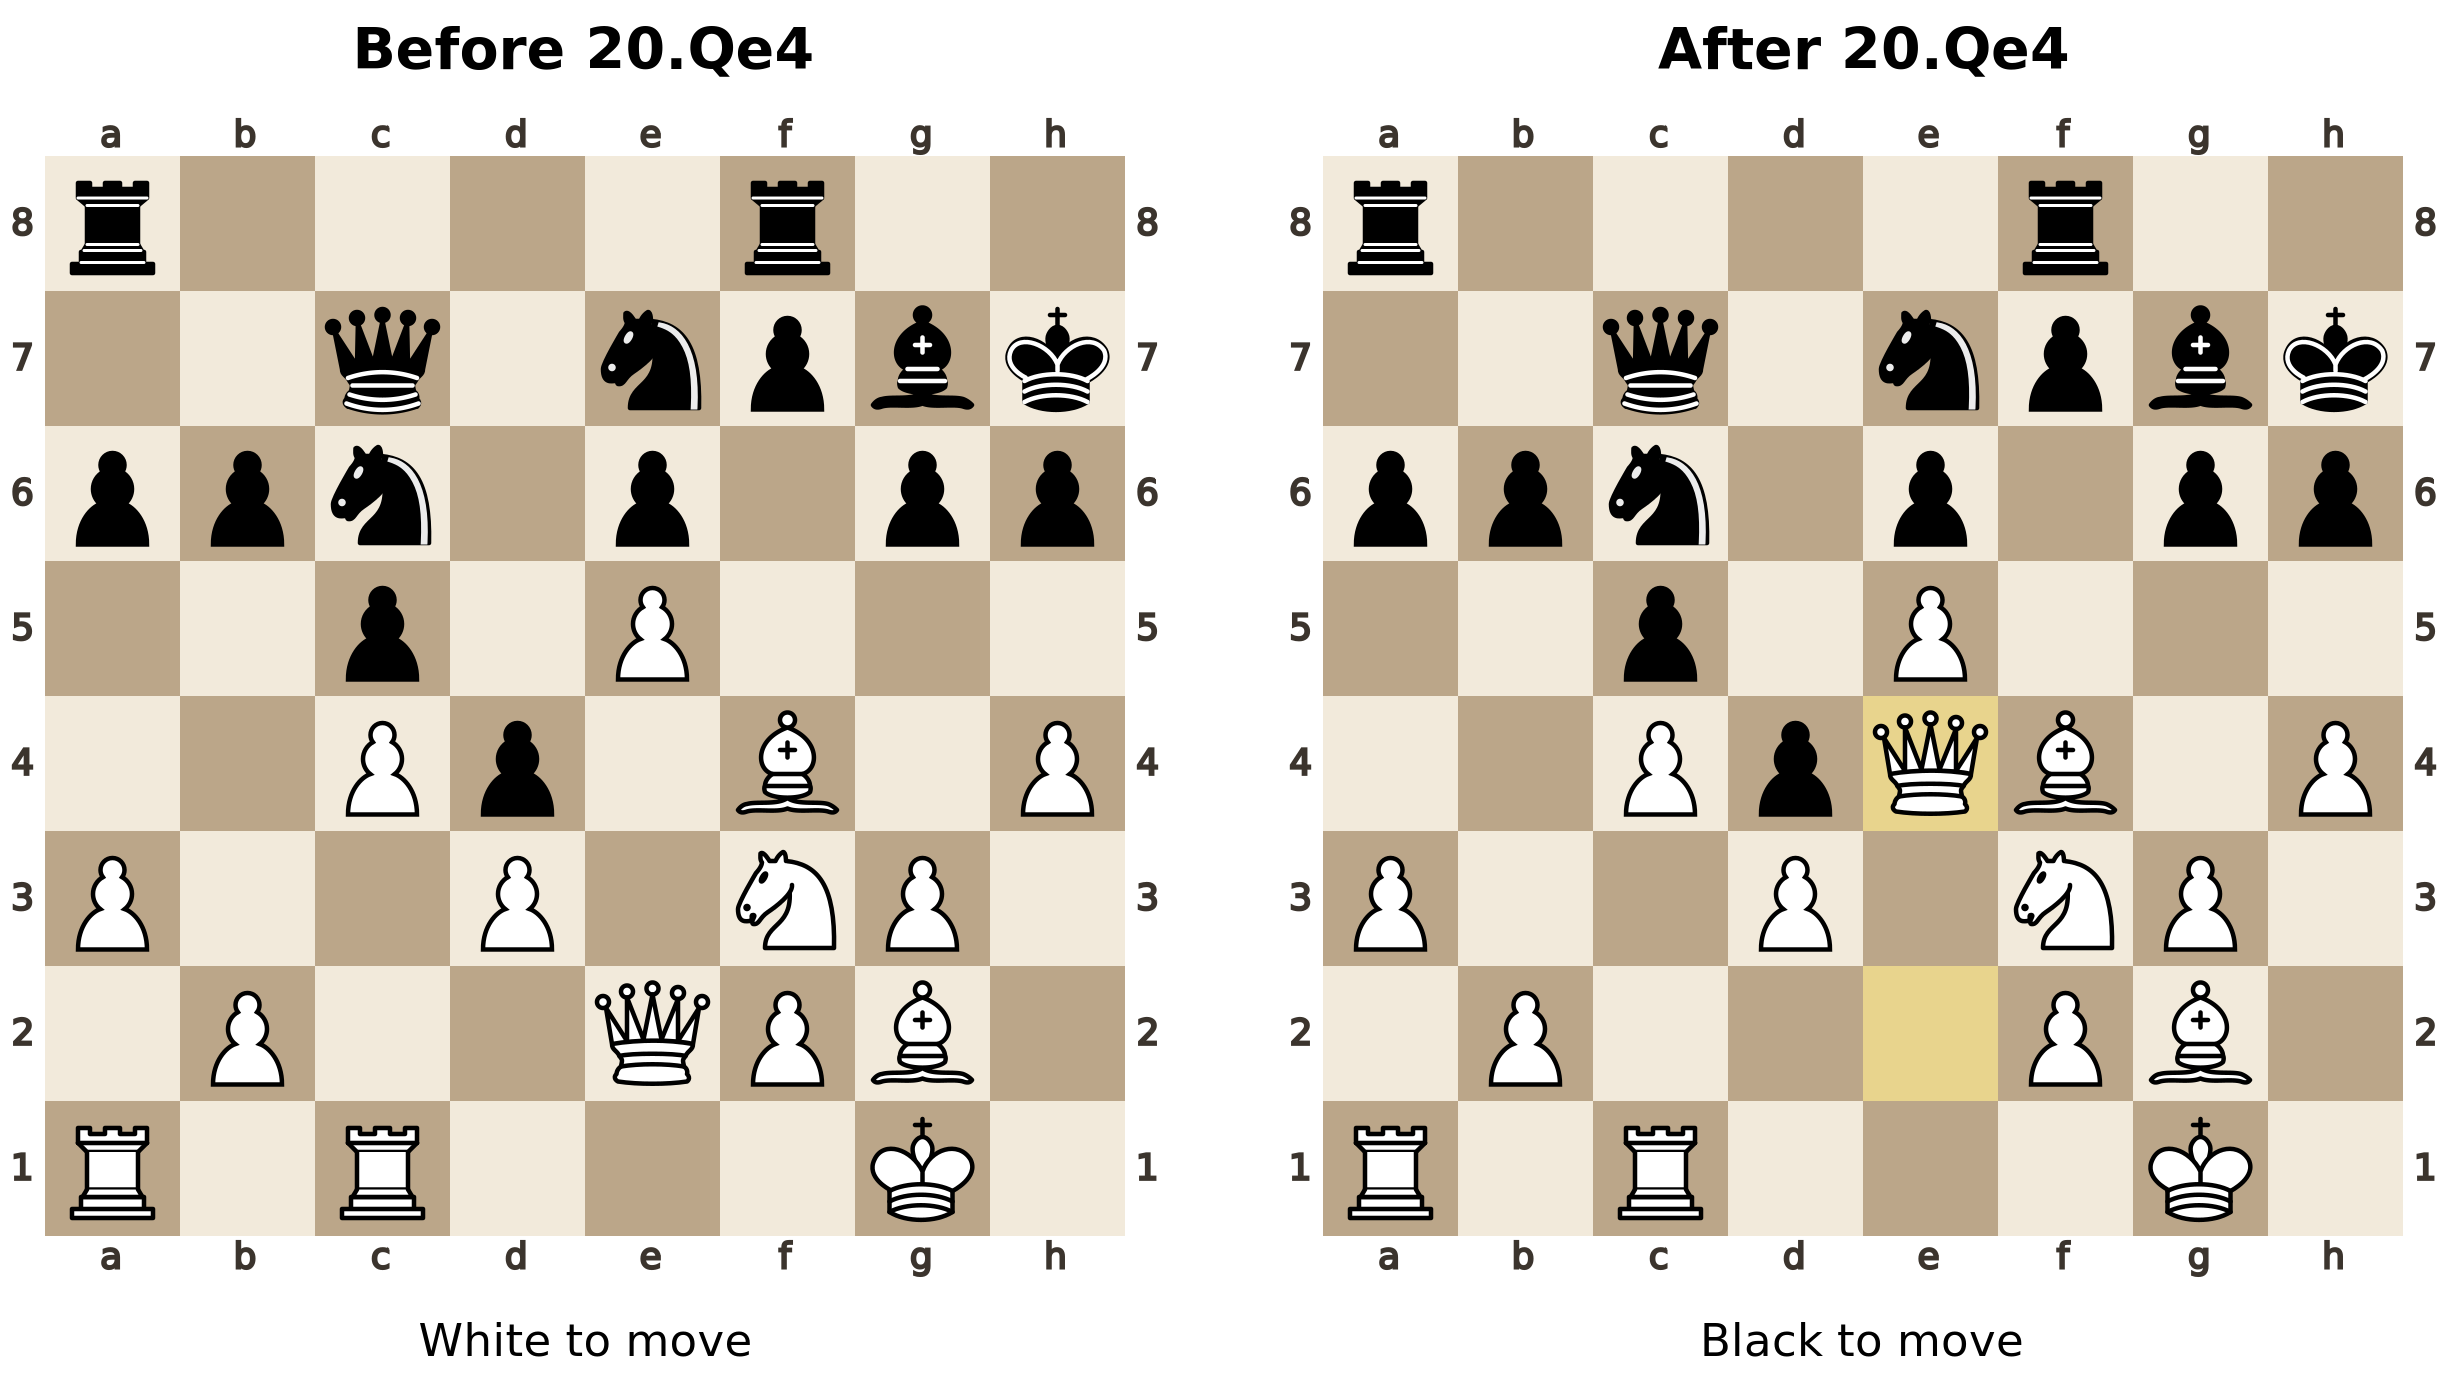
After 19…Nbc6, White play 20.Qe4, bringing the queen from e2 to e4. From e4, the queen attacks both the c6-knight and the g6-pawn near Black’s king. Both targets are defended. The improvement is greater influence from a central square, rather than an immediate material gain.
The game continued 20…Na5 21.Rab1 Nb3 22.Re1. Black also had active plans, and White continued improving the rooks rather than treating queen centralization as the end of the job. Activity belongs to the whole position, not to one impressive-looking piece.
Do not turn this example into a rule to bring the queen out early. If the opponent can gain useful developing moves by attacking it, a quieter square may be better. The central queen should support your play without becoming an easy target.
Practical lesson: Centralize the queen when the square is safe enough and its lines serve a purpose. Check the opponent's forcing replies before admiring the queen's range.
A practical thinking checklist
When you have no urgent tactical problem and need a plan, use these questions:
- What is my opponent threatening? Check immediate threats before spending time on a maneuver.
- Which piece contributes least? Compare its attacking, defensive, and restricting duties.
- What job should it do? Name a target, a useful line, a blockade, or a square to control.
- Where can it do that job? Choose a destination that is useful and realistically accessible.
- What happens on the way? Check checks, captures, threats, and the duties the piece leaves behind.
- Does the plan still fit after the reply? Continue the route only if the position still justifies it.
Avoid improving a piece mechanically. Sometimes the right move is a pawn break that gives several pieces scope. Sometimes it is an exchange that removes a strong enemy piece. And sometimes your apparently passive piece must remain where it is because its defensive task is essential.
Train the habit in your own games
After a game, choose one quiet middlegame position before turning on an engine. Write down your least useful piece, a better job for it, and a candidate route. Then give your opponent an active reply. Does your plan still work?
Return to the examples in this article and look only at each before-position, hiding the after-position and continuation. Describe the restriction before looking at the move: a crowded first rank, a limited bishop diagonal, a knight needing a blockade square, or a queen with room to centralize. Understanding that restriction makes the improvement easier to find.
The habit to build is simple: when the position allows it, give an underused piece a useful job. You will find more purposeful moves when you connect the piece, its destination, and the needs of the whole position.
Games and annotations by GM Ulvi Bajarani.