
By GM Ulvi Bajarani, Founder and Head Coach of Azeri Chess Academy.
A tactical combination becomes easier to understand when you can identify what makes it work. Is a defender pinned? Can a queen be drawn onto a fork square? Is one of your own pieces blocking a mating line?
This guide explains twelve tactical ideas through selected examples. The aim is to understand the relationships between the pieces, not simply memorize the names. Before reading each solution, examine the diagram and try to find the idea yourself.
What are tactics in chess
Tactics are concrete moves or short sequences that exploit the immediate relationships between pieces to achieve a specific objective. That objective may be winning material, delivering checkmate, promoting a pawn, or avoiding a loss. Tactical play depends on accurate calculation of the opponent’s replies. A tactical motif is a recurring idea, such as a pin or a double attack, that helps explain why a move or combination works.
Notation: K = king, Q = queen, R = rook, B = bishop, N = knight; x means capture, + means check and # means checkmate. A pawn promotion is written, for example, d8=Q. An exclamation mark identifies a strong move.
#1 — Double attack
A double attack creates two or more threats at the same time. A familiar form is a fork, in which one piece attacks multiple enemy pieces, but a double attack may also combine a mating threat with an attack on material.
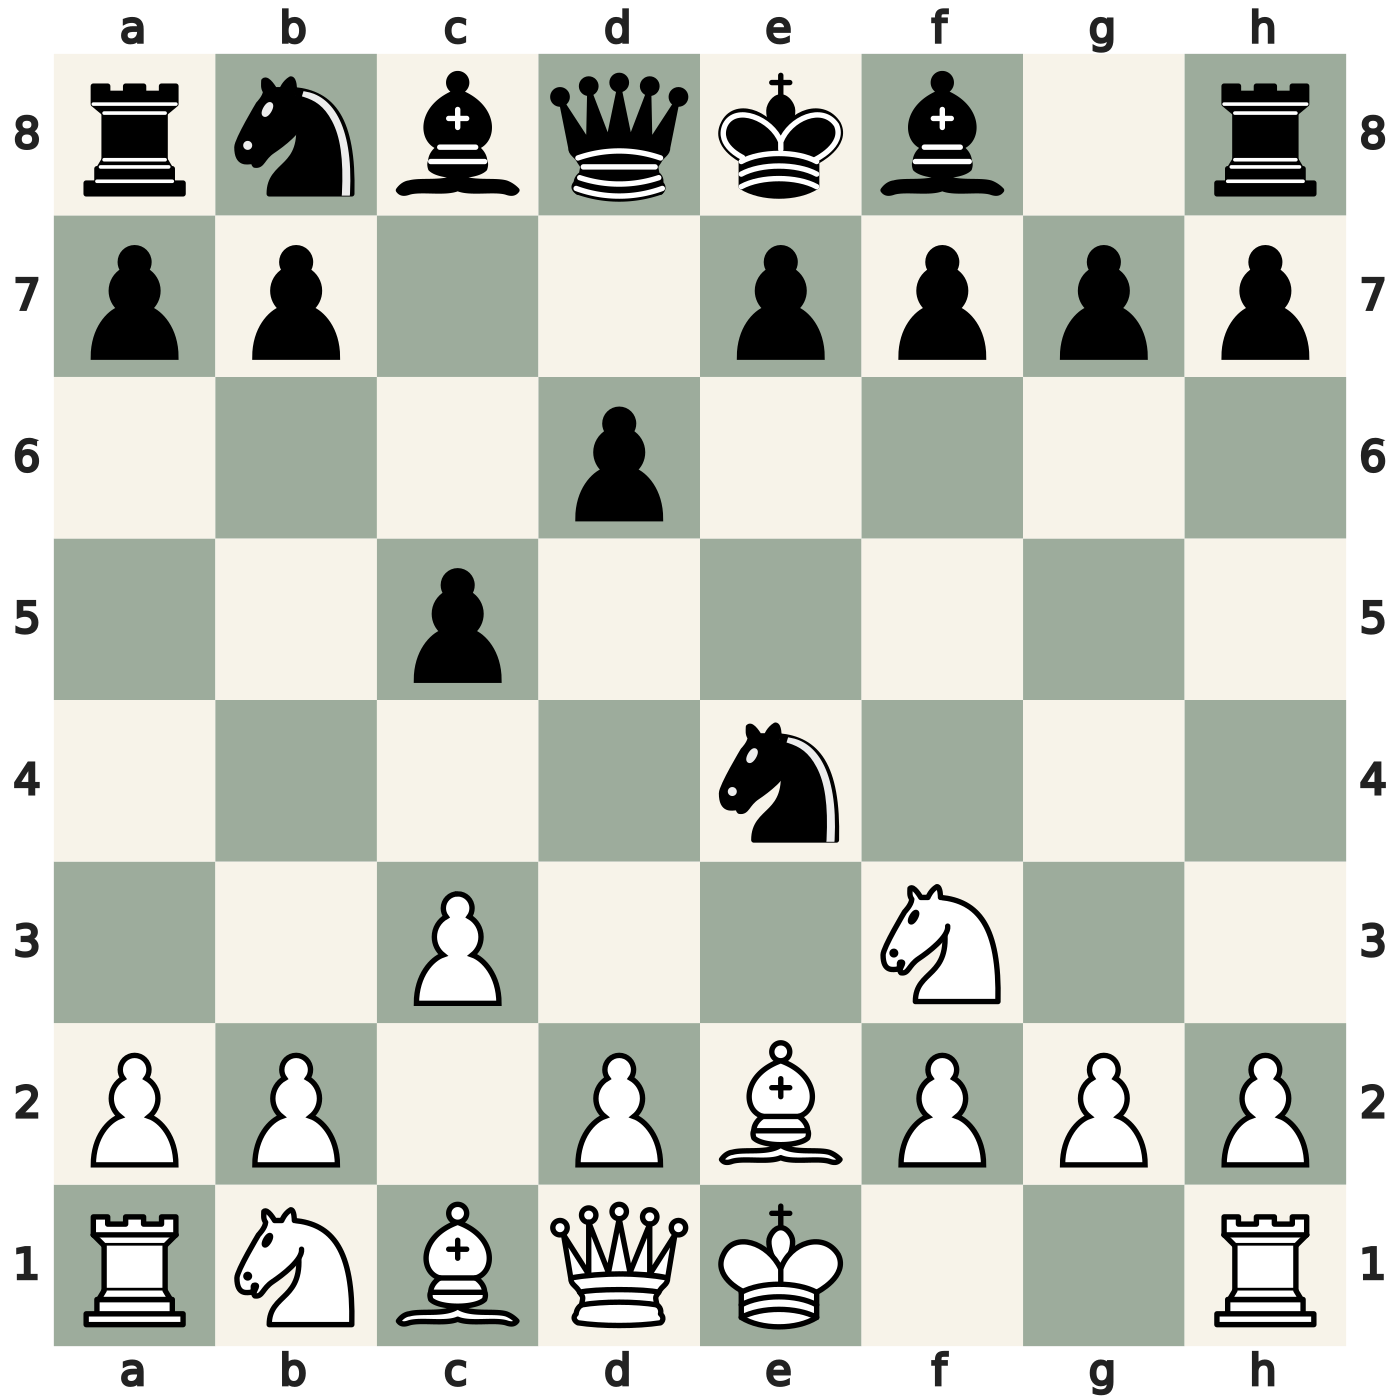
5. Qa4+! Bd7 6. Qxe4
The position arises after 1.e4 c5 2.Nf3 d6 3.c3 Nf6 4.Be2 Nxe4? White play 5.Qa4+!, checking along the a4–e8 diagonal and attacking the unprotected knight on e4 along the fourth rank. Black must answer the check. After the illustrative reply 5…Bd7, 6.Qxe4 wins the knight. Two targets are attacked by one queen move.
What to look for: Loose pieces and an exposed king. Look for a square from which one piece can attack both targets. Verify the route and the opponent’s forcing replies.
Sicilian Defence instructional example.
#2 — Pinning
A pin restricts a piece because moving it would expose another target on the same rank, file or diagonal. Bishops, rooks and queens create pins. In an absolute pin, the target behind the pinned piece is the king, so a move exposing that king is illegal. In a relative pin, moving is legal, but may lose material or allow another threat.

32. Rxh7+! Kxh7 33. Qh6#
The queen on f6 pins the g7-rook to the king on h8. White therefore play Rxh7+: the tempting …Rxh7 is illegal because it would expose the king on the f6–h8 diagonal. After …Kxh7, Qh6 is mate; the g5-pawn protects the queen. The combination uses the absolute pin to decoy the king onto h7.
What to look for: Look for two enemy pieces on the same rank, file or diagonal: can a bishop, rook or queen move onto that line to pin the nearer piece? For an existing pin, identify all three aligned pieces: the attacking piece of one color, followed by the pinned piece and the target behind it, both of the opposite color. Then check whether the pinned piece can legally perform its defensive task.
Karl Pitschel–Adolf Anderssen, Leipzig, 1851.
A pin does not have to win material immediately. It may make a defender ineffective, allow an invasion, or support a mating attack. Always check whether the pinned piece can legally perform the defensive task you are counting on.
#3 — Skewer
In this guide, a skewer checks a king that stands in front of another target on the same rank, file or diagonal. If the king moves off that line, the target behind it is exposed. Some books use the term more broadly for an attack on a more valuable piece in front of a less valuable one; here, we focus on king skewers.

49… Rd8+! 50. Ke3 Rxd1
Black bring the rook to the d-file with check. The white king on d2 stands in front of the bishop on d1. In the game continuation, the king moves to e3 and Black capture the bishop. Unlike an absolute pin, the king is the front target, not the piece behind it. As with any check, examine all legal responses: moving the king is not automatically the only defense to a single check.
What to look for: Look for pieces aligned on the same rank, file or diagonal with a king. Can a bishop, rook or queen check the king along that line and expose the target behind it? Calculate the legal replies to the check.
Sarhan Guliev–Vasilios Kotronias, European Team Championship, Pula, 1997.
#4 — Discovered attack, discovered check and double check
Discovered attack
A discovered attack occurs when moving one piece or pawn opens a line of attack for a bishop, rook or queen behind it.
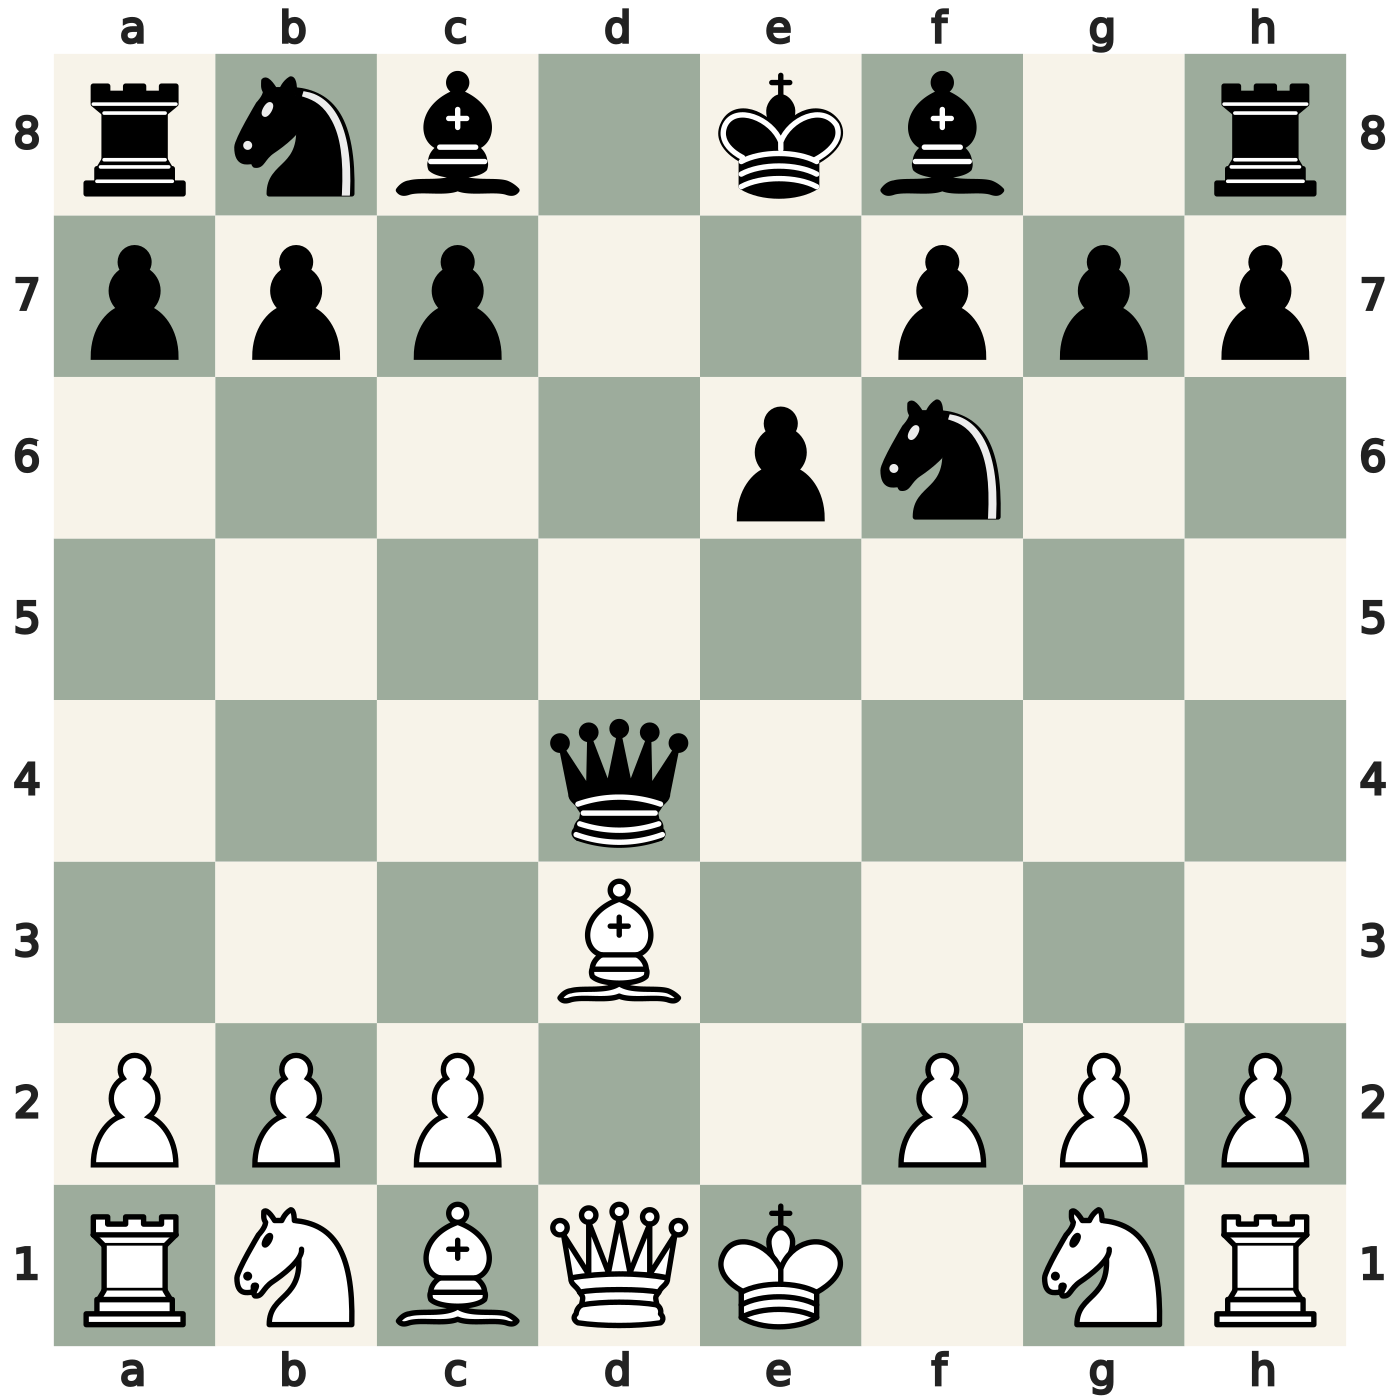
6. Bb5+! c6 7. Qxd4
After 1.e4 e6 2.d4 d5 3.Bd3 dxe4 4.Bxe4 Nf6 5.Bd3 Qxd4?, White have 6.Bb5+! The bishop leaves d3 with check, opening the d-file for the queen on d1 to attack the black queen on d4. After the illustrative reply 6…c6, White take the queen. If Black interpose their queen with 6…Qd7, 7.Bxd7+ instead wins the queen for a bishop. Here the moving bishop gives check; the uncovered queen attacks material. That makes this a discovered attack, but not a discovered check.
What to look for: Look for two relevant pieces on the same rank, file or diagonal as a possible setup, and three aligned pieces when a discovered-attack arrangement already exists: two attacking-side units of the same color (the bishop, rook or queen behind and the covering piece or pawn in front), and a target of the opposite color. Ask whether moving the covering unit can uncover an attack and create another threat at the same time.
French Defence instructional example.
Discovered check
A discovered check is a discovered attack against the king: the piece uncovered by another piece’s move gives check.

41. Kd4+! Re5 42. Rxe5+ fxe5+
The white king moves from e3 to d4, uncovering the rook’s check along the e-file while attacking the rook on c5. The check comes from the rook, not the king. A king retreat such as 41…Kd7 allows 42.Kxc5. Black can instead meet both threats with 41…Re5, in this continuation; after 42.Rxe5+ fxe5+, the rooks are exchanged. This is why we calculate the opponent’s strongest defense rather than assume that a discovered check always wins a piece.
Mitrovic–Ziger, Novi Sad, 1989; position after 40.Rxe2 Rxc5.
Double check
In a double check, two pieces give check to the king at the same time. It involves a discovered check: a move uncovers a line of attack against the king. In the usual form, the moving piece also gives check. An en passant capture can exceptionally uncover two checking lines at once, even though the capturing pawn does not itself give check. The response to a double check must be a king move.
In standard algebraic notation, a double check is written with a single +. Some books use ++ to distinguish double check; this article uses + consistently. A king move is necessary, although the king may sometimes escape by capturing one of the checking pieces.
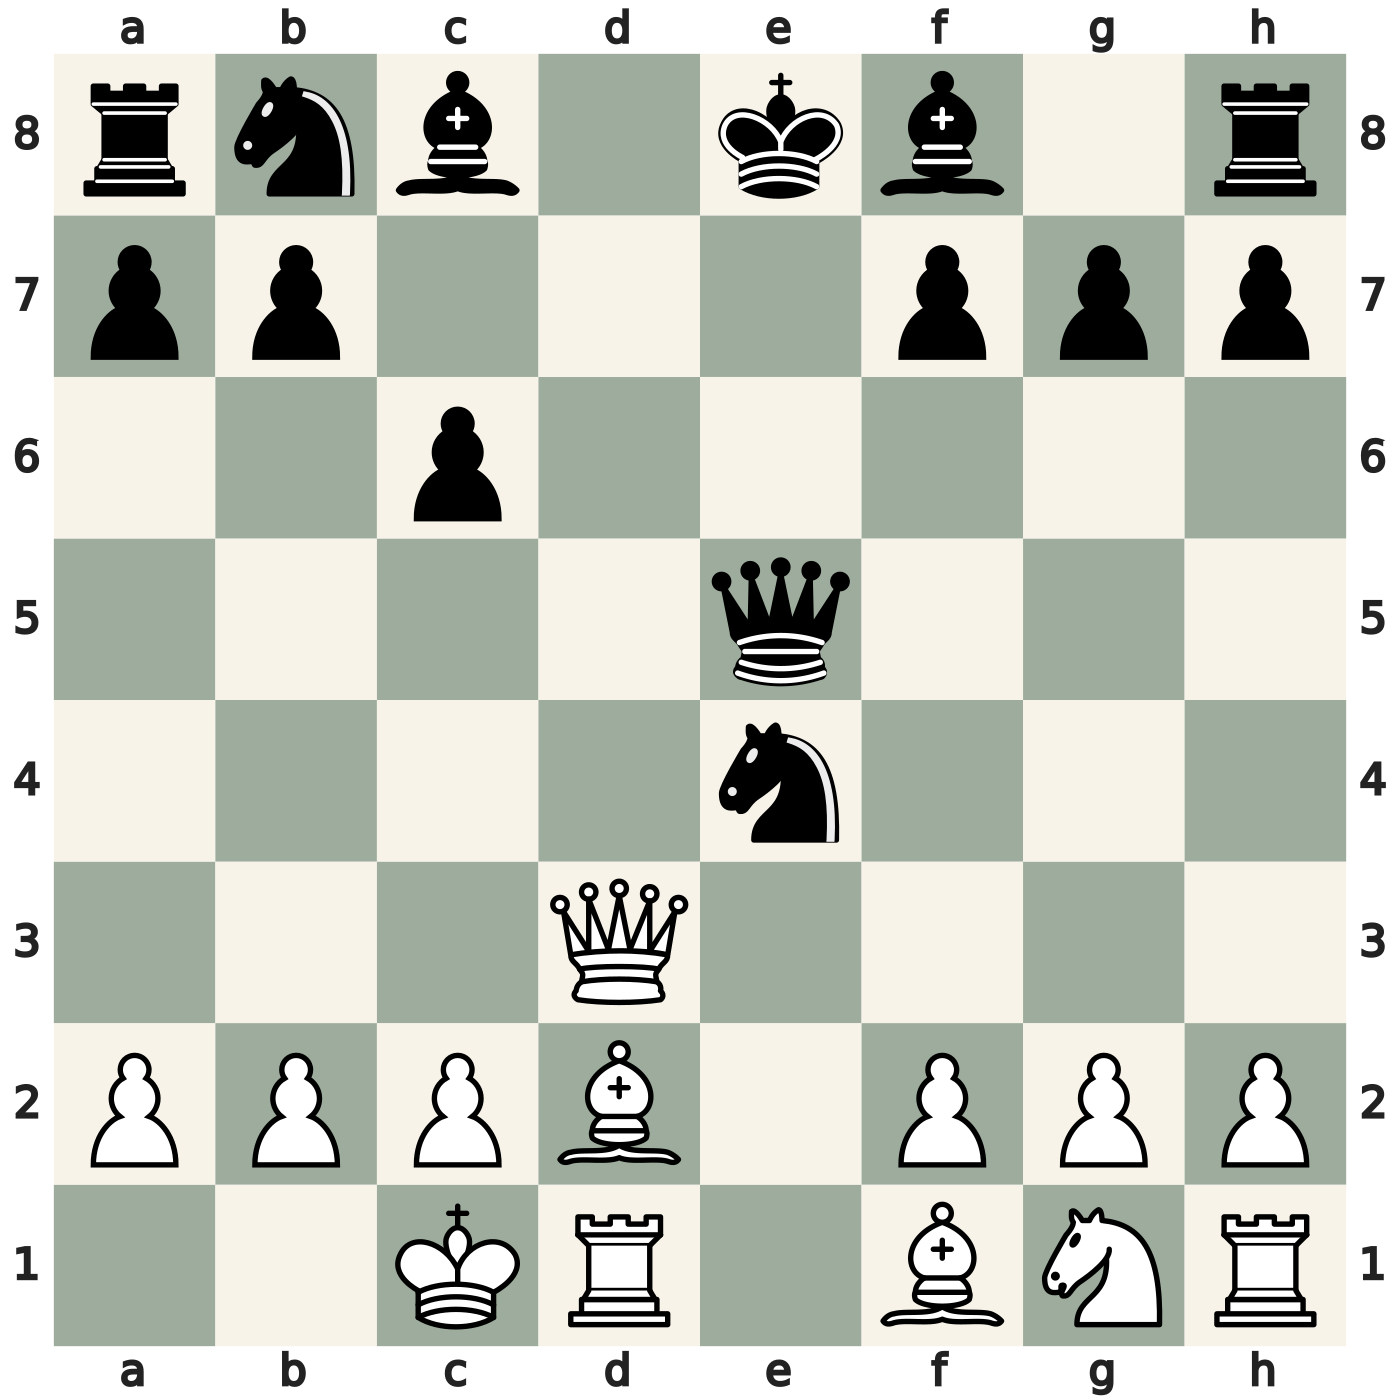
9. Qd8+! Kxd8 10. Bg5+! Kc7 11. Bd8#
The queen sacrifice draws the king to d8. Then 10.Bg5+ both uncovers the rook on d1 and gives check with the bishop. A block or a capture by a non-king piece cannot answer both checks. After 10…Kc7, 11.Bd8 is mate; 10…Ke8 instead allows 11.Rd8 mate.
Richard Réti–Savielly Tartakower, Vienna, 1910.
#5 — X-ray
An X-ray is a line piece’s potential influence beyond an intervening piece. If that piece moves along or away from the line, a previously blocked capture or defense may become possible.
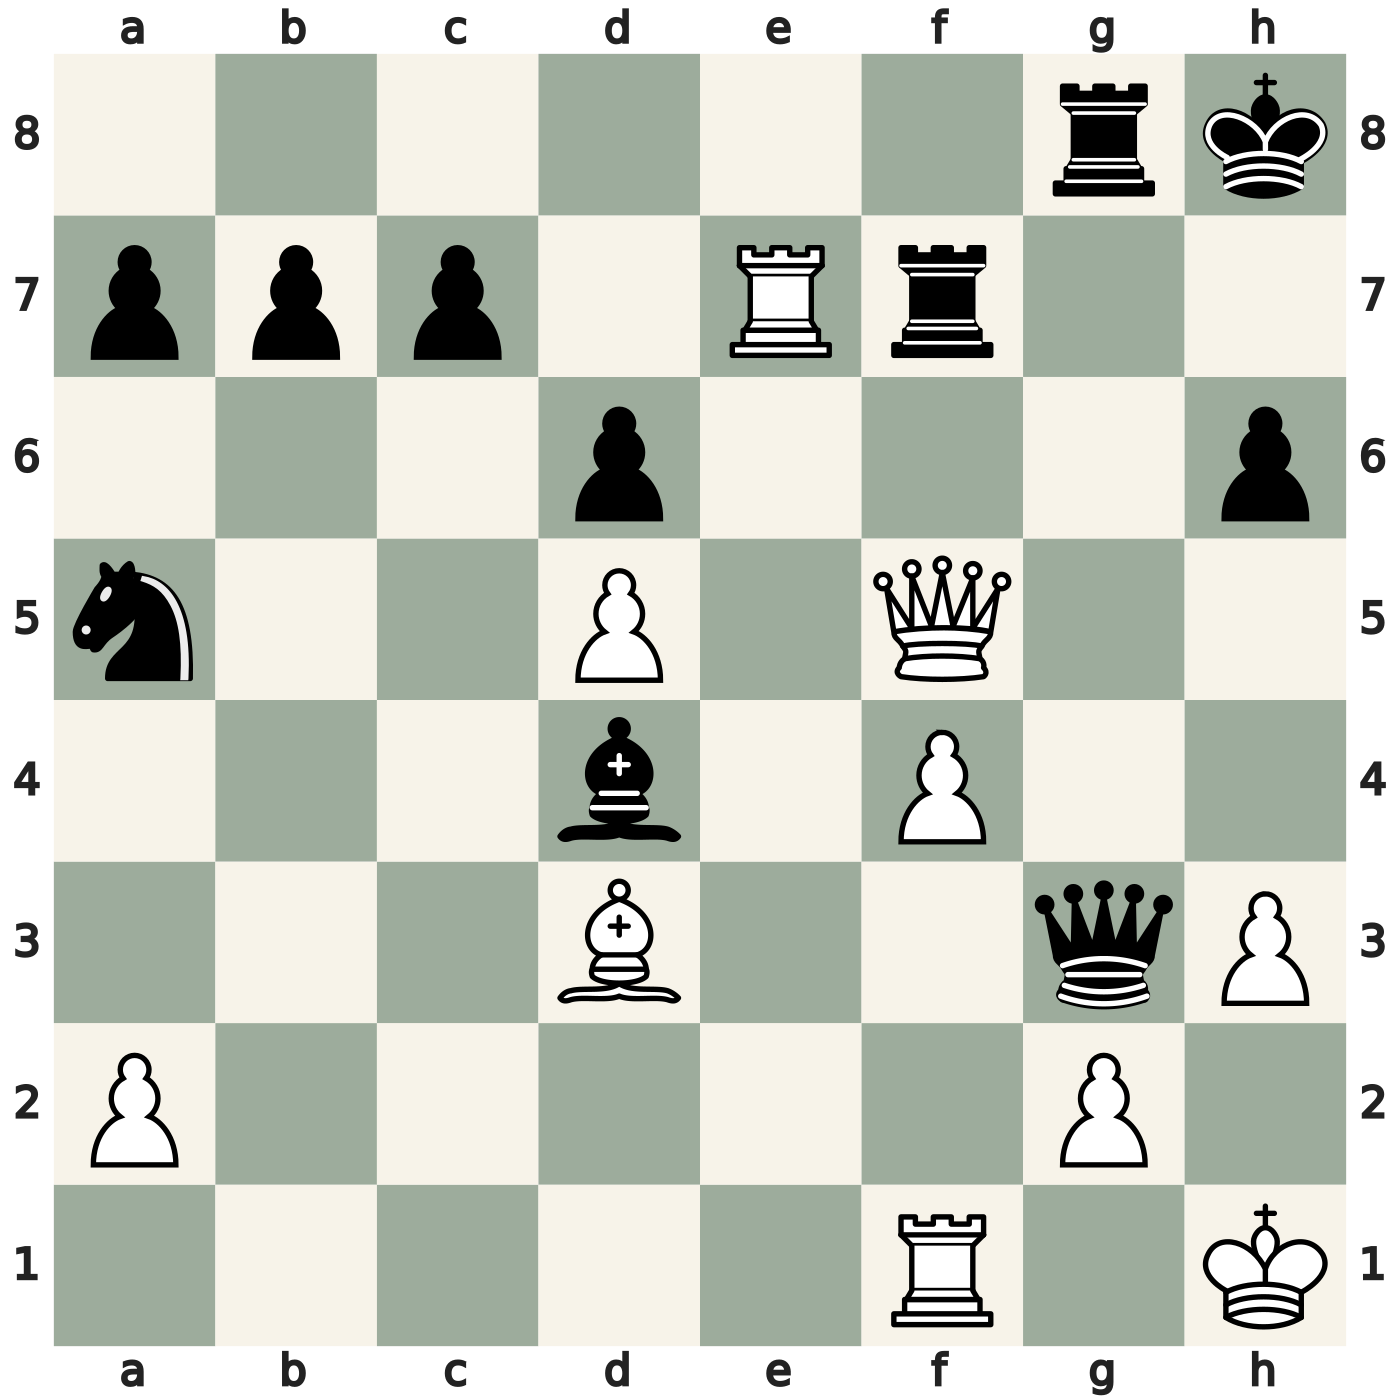
27. Qh7+! Rxh7 28. Rxh7#
The white rook on e7 cannot initially reach h7 because the black rook on f7 blocks the seventh rank. After 27.Qh7+, Black’s rook captures on h7, clearing the route for 28.Rxh7 mate. White use the rook’s potential influence through the blocking rook.
What to look for: Look for queen, bishop and rook attacks along ranks, files and diagonals. Trace their lines beyond intervening pieces and ask which captures or moves could make that potential influence usable.
Lehmann–Waldstein, Berlin, 1866.
A bishop, rook or queen cannot legally move through a blocker. The X-ray describes the tactical relationship that becomes usable when the line changes. This is why captures along a shared rank, file or diagonal deserve careful calculation.
#6 — Removal of a defender
Removal of a defender means capturing a piece or pawn that protects another target. The target may be a piece, a pawn, or an important square.
There are three ways to eliminate a defender’s contribution: capture it (removal of a defender), force it away from its defensive duty (deflection), or cut off its line (interference). Interference applies to the line-based defense of queens, rooks and bishops. The next three sections distinguish these methods.

1. Rxh7+ Kxh7 2. Kxf5
The black bishop on h7 protects the rook on f5. White cannot play Kxf5 immediately because their king would enter the bishop’s attack. First, 1. Rxh7+ removes that defender. After 1…Kxh7, 2. Kxf5 is legal: the rooks have been exchanged and White have won the bishop.
What to look for: Which piece protects the target, and can you capture that defender first?
#7 — Deflection
Deflection forces a defender away from a square, piece, or line that it needs to protect.
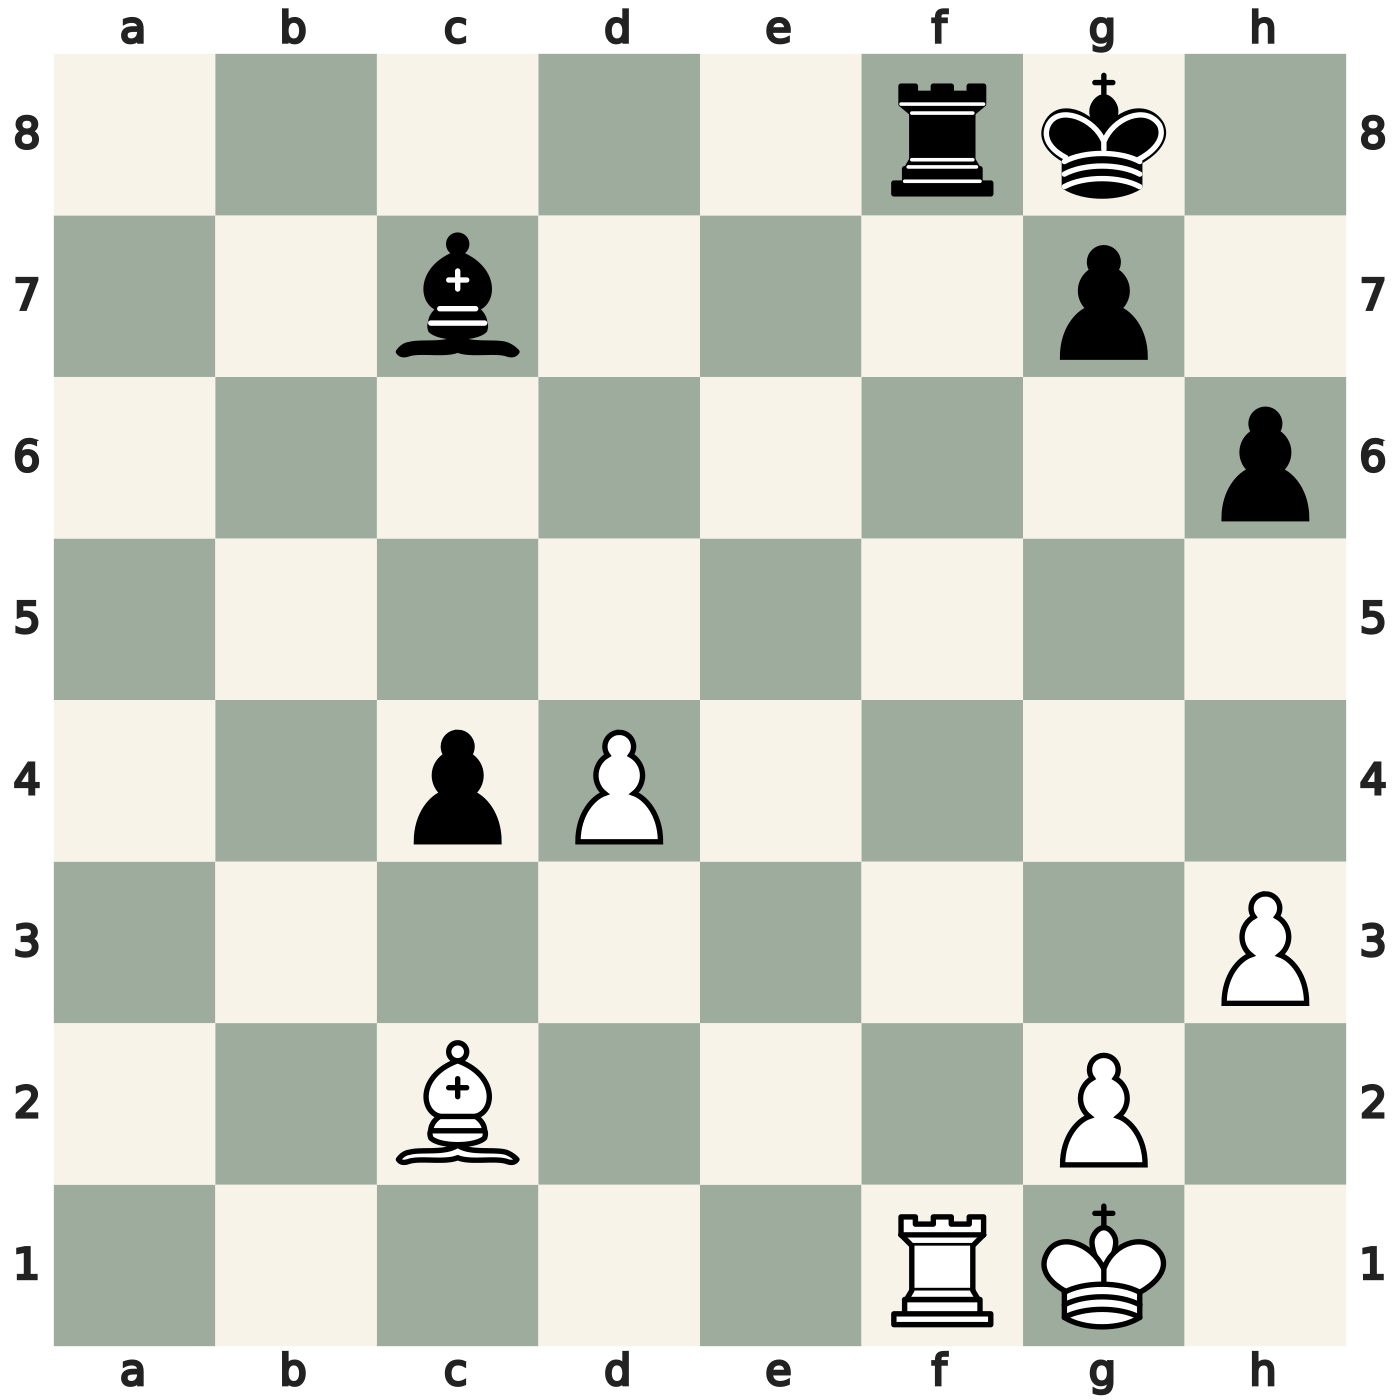
1. Bh7+! Kxh7 2. Rxf8 (or 1…Kh8 2. Rxf8+)
The black king on g8 protects the rook on f8. White play 1. Bh7+!, forcing the king to h7 or h8. In either case, it no longer protects f8. White then capture the rook. If Black accept the bishop sacrifice, White win a rook for a bishop. The point is not to capture the defender, as in removal of a defender, but to force it away from its duty.
What to look for: Can a forcing move make the defender abandon its job?
Removal captures the defender; deflection drives it away. If a piece has several duties, a forcing move may make it abandon one of them. That is a common way to exploit an overloaded defender.
#8 — Decoy
Decoy draws an enemy piece onto a square where a tactical idea becomes possible.
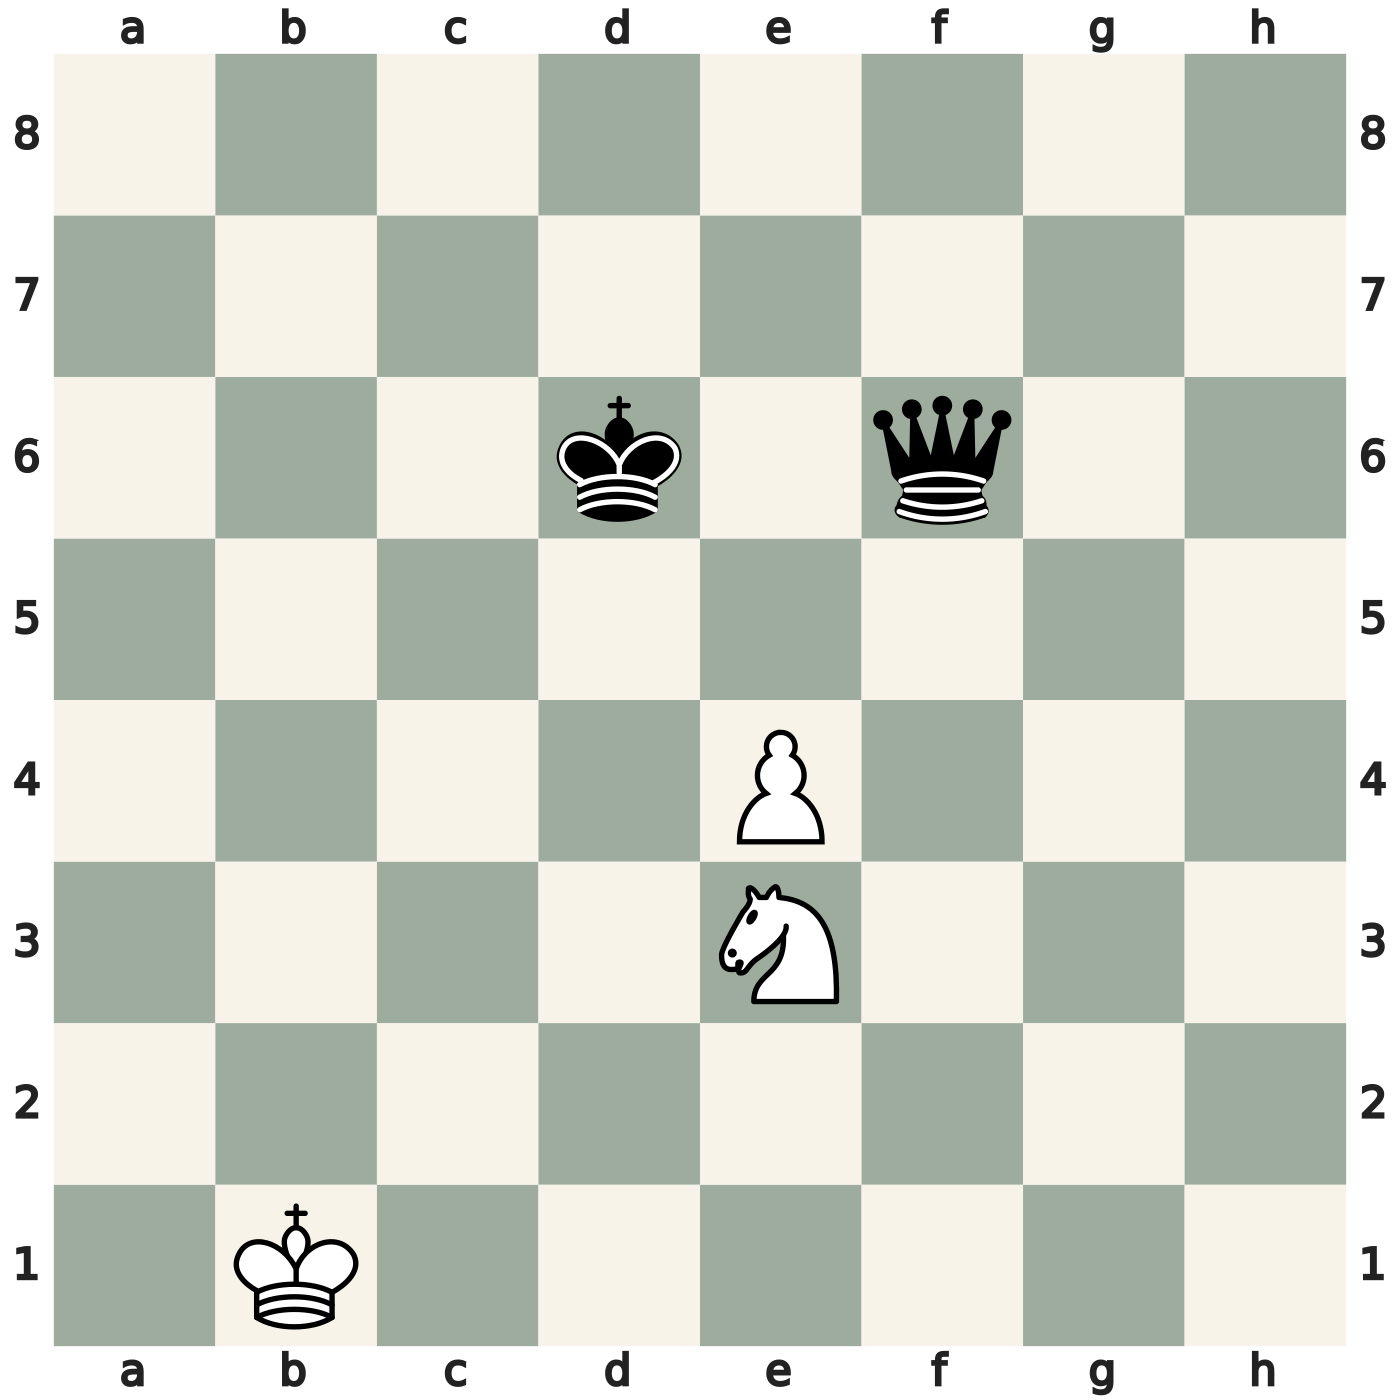
1. e5+! Qxe5 2. Nc4+; or 1…Kxe5 2. Ng4+
White would like either the black king or the black queen to occupy e5. The pawn sacrifice 1. e5+! achieves exactly that. After 1…Qxe5, 2. Nc4+ forks the king and queen. After 1…Kxe5, 2. Ng4+ does the same. If the king declines the pawn and moves elsewhere, White capture the queen with exf6. Deflection asks where a defender must be driven away from; decoy asks where a piece must be drawn to. A single move can sometimes do both.
What to look for: On which square would an enemy piece become vulnerable to a fork, a pin, or mate?
#9 — Interference
Interference interrupts the line of a rook, bishop, or queen by placing a piece or pawn between it and its target.
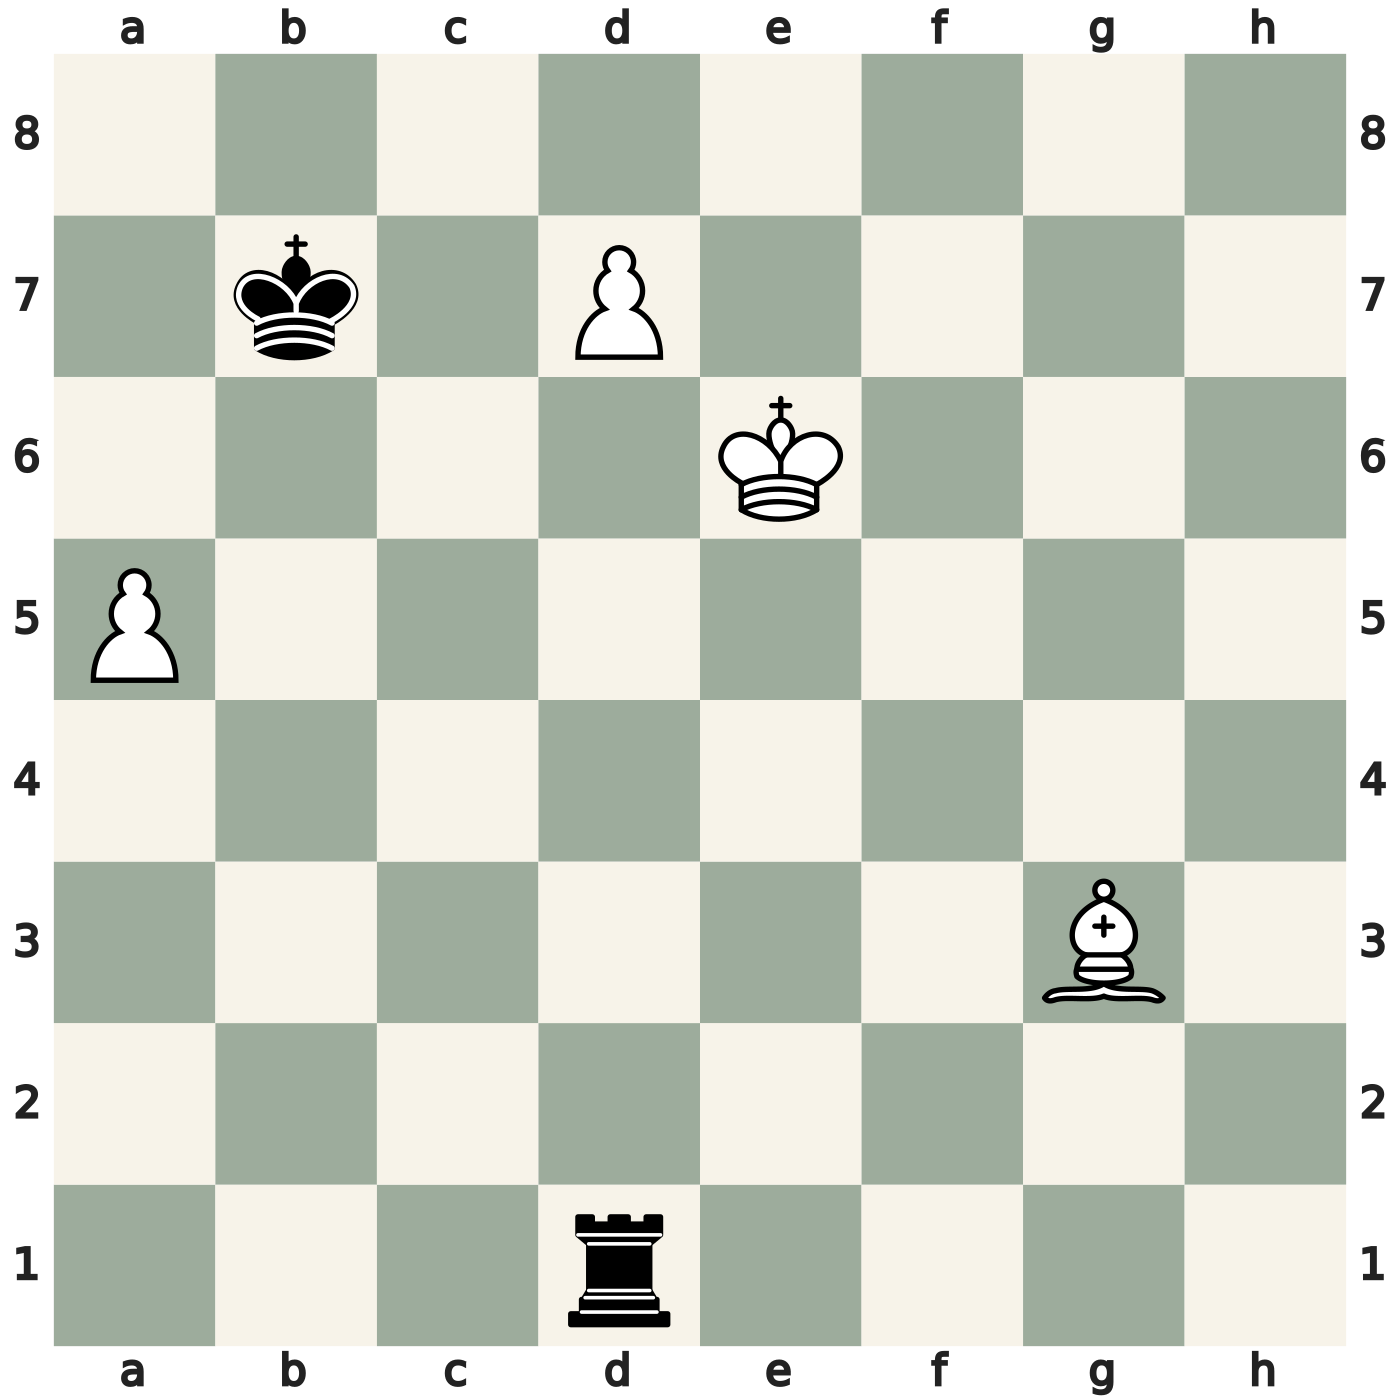
1. Bd6!
The black rook on d1 controls the promotion square d8. Immediate 1. d8=Q? would allow 1…Rxd8. Instead, 1. Bd6! blocks the d-file. White threaten to promote without losing the new queen to the rook. Capturing the bishop does not solve the problem: 1…Rxd6+ 2. Kxd6 leaves White ready to promote, for example 2…Kb8 3. d8=Q+. The important relationship is the rook’s line to d8; White cut that connection.
What to look for: Can you place something between a long-range piece and the square it must control?
Compare this with clearance: interference closes a useful line for the opponent, while clearance opens a useful line for your own pieces. A combination may do both at different moments.
#10 — Clearance
Clearance opens a rank, file, diagonal or square so that another piece can use it. The obstacle may be an enemy unit that must be removed or one of your own pieces that needs to move with tempo.
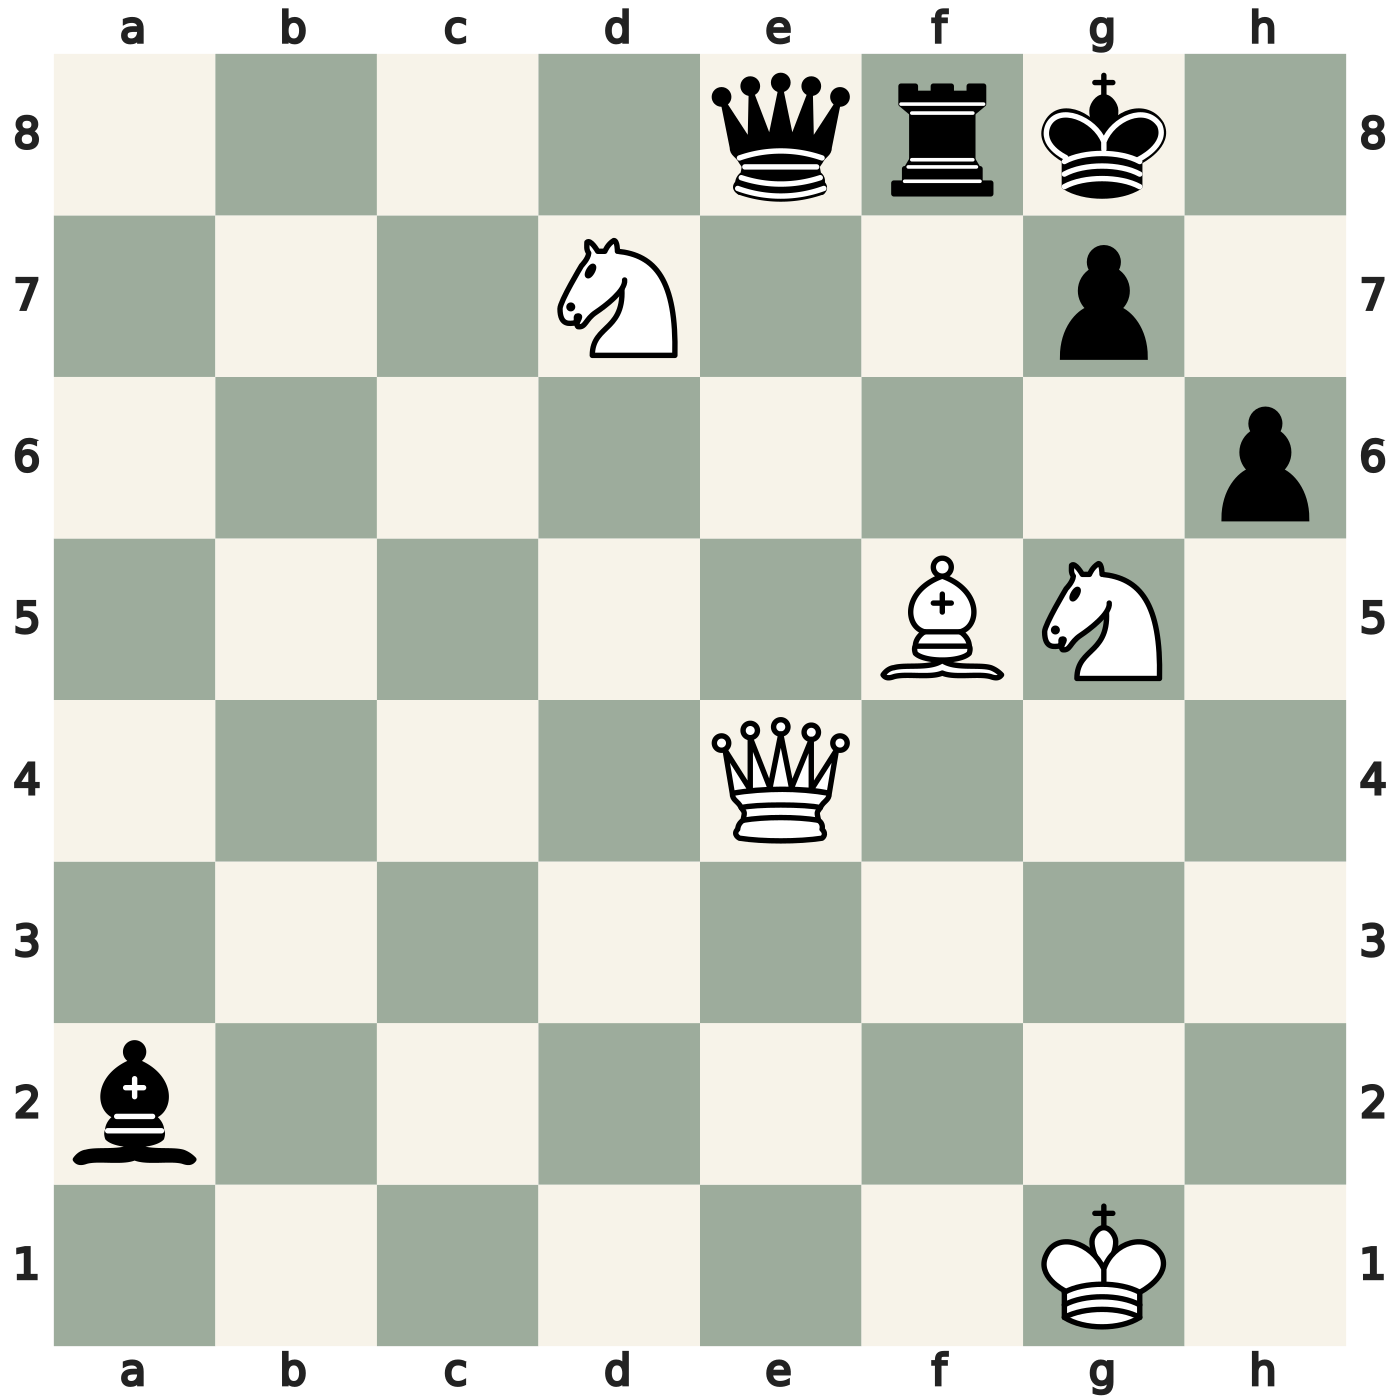
1. Be6+! Kh8 2. Qh7#
White would like to play Qh7 mate, but their own bishop on f5 blocks the queen’s route from e4. With Be6+, the bishop clears the diagonal while giving check. After …Kh8, Qh7 is mate. The same mate follows every other legal reply to the bishop check: …Rf7, …Qf7, …Qxe6 or …Bxe6. The knight on g5 protects h7.
What to look for: Imagine the move you would like to play. Is your own piece blocking its route or occupying its destination? A forcing move by that piece may clear the way.
Enemy-piece clearance
Clearance can remove an enemy piece as well as move one of your own pieces. Here, a black bishop blocks the h-file that White need for a mating attack.

1. Qxh7+! Kxh7 2. Rh3#
White sacrifice the queen with 1.Qxh7+!, removing the black bishop from h7. After the forced 1…Kxh7, the h-file is clear between h3 and the black king. White play 2.Rh3#, bringing the rook onto that open file. The knight on e7 covers g8 and g6, while Black’s own g7-pawn blocks another escape square. The combination clears a line by capturing an enemy piece and also draws the king to h7.
What to look for: Which enemy piece blocks the line you need, and can you remove it with a forcing move?
Illustrative position.
#11 — Blockade and obstruction of a piece
A blockade makes a square unavailable by occupying it with a piece or pawn. It can stop a pawn from advancing or close an escape square around a king. Obstruction also includes restricting a piece’s mobility and exploiting its lack of safe moves.

1. Kf5! Kf7 2. d8=Q
Promoting immediately with 1. d8=Q? allows 1…f5+!, uncovering the bishop’s diagonal to d8. Once White answer the check, …Bxd8 wins the new queen. Instead, 1. Kf5! blocks the f6-pawn. It can no longer advance to f5 to uncover the bishop, so White can promote safely next move. The move …Kf7 is one illustrative legal reply, not a forced response. This also illustrates an intermediate move: White improve the conditions before promoting.
What to look for: Ask which pawn advance or escape square makes the opponent’s defense work. Then consider whether you can block it. Against a restricted piece, count safe destinations, not merely legal moves.
Obstruction of a piece
A restricted piece can be attacked when it has no safe retreat.

37… Nc6! 38. Rb4 Nxb4
Black attack the rook on d4 with …Nc6. The rook is hemmed in by its own pieces and enemy pawns. Its apparent retreat to b4 is now covered by the knight. The other direct rook moves also leave it capturable: Rxd5 exd5, Rxe4 dxe4, Rc4 dxc4, or Rd3 exd3. The point is the rook’s restricted mobility, rather than a pawn blockade. The line with Rb4 is an illustration, not a forced White reply.
What to look for: Count the safe squares of a cramped enemy piece before attacking it.
#12 — Intermediate move
An intermediate move, also called an in-between move or zwischenzug, interrupts an expected sequence. Before making the obvious capture, recapture or retreat, a player inserts another move that improves the outcome.
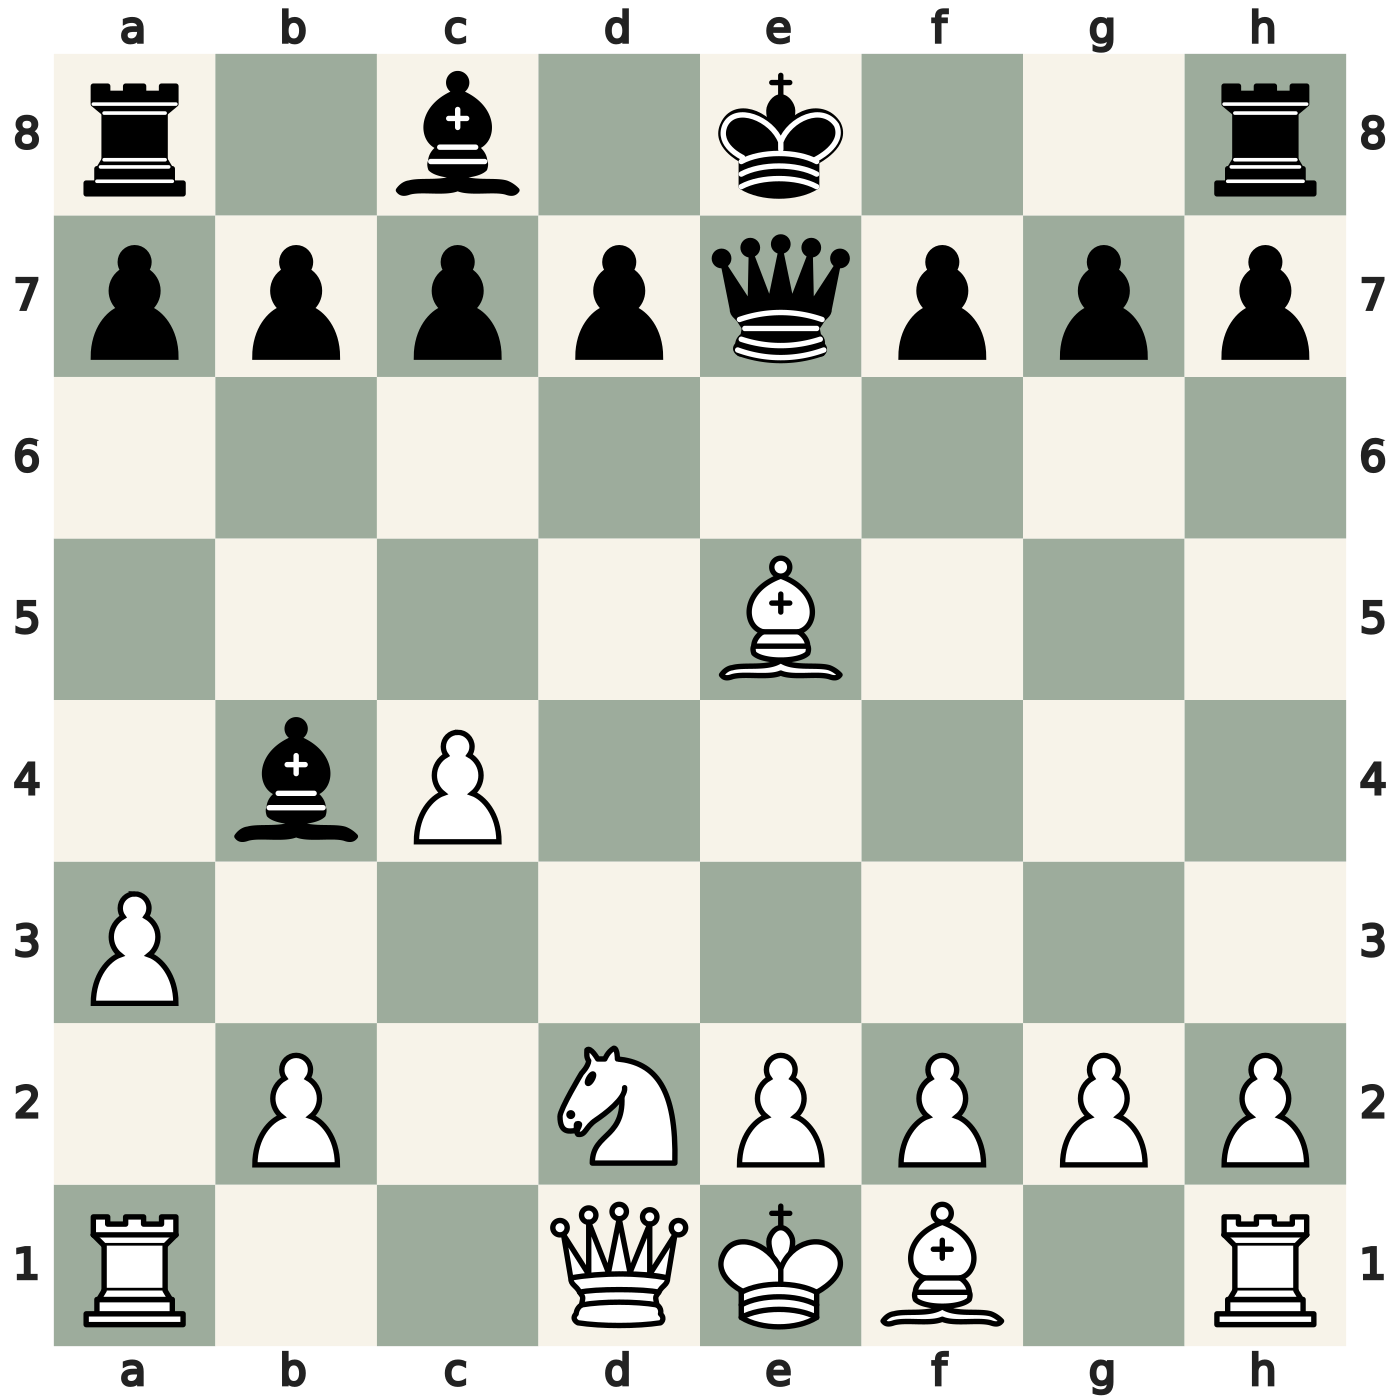
9… Bxd2+! 10. Qxd2 Qxe5
Black can take the bishop on e5, but immediately playing …Qxe5 allows White to capture the bishop on b4 with axb4. Black first insert …Bxd2+, exchanging that bishop for the knight with check. After the illustrative recapture Qxd2, …Qxe5 wins the bishop without leaving the b4-bishop hanging. Move order makes the difference.
What to look for: Before an automatic recapture, inspect checks, captures and threatening moves. Also ask whether your opponent has an intermediate move that changes your intended combination.
An intermediate move is not necessarily a check. A capture, a threatening move or a quiet move can also work if the opponent cannot exploit the delay. The essential question is whether the changed move order improves the result.
#13 — How to use these ideas in your games
Recognizing a motif is the beginning of calculation, not the end. A tempting fork may fail to a stronger check. A pinned piece may still defend along the pin line. A sacrifice may be declined. Work through the opponent’s strongest replies before deciding that the combination succeeds.
Search for candidate moves in this order
- Checks. Inspect every legal check, including sacrifices and discovered checks.
- Captures. Look beyond the obvious target: can you remove a defender or improve the move order?
- Threatening moves. Consider moves that create threats, such as forks, mating threats, attacks on a queen or threats to promote.
- Other moves. If forcing options do not work, examine quiet improvements, defensive moves, clearance and blockade ideas.
This order helps organize the search; it does not mean a check is always better than a quiet move. At every stage, ask what the opponent is threatening and whether your candidate move leaves your king or material vulnerable.
Name the obstacle and test the solution
Start with a concrete goal: win a loose piece, promote a pawn, attack a king, or stop an opponent’s threat. Then identify what prevents it. A defender may need to be captured, deflected or cut off. A square may need to be cleared or blocked. A target may need to be drawn to a different square.
After finding the idea, calculate the strongest defense and reassess the resulting position. Do not stop at the first attractive move. Count the material after the full sequence and check whether the opponent gains a counterattack, a perpetual check or another resource.
Expect motifs to work together
The Pitschel–Anderssen example uses a pin to make a king decoy possible. The decoy example finishes with a double attack. The blockade example requires an intermediate move before promotion. These are not competing labels: they describe different parts of the same combination.
For practice, solve the position without moving the pieces, write down your line, and compare it with the explanation. If your move fails, identify the missed defensive resource. That habit is more useful than remembering only the final move.
For a fuller calculation routine, read How to Solve Chess Puzzles.
In structured lessons, these motifs can be studied through examples, exercises and discussion of the student’s decisions. The goal is to recognize the same relationships when they arise in your own games, without a label telling you which tactic to find.
Diagram credits
Chess-piece artwork: Copyright © Colin M. L. Burnett. Used under the BSD license option. Boards have been composed and rendered for this article. Source: https://commons.wikimedia.org/wiki/Category:SVG_chess_pieces and https://python-chess.readthedocs.io/en/stable/svg.html. The following notice applies to the piece artwork, not to the article’s prose.
Redistribution and use in source and binary forms, with or without modification, are permitted provided that the following conditions are met:
1. Redistributions of source code must retain the above copyright notice, this list of conditions and the following disclaimer.
2. Redistributions in binary form must reproduce the above copyright notice, this list of conditions and the following disclaimer in the documentation and/or other materials provided with the distribution.
3. Neither the name of The author nor the names of its contributors may be used to endorse or promote products derived from this software without specific prior written permission.
This software is provided by The author and contributors “as is” and any express or implied warranties, including, but not limited to, the implied warranties of merchantability and fitness for a particular purpose are disclaimed. In no event shall The author and contributors be liable for any direct, indirect, incidental, special, exemplary, or consequential damages (including, but not limited to, procurement of substitute goods or services; loss of use, data, or profits; or business interruption) however caused and on any theory of liability, whether in contract, strict liability, or tort (including negligence or otherwise) arising in any way out of the use of this software, even if advised of the possibility of such damage.